QFramework 随笔

参考资料:

  1. Unity游戏框架搭建决定版 QFramework的二次开发
  2. “您好 我是QFramework”
  3. QFramework v1.0 使用指南
  4. 基础 | 三层架构与MVC模式

Introduction

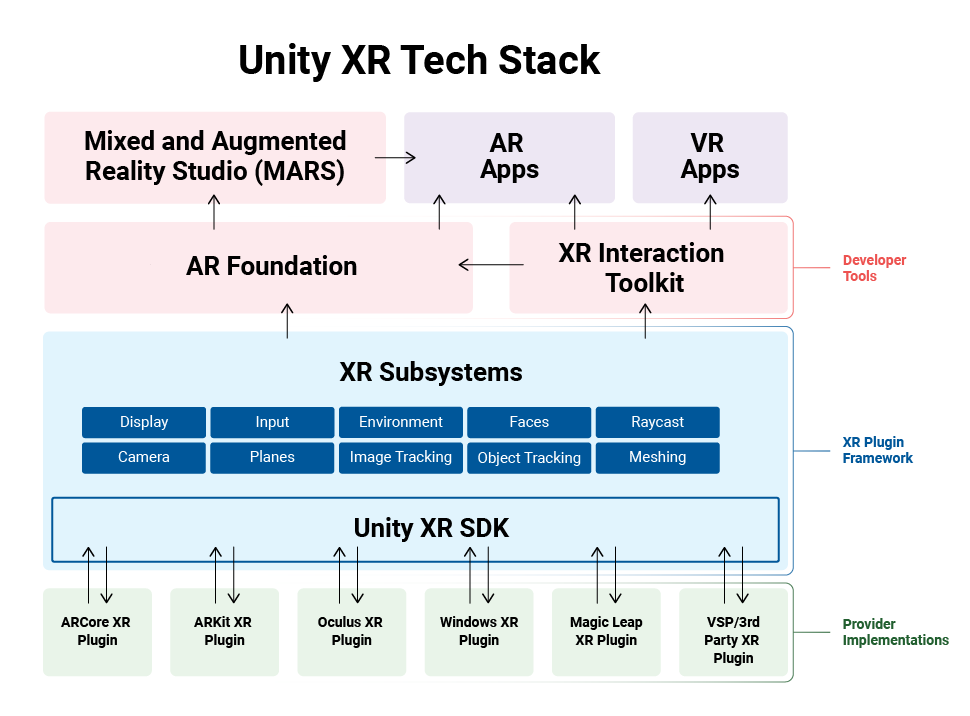
QFramework.cs 提供了 MVC、分层、CQRS、事件驱动、数据驱动等工具,除了这些工具,QFramework.cs 还提供了架构使用规范。

QFramework 内置模块如下:

  • 0.Framework:核心架构(包含一套系统设计架构)

  • 1.CoreKit: 核心工具库、插件管理

  • 2.ResKit:资源管理套件(快速开发)

  • 3.UIKit:UI 管理套件(支持自动绑定、代码生成)

  • 4.Audio:音频方案

    MVC

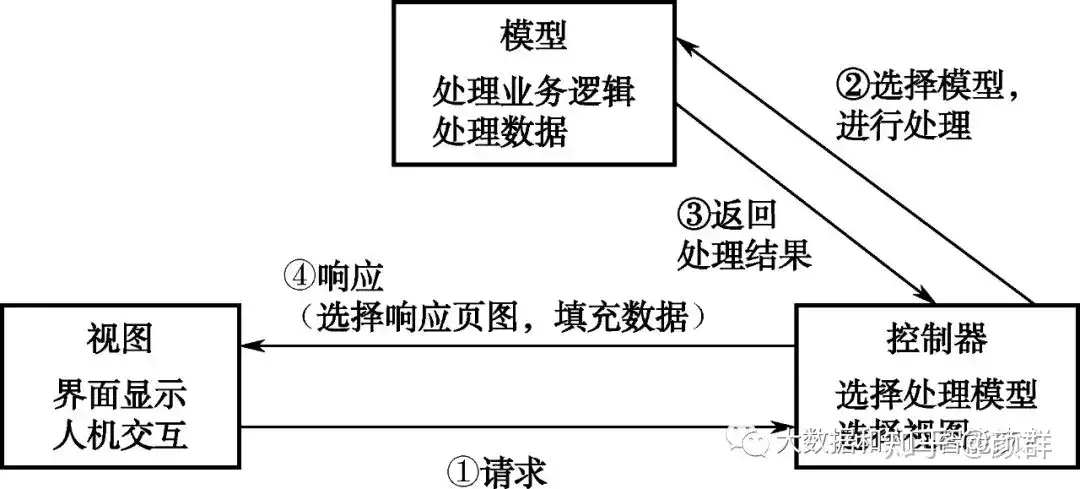
    MVC模式是软件工程中常见的一种软件架构模式,该模式把软件系统(项目)分为三个基本部分:**模型(Model)、视图(View)和控制器(Controller)**使用此模式有诸多优势,例如:简化后期对项目的修改、扩展等维护操作;使项目的某一部分变得可以重复利用;使项目的结构更加直观。

    1. **视图(View):**负责界面的显示,以及与用户的交互功能。实际在Unity中,这一部分往往指 UI 的呈现。

    2. 控制器(Controller):可以理解为一个分发器,用来决定对于视图发来的请求(命令),需要用哪一个模型来处理,以及处理完后需要跳回(通过事件更改)到哪一个视图。即用来连接视图和模型。

    3. **模型(Model):**模型持有所有的数据、状态和程序逻辑。模型接受视图数据(的命令),并返回最终的处理结果(,触发事件)。

      img

CQRS 命令和查询责任分离

一种将数据存储的读取操作和更新操作分离的模式。

Query 是一个可选的概念,如果游戏中数据的查询逻辑并不是很重的话,直接在 Controller 的表现逻辑里写就可以了,但是查询数据比较重,或者项目规模非常大的话,最好是用 Query 来承担查询的逻辑。

img

事件驱动

在事件驱动编程中,系统的流程是由外部事件(如用户输入或外部数据更改)驱动的。程序会对发生的事件做出反应。其核心思想是定义并使用事件处理器

用户输入 => 事件响应 => 代码运行 => 刷新页面状态

InputSystem 帮助Unity开发者将用户输入抽象为事件

数据驱动

操作UI(用户输入)=> 触发事件 => 响应处理 => 更新数据 => 更新UI(呈现)

BindableProperty<T> 提供了快速的绑定

Framework

系统设计架构,核心概念包括Architecture、Command、Event、Model、System

Architecture

可以将Architecture视为一个项目模块的管理器(System)的集合, 省去创建大量零散管理器单例的麻烦

使用注册的方式将当前项目所使用的 模块 系统和 工具 添加进内部的IOC容器中,方便管理。

Controller

赋予 MonoBehaviour 脚本对象访问架构的能力

Model

同类的公共数据

架构规范与推荐用法

QFramework 架构提供了四个层级:

  • 表现层:IController
  • 系统层:ISystem
  • 数据层:IModel
  • 工具层:IUtility

通用规则

  • IController 更改 ISystem、IModel 的状态必须用Command
  • ISystem、IModel 状态发生变更后通知 IController 必须用事件或BindableProperty
  • IController可以获取ISystem、IModel对象来进行数据查询
  • ICommand、IQuery 不能有状态,
  • 上层可以直接获取下层,下层不能获取上层对象
  • 下层向上层通信用事件
  • 上层向下层通信用方法调用(只是做查询,状态变更用 Command),IController 的交互逻辑为特别情况,只能用 Command

表现层

ViewController 层。

IController接口,负责接收输入和状态变化时的表现,一般情况下,MonoBehaviour 均为表现层

  • 可以获取 System、Model
  • 可以发送 Command、Query
  • 可以监听 Event

系统层

System层

ISystem接口,帮助IController承担一部分逻辑,在多个表现层共享的逻辑,比如计时系统、商城系统、成就系统等

  • 可以获取 System、Model

  • 可以监听Event

  • 可以发送Event

数据层

IModel接口,负责数据的定义、数据的增删查改方法的提供

  • 可以获取 Utility
  • 可以发送 Event

工具层

Utility层

IUtility接口,负责提供基础设施,比如存储方法、序列化方法、网络连接方法、蓝牙方法、SDK、框架继承等。啥都干不了,可以集成第三方库,或者封装API

常用技巧

TypeEventSystem

独立的事件系统,可以理解为群发和广播,创建结构体传递事件内容

1
public struct PlayerDieEvent { }

一些简单的事件可以通过 .Register

Hands

最近Unity XRTK 终于加入了对手势追踪的支持,这里记录回顾一下相关的组件和类

This diagram illustrates the current Unity XR plug-in framework structure, and how it works with platform provider implementations.

Setup

为了能够正常使用手势追踪,需要XR相关的包升级。这里的 Editor 版本为 2021.3.20f1。

将XR相关的包升级

Upgrade packages

如果在包管理器中看不到升级的按钮,那么可以通过左上角“➕” -> “Add package by name“,分别输入:

com.unity.xr.handscom.unity.xr.interaction.toolkitcom.unity.xr.management 来完成升级。

注意:这些包可能对Editor版本有一定要求,具体可以查看对应说明:
XR Interaction Toolkit 2.3.1

XR Plugin Management 4.3.3

XR Hands 1.1.0

Config XR Plug-in Management

Edit -> Project Settings -> XR Plug-in Managerment 在对应平台下勾选 OpenXR

在对应平台下勾选 OpenXR

-> OpenXR 进入子菜单OpenXR,添加将使用的设备的预设,并勾选相关特性

添加将使用的设备的预设,并勾选相关特性

然后导入一些示例场景和预制体:

例如 XRTK 下的: Starter Assets, XR Device Simulator, Hands Interaction Demo

与 XR Hands 下的:HandVisualizer

在Project窗口中搜索 Complete XR Origin Hands Set Up,并将此预制体放入场景中,即可以运行场景查看效果。手和控制器的切换追随设备,并能实时体现在游戏中。 某些版本的XR组件下可能出现切换时Editor暂停,可以尝试更新组件。

将此预制体放入场景中

Access Hand Data

Refer to:Access hand data

有时候我们希望除了一些回调外,能获得手部更详实的位姿数据, 以实现网络同步等等更多的功能。

我们可以订阅 XRHandSubsystem,并获取数据,例如:

1
2
3
4
5
6
7
8
9
10
11
12
13
14
15
16
17
18
19
20
21
22
23
24
25
26
27
28
29
30
31
32
33
34
35
36
37
void Start()
{
XRHandSubsystem m_Subsystem =
XRGeneralSettings.Instance?
.Manager?
.activeLoader?
.GetLoadedSubsystem<XRHandSubsystem>();

if (m_Subsystem != null)
m_Subsystem.updatedHands += OnHandUpdate;
}

void OnHandUpdate(XRHandSubsystem subsystem,
XRHandSubsystem.UpdateSuccessFlags updateSuccessFlags,
XRHandSubsystem.UpdateType updateType)
{
switch (updateType)
{
case XRHandSubsystem.UpdateType.Dynamic:
// Update game logic that uses hand data
break;
case XRHandSubsystem.UpdateType.BeforeRender:
for (var i = XRHandJointID.BeginMarker.ToIndex();
i < XRHandJointID.EndMarker.ToIndex();
i++)
{
var trackingData = subsystem.rightHand .GetJoint(XRHandJointIDUtility.FromIndex(i));

if (trackingData.TryGetPose(out Pose pose))
{
// displayTransform is some GameObject's Transform component
Debug.Log($"[{nameof(XRHand)}]Joint{i} : {nameof(Position)} {pose.position} | {nameof(Rotate)} {pose.rotation}");
}
}
break;
}
}

General settings container used to house the instance of the active settings as well as the manager instance used to load the loaders with.

XR Loader abstract class used as a base class for specific provider implementations. Providers should implement subclasses of this to provide specific initialization and management implementations that make sense for their supported scenarios and needs.

此时可以看到,Joint点的数据已被正常获得并打印。

HandVisualizer

HandVisulizer 类控制着手势的渲染,将上述我们获得的Joints的空间位置与旋转翻译成SkinnedMeshRenderer的变化,渲染逻辑可见其OnUpdateHands()方法中,大致通过更新Joint的位置带动蒙皮的变换。

1
2
3
4
5
6
7
8
9
10
11
12
13
14
15
16
17
18
19
20
21
22
23
var originTransform = xrOrigin.Origin.transform;
var originPose = new Pose(originTransform.position, originTransform.rotation);

var wristPose = Pose.identity;
UpdateJoint(debugDrawJoints, velocityType, originPose, hand.GetJoint(XRHandJointID.Wrist), ref wristPose);
UpdateJoint(debugDrawJoints, velocityType, originPose, hand.GetJoint(XRHandJointID.Palm), ref wristPose, false);

for (int fingerIndex = (int)XRHandFingerID.Thumb;
fingerIndex <= (int)XRHandFingerID.Little;
++fingerIndex)
{
var parentPose = wristPose;
var fingerId = (XRHandFingerID)fingerIndex;

int jointIndexBack = fingerId.GetBackJointID().ToIndex();
for (int jointIndex = fingerId.GetFrontJointID().ToIndex();
jointIndex <= jointIndexBack;
++jointIndex)
{
if (m_JointXforms[jointIndex] != null)
UpdateJoint(debugDrawJoints, velocityType, originPose, hand.GetJoint(XRHandJointIDUtility.FromIndex(jointIndex)), ref parentPose);
}
}

Duplicate Hands

复制手部的运动其实也就是复制其骨骼的Transform

Notes of FEM Simulation of 3D Deformable Solids

Deformation map and deformation gradient

${\pmb{R}^3 = }$ all vectors with 3 real components.

${\pmb{R}^n = }$ all vectors with n real components.

When the object undergoes deformation, every material point $\vec{X}$ is being displaced to a new deformed location which is, by convention, denoted by a lowercase variable $\vec{x}$ The relation between each material point and its deformation function $\vec{\phi} : R^{3} \rightarrow R^{3} $.
$$
\vec{x} = \vec{\phi}(\vec{X})·1
$$
An important physical quantity derived directly from $\vec{\phi}(\vec{X})$, is the deformation gradient tensor ${ \pmb{F} \in \pmb{R^{3\times3}}}$

If we write ${\vec{X} = (X_1,X_2,X_3)^T} or{\vec{X} = (X,Y,Z)^T} $ and ${\vec{\phi}(\vec{X}) = (\vec{\phi_1}(\vec{X}),\vec{\phi_2}(\vec{X}),\vec{\phi_3}(\vec{X}))^T}$

注意是原每一组点根据三个对应关系被分别转换到三个分量上

for the three components of the vector-valued function ${\vec{\phi}}$, the deformation gradient is written as:
$$
\pmb{F}:= \frac{\partial(\phi_1,\phi_2,\phi_3)}{\partial({X_1,X_2,X_3})} = \left( \begin{matrix}\frac{\partial\phi_1}{\partial X_1} & \frac{\partial\phi_1}{\partial X_2} & \frac{\partial\phi_1}{\partial X_3}\
\frac{\partial\phi_2}{\partial X_1} & \frac{\partial\phi_2}{\partial X_2} & \frac{\partial\phi_2}{\partial X_3}\
\frac{\partial\phi_3}{\partial X_1} & \frac{\partial\phi_3}{\partial X_2} & \frac{\partial\phi_3}{\partial X_3}\end{matrix}\right)
$$
or, in index notation ${ F_{ij} = \phi_{i,j} }$ . In simple terms, the deformation gradient measures the amount of change in shape and size of a material body relative to its original configuration. The magnitude of the deformation gradient can be used to determine the amount of deformation or strain that has occurred, and its orientation can be used to determine the direction of deformation.

Note that, in general, $\pmb{F}$ will be spatially varying across ${\Omega}$, which is the volumetric domain occupied by the object. This domain will be referred to as the reference(or undefined configuration)

Strain energy and hyperelasticity

One of the consequences of elastic deformation is the accumulation of potential energy in the deformed body, which is referred to as strain energy ${E[\phi]}$ in the context of deformable solids. It is suggested that the energy is fully determined by the deformation map of a given configuration.

However intuitive, this statement nevertheless reflects a significant hypothesis that led to this formulation: we have assumed that the potential energy associated with a deformed configuration only depends on the final deformed shape, and not on the deformation path over time that brought the body into its current configuration.

The independence of the strain energy on the prior deformation history is a characteristic property of so-called hyperelastic materials. This property of is closely related with the fact that elastic forces of hyperelastic materials are conservative: the total work done by the internal elastic forces in a deformation path depends solely on the initial and final configurations, not the path itself.

Different parts of a deforming body undergo shape changes of different severity. As a consequence, the relation between deformation and strain energy is better defined on a local scale. We achieve that by introducing an energy density function ${\Psi[\phi;\vec{X}]}$ which measures the strain energy per unit undeformed volume on an infinitesimal domain ${dV}$ around the material point $\vec{X}$. We can then obtain the total energy for the deforming body by integrating the energy density function over the entire domain ${\Omega}$:
$$
E[\phi] = \int_\Omega\Psi[\phi;\vec{X}]d\vec{X}
$$

Introduction to VR Development

Virtual reality (VR) is a simulated experience that employs pose tracking and 3D near-eye displays to give the user an immersive feel of a virtual world.

The equipment I am using now is Pico Neo3 based on PICO Unity Integration SDK

对于使用Unity开发, 其 XR Interactioin Toolkit 包已经提供了相当实用强力的脚本与抽象。本文会给出一些踩的坑和常见用法。

Environment:

  1. Unity Editor 2021.3.5f1c1

  2. XR Interaction Toolkit | XR Interaction Toolkit | 2.2.0

  3. Preview Tool provided by Pico Official

Notice

  • 2.2.0中,XRKT提供了一些新的方法与属性, 一些旧版的被标记为弃用。本例中的代码可能有些无法在老版本中实现,但旧版一般也都提供了近似的方法与属性。

  • 推测在使用Preview Tool时(有线连接),尤其是在PC端提示绿标“连接成功” 时,PC端的以太网会连接到一个”NDIS”设备,导致一些暂时的网络异常(无法访问网页)。

Interaction Toolkit

这可以被理解为使用Unity进行XR开发的核心,进行相关的配置后,几乎一切目前的VR设备可以被抽象为Unity的Device。XR Origin管理着这些设备。

在本文的项目中,直接使用了示例场景中的Introduction to VR Development.prefab预制体,其已经配置好了XR Origin,Input Action Manager InteractionManager EventSystem 等等基础的交互组件。

624b6fa1d9d4a945c593557a04b5a698.png

624b6fa1d9d4a945c593557a04b5a698.png

Interactor & Interactable

XRTK提供的主要交互方式为Interactor,可以大致分为

RayInteractor,Direct Interactor,Teleport Interactor三种,分别可以理解为射线交互,近距离的抓取抛掷交互,传送交互。其均继承自XRBaseControllerInteactor

可以被交互的物体需要挂载Interactable组件,并合理配置其Layer与Interaction Layer

Layer & Raycast Mask

即Inspector中右上角的Layer概念,可以控制对射线的遮罩。

Interaction Layer

配置Interactor可以交互的层,只有Interactable的Interaction Layer被包括在了Interactor的Interaction Layer中,Interactor才能与之交互。

例如:

CUBE 物体挂载的 Interactable组件中,勾选Interaction Layer为Deployable。并且CUBE的Layer 被囊括在Interactor中的Raycast Configuration -> Raycast Mask 中。

对应RayInteractor中的Interaction Layer囊括了此Deployable,那么CUBE可以被此Interactor交互。

e320974c3f47a8dd692c384abe24a8d8.png

e320974c3f47a8dd692c384abe24a8d8.png

498a2344f6b99fd75cf255dc921c6923.png

498a2344f6b99fd75cf255dc921c6923.png

Events

Interactor 对物体的交互可以抽象为两种类型,即Hover(悬停,待选,摸)Select(选取,拿起,抓起)。每个类型又提供了EnteredExited两个事件。

Development Practice

Assign Interaction Layer

通过代码指定Interaction Layer,在以下情况下,分别代表1 - Default 2 - Deployable

d5223dbaf91397bab58910ed077ae74e.png

d5223dbaf91397bab58910ed077ae74e.png

1
2
XRGrabInteractable xRGrabInteractable = gameObject.GetOrAddComponent<XRGrabInteractable>();
xRGrabInteractable.interactionLayers = 2;

Bind Events and Handler Methods

绑定selectEnteredselectExited等等事件,Handler方法接受对应的EventArgs,以XRInteractorHoverEnteredHandler(HoverEnterEventArgs args)为例

1
2
3
4
5
6
7
8
9
10
11
12
13
14
15
16
17
public class DragManager: SingletonForMonobehaviour<DragManager>
{
//首先声明Interactor类,并在U
public XRDirectInteractor leftDirectInteractor;
public XRRayInteractor leftRayInteractor;

private void InitXRInteractor()
{
leftRayInteractor.hoverEntered.AddListener(XRInteractorHoverEnteredHandler); }
}

private void XRInteractorHoverEnteredHandler(HoverEnterEventArgs args)
{
Debug.log("[Interactor]Enter Hover"):
}

}

获取当前交互的物体

1
2
3
4
5
private void XRInteractorHoverEnteredHandler(HoverEnterEventArgs args)
{
IXRHoverInteractable hoverComponent = args.interactableObject;
GameObject obj = hoverComponent.transform.gameObject;
}

UI Elements

在UI组件上挂载TrackedDeviceGraphicRaycaster,可以使得其接受对应的Hover、Select事件

Input Event

响应对应的按键。

Base Concepts & Models

PICO Neo3为例:

43cc2a7be65a3d7abe62537ceab2e0b1.png

43cc2a7be65a3d7abe62537ceab2e0b1.png

The table below describes the mappings between PICO controller buttons and Unity keys:

Button Unity Keys
Menu CommonUsages.menuButton: represents whether the Menu button has been activated (pressed).
Trigger - CommonUsages.triggerButton: represents whether the Trigger button has been activated (pressed).
- CommonUsages.trigger: represents the degree to which the Trigger button was pressed. For example, in an archery game, it represents how full the bow has been drawn.
Grip - CommonUsages.gripButton: represents whether the Grip button has been activated (pressed).
- CommonUsages.grip: represents the degree to which the Grip button was pressed. For example, in an archery game, it represents how full the bow has been drawn.
Joystick - CommonUsages.primary2DAxisClick: represents whether the Joystick has been activated (pressed).
- CommonUsages.primary2DAxis: represents whether the Joystick has been moved upward, downward, leftward, or rightward.
X/A CommonUsages.primaryButton: represents whether the X/A button has been activated (pressed).
Y/B CommonUsages.secondaryButton: represents whether the Y/B button has been activated (pressed).

Development Practice

下面给出了代码中获取到输入、事件的用法。

也许2.2.0的VRKT提供了相应事件,可以自行搜索用法。此处给出的代码参考PicoXR中的输入事件_窗外听轩雨的博客-CSDN博客 的内容。

Get Input Device

通过XRNode获取设备

1
2
3
4
5
6
//XRNode为枚举变量
//常用的有 Head LeftHand RightHand
//根据这些枚举可以轻松获得指定的头盔,左手柄,右手柄
InputDevice headController = InputDevices.GetDeviceAtXRNode(XRNode.Head);
InputDevice leftHandController = InputDevices.GetDeviceAtXRNode(XRNode.LeftHand);
InputDevice rightHandController = InputDevices.GetDeviceAtXRNode(XRNode.RightHand);

Try Get Input Value

1
2
3
4
5
6
7
8
9
10
InputDevice device;
//省略device的获取 使用前要先获取
public void Test()
{
bool isDown; //记录是否按下
if(device.TryGetFeatureValue(CommonUsages.triggerButton,out isDown) && isDown)
{
//xxxxx 处理逻辑
}
}

InputEvent.cs

将输入转为事件,分离事件与处理逻辑。

1
2
3
4
5
6
7
8
9
10
11
12
13
14
15
16
17
18
19
20
21
22
23
24
25
26
27
28
29
30
31
32
33
34
35
36
37
38
39
40
41
42
43
44
45
46
47
48
49
50
51
52
53
54
55
56
57
58
59
60
61
62
63
64
65
66
67
68
69
70
71
72
73
74
75
76
77
78
79
80
81
82
83
84
85
86
87
88
89
90
91
92
93
94
95
96
97
98
99
100
101
102
103
104
105
106
107
108
109
110
111
112
113
114
115
116
117
118
119
120
121
122
123
124
125
126
127
128
129
130
131
132
133
134
135
136
137
138
139
140
141
142
143
144
145
146
147
148
149
150
151
152
153
154
155
156
157
158
159
160
161
162
163
164
165
166
167
168
169
using System;
using System.Collections;
using System.Collections.Generic;
using UnityEngine;
using UnityEngine.XR;
using Common;
/// <summary>
/// 提供各种输入事件
/// </summary>
public class InputEvent:MonoSingleton<InputEvent>
{
//*************输入设别**************************
InputDevice leftHandController;
InputDevice rightHandController;
InputDevice headController;

//**************对外提供公开事件******************
#region public event

public Action onLeftTriggerEnter;
public Action onLeftTriggerDown;
public Action onLeftTriggerUp;

public Action onRightTriggerEnter;
public Action onRightTriggerDown;
public Action onRightTriggerUp;

public Action onLeftGripEnter;
public Action onLeftGripDown;
public Action onLeftGripUp;

public Action onRightGripEnter;
public Action onRightGripDown;
public Action onRightGripUp;

public Action onLeftAppButtonEnter;
public Action onLeftAppButtonDown;
public Action onLeftAppButtonUp;

public Action onRightAppButtonEnter;
public Action onRightAppButtonDown;
public Action onRightAppButtonUp;

public Action onLeftJoyStickEnter;
public Action onLeftJoyStickDown;
public Action onLeftJoyStickUp;

public Action onRightJoyStickEnter;
public Action onRightJoyStickDown;
public Action onRightJoyStickUp;

public Action<Vector2> onLeftJoyStickMove;
public Action<Vector2> onRightJoyStickMove;

public Action onLeftAXButtonEnter;
public Action onLeftAXButtonDown;
public Action onLeftAXButtonUp;

public Action onLeftBYButtonEnter;
public Action onLeftBYButtonDown;
public Action onLeftBYButonUp;

public Action onRightAXButtonEnter;
public Action onRightAXButtonDown;
public Action onRightAXButtonUp;

public Action onRightBYButtonEnter;
public Action onRightBYButtonDown;
public Action onRightBYButtonUp;

#endregion

//提供状态字典独立记录各个feature的状态
Dictionary<string, bool> stateDic;

//单例模式提供的初始化函数
protected override void Init()
{
base.Init();
leftHandController = InputDevices.GetDeviceAtXRNode(XRNode.LeftHand);
rightHandController = InputDevices.GetDeviceAtXRNode(XRNode.RightHand);
headController = InputDevices.GetDeviceAtXRNode(XRNode.Head);
stateDic = new Dictionary<string, bool>();

}
//*******************事件源的触发**************************

/// <summary>
/// 按钮事件源触发模板
/// </summary>
/// <param name="device">设备</param>
/// <param name="usage">功能特征</param>
/// <param name="btnEnter">开始按下按钮事件</param>
/// <param name="btnDown">按下按钮事件</param>
/// <param name="btnUp">抬起按钮事件</param>
private void ButtonDispatchModel(InputDevice device,InputFeatureUsage<bool> usage,Action btnEnter,Action btnDown,Action btnUp)
{
Debug.Log("usage:" + usage.name);
//为首次执行的feature添加bool状态 -- 用以判断Enter和Up状态
string featureKey = device.name + usage.name;
if(!stateDic.ContainsKey(featureKey))
{
stateDic.Add(featureKey, false);
}

bool isDown;
if(device.TryGetFeatureValue(usage,out isDown) && isDown)
{
if(!stateDic[featureKey])
{
stateDic[featureKey] = true;
if(btnEnter != null)
btnEnter();
}
if(btnDown!=null)
btnDown();
}
else
{
if(stateDic[featureKey])
{
if(btnUp!=null)
btnUp();
stateDic[featureKey] = false;
}
}
}

/// <summary>
/// 摇杆事件源触发模板
/// </summary>
/// <param name="device">设备</param>
/// <param name="usage">功能特征</param>
/// <param name="joyStickMove">移动摇杆事件</param>
private void JoyStickDispatchModel(InputDevice device,InputFeatureUsage<Vector2> usage,Action<Vector2> joyStickMove)
{
Vector2 axis;
if (device.TryGetFeatureValue(usage, out axis) && !axis.Equals(Vector2.zero))
{
if(joyStickMove!=null)
joyStickMove(axis);
}
}

//******************每帧轮询监听事件***********************
private void Update()
{
ButtonDispatchModel(leftHandController, CommonUsages.triggerButton, onLeftTriggerEnter, onLeftTriggerDown, onLeftTriggerUp);
ButtonDispatchModel(rightHandController, CommonUsages.triggerButton, onRightTriggerEnter, onRightTriggerDown, onRightTriggerUp);

ButtonDispatchModel(leftHandController, CommonUsages.gripButton, onLeftGripEnter, onLeftGripDown, onLeftGripUp);
ButtonDispatchModel(rightHandController, CommonUsages.gripButton, onRightGripEnter, onRightGripDown, onRightGripUp);

ButtonDispatchModel(leftHandController, CommonUsages.primaryButton, onLeftAXButtonEnter, onLeftAXButtonDown, onLeftAXButtonUp);
ButtonDispatchModel(rightHandController, CommonUsages.primaryButton, onRightAXButtonEnter, onRightAXButtonDown, onRightAXButtonUp);

ButtonDispatchModel(leftHandController, CommonUsages.secondaryButton, onLeftBYButtonEnter, onLeftBYButtonDown, onLeftBYButonUp);
ButtonDispatchModel(rightHandController, CommonUsages.secondaryButton, onRightBYButtonEnter, onRightBYButtonDown, onRightBYButtonUp);

ButtonDispatchModel(leftHandController, CommonUsages.primary2DAxisClick, onLeftJoyStickEnter, onLeftJoyStickDown, onLeftJoyStickUp);
ButtonDispatchModel(rightHandController, CommonUsages.primary2DAxisClick, onRightJoyStickEnter, onRightJoyStickDown, onRightJoyStickUp);

ButtonDispatchModel(leftHandController, CommonUsages.menuButton, onLeftAppButtonEnter, onLeftAppButtonDown, onLeftAppButtonUp);
ButtonDispatchModel(rightHandController, CommonUsages.menuButton, onRightAppButtonEnter, onRightAppButtonDown,onRightAppButtonUp);

JoyStickDispatchModel(leftHandController, CommonUsages.primary2DAxis, onLeftJoyStickMove);
JoyStickDispatchModel(rightHandController, CommonUsages.primary2DAxis, onRightJoyStickMove);
}
}

Bind Events and Handler Methods

将对应的输入事件与处理事件想绑定,此处给出了EnterDownUp三个事件

1
2
3
4
5
6
7
8
9
10
11
12
13
14
15
16
17
18
19
20
21
22
23
private void BindXRInputEvent()
{
InputEvent.Instance.onLeftAXButtonEnter += AXButtonEnterHandler;
InputEvent.Instance.onLeftAXButtonUp += AXButtonUpHandler;

InputEvent.Instance.onLeftBYButtonEnter += BYButtonEnterHandler;
InputEvent.Instance.onLeftBYButonUp += BYButtonUpHandler;
}


private void AXButtonEnterHandler()
{
Debug.Log("[Input] LeftAXButtonEnter is called");
if (!hasStarted) return;
UIManager.Instance.OpenPanel(eUIPanelType.ChooseBluePrintPanel);
}

private void AXButtonUpHandler()
{
Debug.Log("[Input] LeftAXButtonUp is called");
if (!hasStarted) return;
UIManager.Instance.PopPanel();
}

Build

由于Neo3是安卓设备,在Unity打包时会遇到一些打安卓包的坑,主要原因是外网的一些资源不能正常访问。主要的解决办法时换源或者使用代理。