Hands

最近Unity XRTK 终于加入了对手势追踪的支持,这里记录回顾一下相关的组件和类

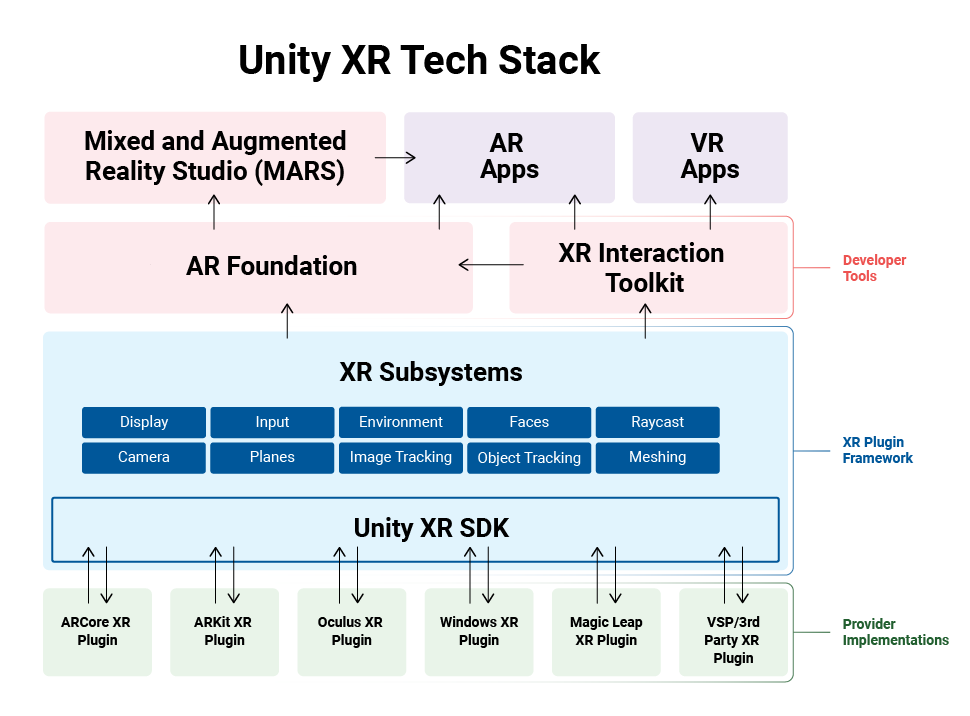
This diagram illustrates the current Unity XR plug-in framework structure, and how it works with platform provider implementations.

Setup

为了能够正常使用手势追踪,需要XR相关的包升级。这里的 Editor 版本为 2021.3.20f1。

将XR相关的包升级

Upgrade packages

如果在包管理器中看不到升级的按钮,那么可以通过左上角“➕” -> “Add package by name“,分别输入:

com.unity.xr.handscom.unity.xr.interaction.toolkitcom.unity.xr.management 来完成升级。

注意:这些包可能对Editor版本有一定要求,具体可以查看对应说明:
XR Interaction Toolkit 2.3.1

XR Plugin Management 4.3.3

XR Hands 1.1.0

Config XR Plug-in Management

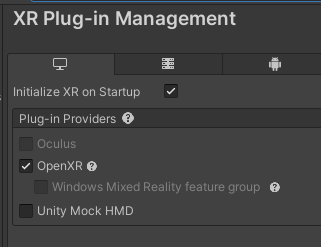
Edit -> Project Settings -> XR Plug-in Managerment 在对应平台下勾选 OpenXR

在对应平台下勾选 OpenXR

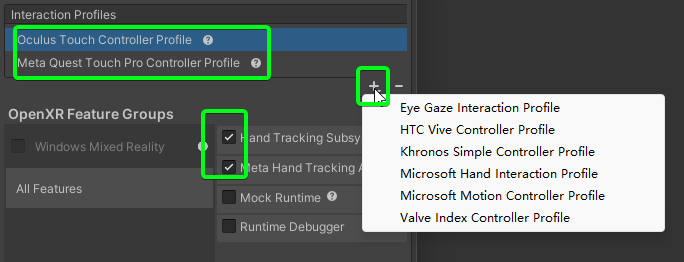
-> OpenXR 进入子菜单OpenXR,添加将使用的设备的预设,并勾选相关特性

添加将使用的设备的预设,并勾选相关特性

然后导入一些示例场景和预制体:

例如 XRTK 下的: Starter Assets, XR Device Simulator, Hands Interaction Demo

与 XR Hands 下的:HandVisualizer

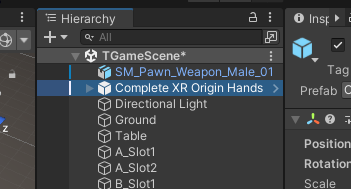
在Project窗口中搜索 Complete XR Origin Hands Set Up,并将此预制体放入场景中,即可以运行场景查看效果。手和控制器的切换追随设备,并能实时体现在游戏中。 某些版本的XR组件下可能出现切换时Editor暂停,可以尝试更新组件。

将此预制体放入场景中

Access Hand Data

Refer to:Access hand data

有时候我们希望除了一些回调外,能获得手部更详实的位姿数据, 以实现网络同步等等更多的功能。

我们可以订阅 XRHandSubsystem,并获取数据,例如:

1
2
3
4
5
6
7
8
9
10
11
12
13
14
15
16
17
18
19
20
21
22
23
24
25
26
27
28
29
30
31
32
33
34
35
36
37
void Start()
{
XRHandSubsystem m_Subsystem =
XRGeneralSettings.Instance?
.Manager?
.activeLoader?
.GetLoadedSubsystem<XRHandSubsystem>();

if (m_Subsystem != null)
m_Subsystem.updatedHands += OnHandUpdate;
}

void OnHandUpdate(XRHandSubsystem subsystem,
XRHandSubsystem.UpdateSuccessFlags updateSuccessFlags,
XRHandSubsystem.UpdateType updateType)
{
switch (updateType)
{
case XRHandSubsystem.UpdateType.Dynamic:
// Update game logic that uses hand data
break;
case XRHandSubsystem.UpdateType.BeforeRender:
for (var i = XRHandJointID.BeginMarker.ToIndex();
i < XRHandJointID.EndMarker.ToIndex();
i++)
{
var trackingData = subsystem.rightHand .GetJoint(XRHandJointIDUtility.FromIndex(i));

if (trackingData.TryGetPose(out Pose pose))
{
// displayTransform is some GameObject's Transform component
Debug.Log($"[{nameof(XRHand)}]Joint{i} : {nameof(Position)} {pose.position} | {nameof(Rotate)} {pose.rotation}");
}
}
break;
}
}

General settings container used to house the instance of the active settings as well as the manager instance used to load the loaders with.

XR Loader abstract class used as a base class for specific provider implementations. Providers should implement subclasses of this to provide specific initialization and management implementations that make sense for their supported scenarios and needs.

此时可以看到,Joint点的数据已被正常获得并打印。

HandVisualizer

HandVisulizer 类控制着手势的渲染,将上述我们获得的Joints的空间位置与旋转翻译成SkinnedMeshRenderer的变化,渲染逻辑可见其OnUpdateHands()方法中,大致通过更新Joint的位置带动蒙皮的变换。

1
2
3
4
5
6
7
8
9
10
11
12
13
14
15
16
17
18
19
20
21
22
23
var originTransform = xrOrigin.Origin.transform;
var originPose = new Pose(originTransform.position, originTransform.rotation);

var wristPose = Pose.identity;
UpdateJoint(debugDrawJoints, velocityType, originPose, hand.GetJoint(XRHandJointID.Wrist), ref wristPose);
UpdateJoint(debugDrawJoints, velocityType, originPose, hand.GetJoint(XRHandJointID.Palm), ref wristPose, false);

for (int fingerIndex = (int)XRHandFingerID.Thumb;
fingerIndex <= (int)XRHandFingerID.Little;
++fingerIndex)
{
var parentPose = wristPose;
var fingerId = (XRHandFingerID)fingerIndex;

int jointIndexBack = fingerId.GetBackJointID().ToIndex();
for (int jointIndex = fingerId.GetFrontJointID().ToIndex();
jointIndex <= jointIndexBack;
++jointIndex)
{
if (m_JointXforms[jointIndex] != null)
UpdateJoint(debugDrawJoints, velocityType, originPose, hand.GetJoint(XRHandJointIDUtility.FromIndex(jointIndex)), ref parentPose);
}
}

Duplicate Hands

复制手部的运动其实也就是复制其骨骼的Transform

Introduction to VR Development

Introduction

Virtual reality (VR) is a simulated experience that employs pose tracking and 3D near-eye displays to give the user an immersive feel of a virtual world.

The equipment I am using now is Pico Neo3 based on PICO Unity Integration SDK

对于使用Unity开发, 其 XR Interactioin Toolkit 包已经提供了相当实用强力的脚本与抽象。本文会给出一些踩的坑和常见用法。

Environment:

  1. Unity Editor 2021.3.5f1c1

  2. XR Interaction Toolkit | XR Interaction Toolkit | 2.2.0

  3. Preview Tool provided by Pico Official

Notice

  • 2.2.0中,XRKT提供了一些新的方法与属性, 一些旧版的被标记为弃用。本例中的代码可能有些无法在老版本中实现,但旧版一般也都提供了近似的方法与属性。

  • 推测在使用Preview Tool时(有线连接),尤其是在PC端提示绿标“连接成功” 时,PC端的以太网会连接到一个”NDIS”设备,导致一些暂时的网络异常(无法访问网页)。

Interaction Toolkit

这可以被理解为使用Unity进行XR开发的核心,进行相关的配置后,几乎一切目前的VR设备可以被抽象为Unity的Device。XR Origin管理着这些设备。

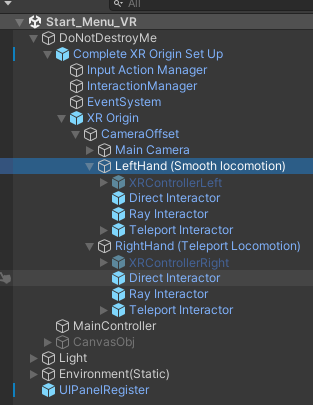
在本文的项目中,直接使用了示例场景中的Introduction to VR Development.prefab预制体,其已经配置好了XR Origin,Input Action Manager InteractionManager EventSystem 等等基础的交互组件。

624b6fa1d9d4a945c593557a04b5a698.png

624b6fa1d9d4a945c593557a04b5a698.png

Interactor & Interactable

XRTK提供的主要交互方式为Interactor,可以大致分为

RayInteractor,Direct Interactor,Teleport Interactor三种,分别可以理解为射线交互,近距离的抓取抛掷交互,传送交互。其均继承自XRBaseControllerInteactor

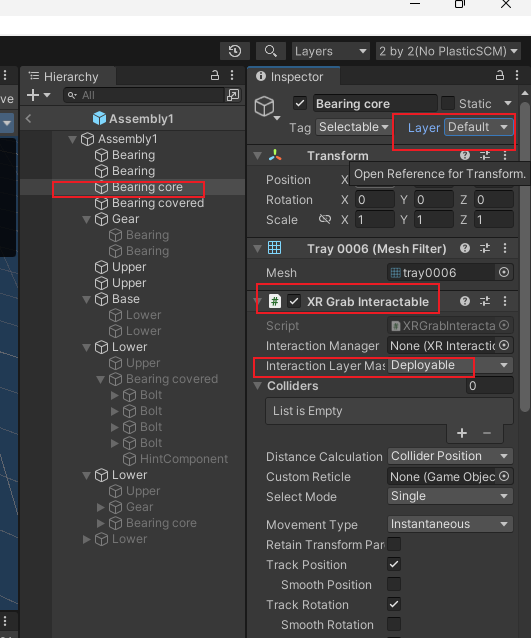
可以被交互的物体需要挂载Interactable组件,并合理配置其Layer与Interaction Layer

Layer & Raycast Mask

即Inspector中右上角的Layer概念,可以控制对射线的遮罩。

Interaction Layer

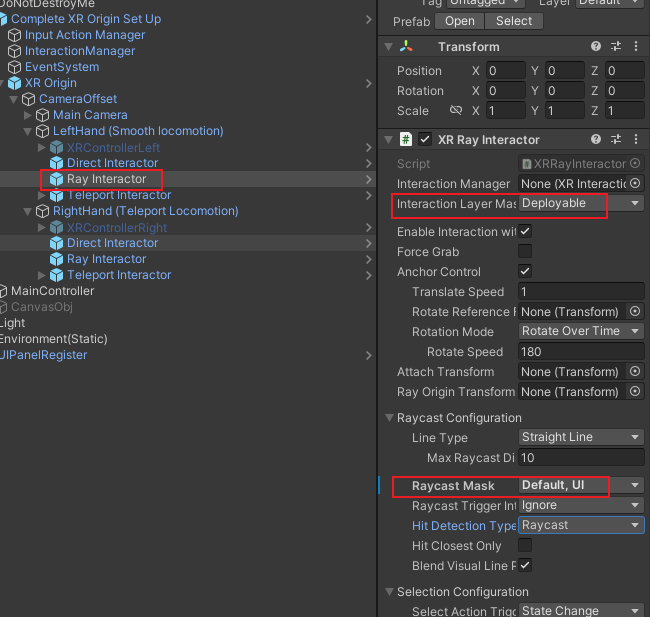
配置Interactor可以交互的层,只有Interactable的Interaction Layer被包括在了Interactor的Interaction Layer中,Interactor才能与之交互。

例如:

CUBE 物体挂载的 Interactable组件中,勾选Interaction Layer为Deployable。并且CUBE的Layer 被囊括在Interactor中的Raycast Configuration -> Raycast Mask 中。

对应RayInteractor中的Interaction Layer囊括了此Deployable,那么CUBE可以被此Interactor交互。

e320974c3f47a8dd692c384abe24a8d8.png

e320974c3f47a8dd692c384abe24a8d8.png

498a2344f6b99fd75cf255dc921c6923.png

498a2344f6b99fd75cf255dc921c6923.png

Events

Interactor 对物体的交互可以抽象为两种类型,即Hover(悬停,待选,摸)Select(选取,拿起,抓起)。每个类型又提供了EnteredExited两个事件。

Development Practice

Assign Interaction Layer

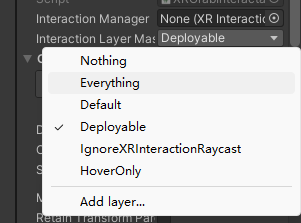
通过代码指定Interaction Layer,在以下情况下,分别代表1 - Default 2 - Deployable

d5223dbaf91397bab58910ed077ae74e.png

d5223dbaf91397bab58910ed077ae74e.png

1
2
XRGrabInteractable xRGrabInteractable = gameObject.GetOrAddComponent<XRGrabInteractable>();
xRGrabInteractable.interactionLayers = 2;

Bind Events and Handler Methods

绑定selectEnteredselectExited等等事件,Handler方法接受对应的EventArgs,以XRInteractorHoverEnteredHandler(HoverEnterEventArgs args)为例

1
2
3
4
5
6
7
8
9
10
11
12
13
14
15
16
17
public class DragManager: SingletonForMonobehaviour<DragManager>
{
//首先声明Interactor类,并在U
public XRDirectInteractor leftDirectInteractor;
public XRRayInteractor leftRayInteractor;

private void InitXRInteractor()
{
leftRayInteractor.hoverEntered.AddListener(XRInteractorHoverEnteredHandler); }
}

private void XRInteractorHoverEnteredHandler(HoverEnterEventArgs args)
{
Debug.log("[Interactor]Enter Hover"):
}

}

获取当前交互的物体

1
2
3
4
5
private void XRInteractorHoverEnteredHandler(HoverEnterEventArgs args)
{
IXRHoverInteractable hoverComponent = args.interactableObject;
GameObject obj = hoverComponent.transform.gameObject;
}

UI Elements

在UI组件上挂载TrackedDeviceGraphicRaycaster,可以使得其接受对应的Hover、Select事件

Input Event

响应对应的按键。

Base Concepts & Models

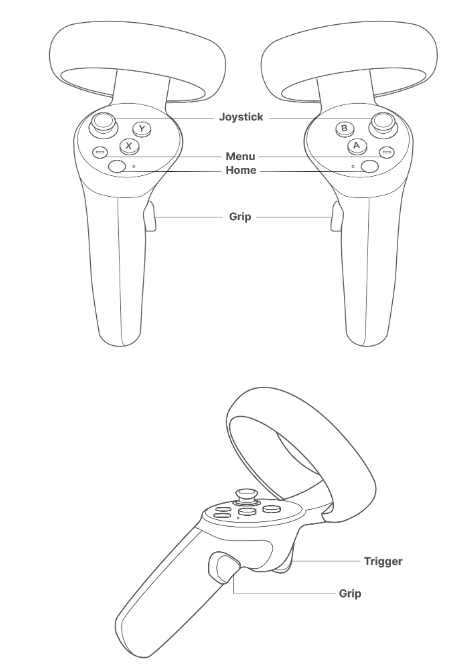
PICO Neo3为例:

43cc2a7be65a3d7abe62537ceab2e0b1.png

43cc2a7be65a3d7abe62537ceab2e0b1.png

The table below describes the mappings between PICO controller buttons and Unity keys:

Button Unity Keys
Menu CommonUsages.menuButton: represents whether the Menu button has been activated (pressed).
Trigger - CommonUsages.triggerButton: represents whether the Trigger button has been activated (pressed).
- CommonUsages.trigger: represents the degree to which the Trigger button was pressed. For example, in an archery game, it represents how full the bow has been drawn.
Grip - CommonUsages.gripButton: represents whether the Grip button has been activated (pressed).
- CommonUsages.grip: represents the degree to which the Grip button was pressed. For example, in an archery game, it represents how full the bow has been drawn.
Joystick - CommonUsages.primary2DAxisClick: represents whether the Joystick has been activated (pressed).
- CommonUsages.primary2DAxis: represents whether the Joystick has been moved upward, downward, leftward, or rightward.
X/A CommonUsages.primaryButton: represents whether the X/A button has been activated (pressed).
Y/B CommonUsages.secondaryButton: represents whether the Y/B button has been activated (pressed).

Development Practice

下面给出了代码中获取到输入、事件的用法。

也许2.2.0的VRKT提供了相应事件,可以自行搜索用法。此处给出的代码参考PicoXR中的输入事件_窗外听轩雨的博客-CSDN博客 的内容。

Get Input Device

通过XRNode获取设备

1
2
3
4
5
6
//XRNode为枚举变量
//常用的有 Head LeftHand RightHand
//根据这些枚举可以轻松获得指定的头盔,左手柄,右手柄
InputDevice headController = InputDevices.GetDeviceAtXRNode(XRNode.Head);
InputDevice leftHandController = InputDevices.GetDeviceAtXRNode(XRNode.LeftHand);
InputDevice rightHandController = InputDevices.GetDeviceAtXRNode(XRNode.RightHand);

Try Get Input Value

1
2
3
4
5
6
7
8
9
10
InputDevice device;
//省略device的获取 使用前要先获取
public void Test()
{
bool isDown; //记录是否按下
if(device.TryGetFeatureValue(CommonUsages.triggerButton,out isDown) && isDown)
{
//xxxxx 处理逻辑
}
}

InputEvent.cs

将输入转为事件,分离事件与处理逻辑。

1
2
3
4
5
6
7
8
9
10
11
12
13
14
15
16
17
18
19
20
21
22
23
24
25
26
27
28
29
30
31
32
33
34
35
36
37
38
39
40
41
42
43
44
45
46
47
48
49
50
51
52
53
54
55
56
57
58
59
60
61
62
63
64
65
66
67
68
69
70
71
72
73
74
75
76
77
78
79
80
81
82
83
84
85
86
87
88
89
90
91
92
93
94
95
96
97
98
99
100
101
102
103
104
105
106
107
108
109
110
111
112
113
114
115
116
117
118
119
120
121
122
123
124
125
126
127
128
129
130
131
132
133
134
135
136
137
138
139
140
141
142
143
144
145
146
147
148
149
150
151
152
153
154
155
156
157
158
159
160
161
162
163
164
165
166
167
168
169
using System;
using System.Collections;
using System.Collections.Generic;
using UnityEngine;
using UnityEngine.XR;
using Common;
/// <summary>
/// 提供各种输入事件
/// </summary>
public class InputEvent:MonoSingleton<InputEvent>
{
//*************输入设别**************************
InputDevice leftHandController;
InputDevice rightHandController;
InputDevice headController;

//**************对外提供公开事件******************
#region public event

public Action onLeftTriggerEnter;
public Action onLeftTriggerDown;
public Action onLeftTriggerUp;

public Action onRightTriggerEnter;
public Action onRightTriggerDown;
public Action onRightTriggerUp;

public Action onLeftGripEnter;
public Action onLeftGripDown;
public Action onLeftGripUp;

public Action onRightGripEnter;
public Action onRightGripDown;
public Action onRightGripUp;

public Action onLeftAppButtonEnter;
public Action onLeftAppButtonDown;
public Action onLeftAppButtonUp;

public Action onRightAppButtonEnter;
public Action onRightAppButtonDown;
public Action onRightAppButtonUp;

public Action onLeftJoyStickEnter;
public Action onLeftJoyStickDown;
public Action onLeftJoyStickUp;

public Action onRightJoyStickEnter;
public Action onRightJoyStickDown;
public Action onRightJoyStickUp;

public Action<Vector2> onLeftJoyStickMove;
public Action<Vector2> onRightJoyStickMove;

public Action onLeftAXButtonEnter;
public Action onLeftAXButtonDown;
public Action onLeftAXButtonUp;

public Action onLeftBYButtonEnter;
public Action onLeftBYButtonDown;
public Action onLeftBYButonUp;

public Action onRightAXButtonEnter;
public Action onRightAXButtonDown;
public Action onRightAXButtonUp;

public Action onRightBYButtonEnter;
public Action onRightBYButtonDown;
public Action onRightBYButtonUp;

#endregion

//提供状态字典独立记录各个feature的状态
Dictionary<string, bool> stateDic;

//单例模式提供的初始化函数
protected override void Init()
{
base.Init();
leftHandController = InputDevices.GetDeviceAtXRNode(XRNode.LeftHand);
rightHandController = InputDevices.GetDeviceAtXRNode(XRNode.RightHand);
headController = InputDevices.GetDeviceAtXRNode(XRNode.Head);
stateDic = new Dictionary<string, bool>();

}
//*******************事件源的触发**************************

/// <summary>
/// 按钮事件源触发模板
/// </summary>
/// <param name="device">设备</param>
/// <param name="usage">功能特征</param>
/// <param name="btnEnter">开始按下按钮事件</param>
/// <param name="btnDown">按下按钮事件</param>
/// <param name="btnUp">抬起按钮事件</param>
private void ButtonDispatchModel(InputDevice device,InputFeatureUsage<bool> usage,Action btnEnter,Action btnDown,Action btnUp)
{
Debug.Log("usage:" + usage.name);
//为首次执行的feature添加bool状态 -- 用以判断Enter和Up状态
string featureKey = device.name + usage.name;
if(!stateDic.ContainsKey(featureKey))
{
stateDic.Add(featureKey, false);
}

bool isDown;
if(device.TryGetFeatureValue(usage,out isDown) && isDown)
{
if(!stateDic[featureKey])
{
stateDic[featureKey] = true;
if(btnEnter != null)
btnEnter();
}
if(btnDown!=null)
btnDown();
}
else
{
if(stateDic[featureKey])
{
if(btnUp!=null)
btnUp();
stateDic[featureKey] = false;
}
}
}

/// <summary>
/// 摇杆事件源触发模板
/// </summary>
/// <param name="device">设备</param>
/// <param name="usage">功能特征</param>
/// <param name="joyStickMove">移动摇杆事件</param>
private void JoyStickDispatchModel(InputDevice device,InputFeatureUsage<Vector2> usage,Action<Vector2> joyStickMove)
{
Vector2 axis;
if (device.TryGetFeatureValue(usage, out axis) && !axis.Equals(Vector2.zero))
{
if(joyStickMove!=null)
joyStickMove(axis);
}
}

//******************每帧轮询监听事件***********************
private void Update()
{
ButtonDispatchModel(leftHandController, CommonUsages.triggerButton, onLeftTriggerEnter, onLeftTriggerDown, onLeftTriggerUp);
ButtonDispatchModel(rightHandController, CommonUsages.triggerButton, onRightTriggerEnter, onRightTriggerDown, onRightTriggerUp);

ButtonDispatchModel(leftHandController, CommonUsages.gripButton, onLeftGripEnter, onLeftGripDown, onLeftGripUp);
ButtonDispatchModel(rightHandController, CommonUsages.gripButton, onRightGripEnter, onRightGripDown, onRightGripUp);

ButtonDispatchModel(leftHandController, CommonUsages.primaryButton, onLeftAXButtonEnter, onLeftAXButtonDown, onLeftAXButtonUp);
ButtonDispatchModel(rightHandController, CommonUsages.primaryButton, onRightAXButtonEnter, onRightAXButtonDown, onRightAXButtonUp);

ButtonDispatchModel(leftHandController, CommonUsages.secondaryButton, onLeftBYButtonEnter, onLeftBYButtonDown, onLeftBYButonUp);
ButtonDispatchModel(rightHandController, CommonUsages.secondaryButton, onRightBYButtonEnter, onRightBYButtonDown, onRightBYButtonUp);

ButtonDispatchModel(leftHandController, CommonUsages.primary2DAxisClick, onLeftJoyStickEnter, onLeftJoyStickDown, onLeftJoyStickUp);
ButtonDispatchModel(rightHandController, CommonUsages.primary2DAxisClick, onRightJoyStickEnter, onRightJoyStickDown, onRightJoyStickUp);

ButtonDispatchModel(leftHandController, CommonUsages.menuButton, onLeftAppButtonEnter, onLeftAppButtonDown, onLeftAppButtonUp);
ButtonDispatchModel(rightHandController, CommonUsages.menuButton, onRightAppButtonEnter, onRightAppButtonDown,onRightAppButtonUp);

JoyStickDispatchModel(leftHandController, CommonUsages.primary2DAxis, onLeftJoyStickMove);
JoyStickDispatchModel(rightHandController, CommonUsages.primary2DAxis, onRightJoyStickMove);
}
}

Bind Events and Handler Methods

将对应的输入事件与处理事件想绑定,此处给出了EnterDownUp三个事件

private void BindXRInputEvent()
{
    InputEvent.Instance.onLeftAXButtonEnter += AXButtonEnterHandler;
    InputEvent.Instance.onLeftAXButtonUp += AXButtonUpHandler;

    InputEvent.Instance.onLeftBYButtonEnter += BYButtonEnterHandler;
    InputEvent.Instance.onLeftBYButonUp += BYButtonUpHandler;
}


private void AXButtonEnterHandler()
{
    Debug.Log("[Input] LeftAXButtonEnter is called");
    if (!hasStarted) return;
    UIManager.Instance.OpenPanel(eUIPanelType.ChooseBluePrintPanel);
}

private void AXButtonUpHandler()
{
    Debug.Log("[Input] LeftAXButtonUp is called");
    if (!hasStarted) return;
    UIManager.Instance.PopPanel();
}

Build

由于Neo3是安卓设备,在Unity打包时会遇到一些打安卓包的坑,主要原因是外网的一些资源不能正常访问。主要的解决办法时换源或者使用代理。