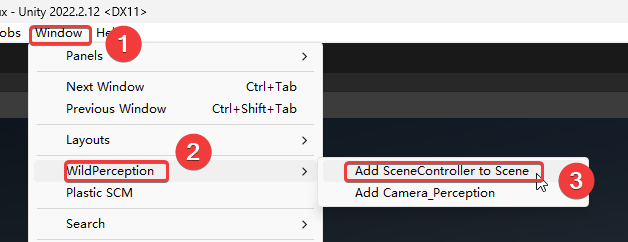
尝试打包WebGL平台遇到的坑

Intro

在将一个 Unity 2022.3 数字孪生项目(利用Unity3D_Robotics_ABB)从原 Win 平台迁移到 WebGL 平台的过程中,遇到了 RuntimeError: null function or function signature mismatchThe script 'xxxxx' could not be instantiated!digest auth failed 等等报错和故障。在对网上的解决方案探索和尝试的过程中,有小结如下

System.Threading 相关命名空间(C# 原生线程)不支持

这是着手切换WebGL平台之前就知道不行的一点,不过使用 UniTask 可以替换。

Unity3D_Robotics_ABB 作者在其实现中主要使用了原生的 Thread 来处理异步的逻辑,在 Unity 打 WebGL 包时并没有报错且能成功出包,然而,在运行 WebGL 的程序时(尤其做某些会拉起线程的操作时),会出现卡死、弹窗报错RuntimeError: null function or function signature mismatch 的问题。

若出现上述问题,应该考虑利用 Unity 托管的异步实现(UniTask、协程等),或 async/await 关键词处理对应需求。

System.Net 相关命名空间不支持(需要利用Unity提供的 UnityWebRequest(UWR) 来进行 HTTP 请求)

这是解决问题花费时间比较长的一点。

在解决完线程的问题后,运行 WebGL 程序,发现会出现 The script 'xxxxx' could not be instantiated! 等控制台警告,且此脚本功能失效。经过测试后,发现脚本中若引用了 System.Net 等 .NET networking classes,则此脚本不能被正确加载,见 WebGL Networking ,此时需要使用 UnityWebRequest 类进行 http 请求。

由于 UnityWebRequest 没有对 Authentication 的支持,需要手动处理一些问题:digest auth failed 。例如,Basic 验证方案可以自己加Header 并存入对应值。然而,对于 Digest 验证方案,手动处理比较麻烦。此时考虑调 JavaScript 的加 Digest 验证的方法并发送 HTTP 请求,或者由代理服务器添加 Digest 验证

技术水平有限,最终选择了由代理服务器添加 Digest 验证的方法,下面是对应的 Python 程序:

1
2
3
4
5
6
7
8
9
10
11
12
13
14
15
16
17
18
19
20
21
22
23
24
25
26
27
28
29
30
31
32
33
34
35
36
37
38
39
40
41
42
43
44
45
46
47
48
from flask import Flask, request, Response
import requests
from requests.auth import HTTPDigestAuth

app = Flask(__name__)

# The URL of the API that requires Digest Authentication
TARGET_API_URL = "http://www.tsingloo.com"
# Replace 'your_username' and 'your_password' with your actual credentials
USERNAME = 'your_username'
PASSWORD = 'your_password'

@app.route('/', defaults={'path': ''})
@app.route('/<path:path>', methods=['GET', 'POST', 'PUT', 'DELETE'])
def proxy(path):
# Construct the full URL to the target API
url = f"{TARGET_API_URL}/{path}"

# Log the requested URL
app.logger.info(f"I am requesting {url}")

# Get the original request method and data
method = request.method
data = request.get_data()

# Selectively copy headers, excluding those that can cause issues
excluded_headers = ['Host', 'Content-Length', 'Content-Type']
headers = {key: value for key, value in request.headers if key not in excluded_headers}

# If the request has a content type, include it in the headers
if 'Content-Type' in request.headers:
headers['Content-Type'] = request.headers['Content-Type']

# Inside your proxy function
response = requests.request(method, url, data=data, headers=headers)

# Make sure to copy the content-type header from the original response to the new response
content_type = response.headers.get('Content-Type')
response_headers = {'Content-Type': content_type} if content_type else {}

return Response(response.content, status=response.status_code, headers=response_headers)

@app.before_request
def log_request():
print(f"Received request: {request.url} - {request.method}")

if __name__ == '__main__':
app.run(debug=True)

短时间内利用 UWR 对 RWS 发送大量请求

为了追求项目的实时性,短时间内 Unity 利用 UWR 向机械臂(RWS)发送大量请求,前70个请求成功,而后的请求报 “503 Service Unavailable (Too many sessions 70/70)”错,且当双方断开连接时,仍需要一段时间“冷却”,而后才能请求正确收到回复,然后短时间内约70个 UWR 的 http 的请求后,重复上述 503 错误。使用C#提供的 HTTP 相关类时未见此问题。当503报错时,关闭代理服务器,重新插拔网线,都不能立刻释放此70个sessions。

值得注意的是,当 UWR 已经收到503报错时,再继续使用Postman测试相关接口,如(http://192.168.x.x/rw/rapid/tasks/T_ROB1/motion?resource=jointtarget)时,Postman有时可以正常收到数据。复盘此情况,推测是在排障中,由 Postman 已经发送了带 http头”Connection: Keep-Alive”并成功建立了正常的连接,早于 UWR 的请求,换言之,其 70 个session中已经维护了一个与postman的长连接。冷却后,使用 Postman 短时间内大量测试相关接口可以持续获得正常的数据,未见503报错。

冷却后,当使用Edge浏览器短时间内大量访问接口,前70个请求成功,而后的也会503报错,表现与 UWR 一样,且观察浏览器发出的 HTTP 请求,其已携带”Connection: Keep-Alive”,不同的是,浏览器发出的 HTTP 带有很长的“User-Agent”头,这一点没弄明白。

冷却后,当使用 Python 对接口短时间内大量发送简单的http请求(不挟带请求头”Connection: Keep-Alive”)时,前70个请求成功,而后的也会503报错,表现与 UWR 一样。

经检查,(编辑器 2022.3 版本默认的) UWR 发出的 HTTP 请求默认不携带标头 Connection: Keep-Alive,有讨论,见Connection: keep-alive in Unity Web Request?,且当使用 UnityWebRequest.SetRequestHeader 手动设置此标头时,会见警告且官方文档不推荐如此做。

最终,通过 UnityWebRequest.SetRequestHeader 手动设置标头”Connection: Keep-Alive”,解决了上述 503 报错。

几乎同一时刻对 RWS 发送多个请求

在将原线程替换为 UniTask 后,某个方法每帧将同时对 RWS 发送三个不同的 HTTP 请求,导致报 “Connection manager can’t add .. ” 错,改为一帧(约23ms)轮流发一个 HTTP 请求后解决。

HttpClient.PostAsyncUnityWebRequest.Post

使用PostAsync时,需要传入一个string和一个httpcontent,在使用 .Post 时,可以是两个string,也可以是一个string和一个 WWWForm,推荐使用后者,可以规避一些可能的编码问题。

反序列化时 dynamic 关键字引起的崩溃

项目中使用从 Unity Package Manager 中添加的 Newtonsoft.Json 来处理请求,原本从字符串中反序列化对象代码如下:

1
2
dynamic obj = JsonConvert.DeserializeObject(jsonStr);
var state = obj.name;

初次尝试打WebGL包时会报缺少某命名空间错,而后在项目设置中将 API 兼容性 级别改为 .Net Framewrok 后不再报错。
上述代码会导致WebGL运行时弹窗报错奔溃,推荐参考 json 的内容定义类型而后获取对应字段的值。

1
2
3
4
5
6
7
8
9
10
11
12
13
14
15
16
17
18
19
20
[Serializable]
public class People
{
public string name;
public int age;
public DateTime birthday;
public bool isMarried;
public float money;
}

public void DeserializeJson()
{
string jsonStr = "{\"name\" :\"张三\",\"age\":30,\"birthday\":\"1990-03-31T17:15:29\",\"isMarried\":true,\"money\":10.0}";

People zhangsan = JsonConvert.DeserializeObject<People>(jsonStr);
Debug.Log("zhangsan.name " + zhangsan.name + " birthday: " + zhangsan.birthday + " isMarried: " + zhangsan.isMarried);

//output: zhangsan.name 张三 birthday: 03/31/1990 17:15:29 isMarried: True
}

利用 Mark Magic 将 Joplin 笔记发布为 Hexo 博客

Refer to Mark Magic, Hexo

Introduction

Mark Magic 是一款可以将来自于一些常用笔记软件的文件数据转化为目标软件 markdown 笔记的工具。 我们可以利用它来将 Joplin 中的笔记导出,随后使用 Hexo 生成网页并发布

Setup

需要保证 Joplin Web Clipper 功能打开,可在Joplin 软件中 Tools -> Options -> Web Clipper 处打开。

Mark Magic 要求 Node.js® version must >= 20

Mark Magic

请参考官方文档 Mark Magic, 其给出了详尽的说明与范例。此处以 Joplin 与 Hexo 为例,权且做个记录:

  1. 为 Mark Magic 新建文件夹

  2. 在此目录下打开命令行,输入以下命令:

    1
    npm i -D @mark-magic/cli @mark-magic/plugin-joplin @mark-magic/plugin-hexo
  3. 安装完毕后,我们在此目录中手动添加 mark-magic.config.yaml 文件

    1
    2
    3
    4
    5
    6
    7
    8
    9
    10
    11
    12
    13
    14
    # mark-magic.config.yaml
    tasks:
    - name: blog
    input:
    name: '@mark-magic/plugin-joplin' # Input plugin to read data from Joplin notes
    config:
    baseUrl: 'http://localhost:27583' # The address of the Joplin web clipper service, usually http://localhost:41184. Here, we are using the development address http://localhost:27583 for demonstration purposes.
    token: '5bcfa49330788dd68efea27a0a133d2df24df68c3fd78731eaa9914ef34811a34a782233025ed8a651677ec303de6a04e54b57a27d48898ff043fd812d8e0b31' # The token for the Joplin web clipper service
    tag: blog # Filter the notes based on a tag
    output:
    name: '@mark-magic/plugin-hexo' # Output plugin to generate the files required by Hexo
    config:
    path: './' # The root directory of the Hexo project
    base: /joplin-hexo-demo/ # The baseUrl when deployed. By default, it is deployed at the root path of the domain. It should match the `root` configuration in the hexo _config.yml file.
  4. 命令行中输入 npx mark-magic 运行插件

  5. 完毕

Hexo

Hexo 是一款静态博客生成器,其可以将 markdown 文件转换为 html 网页。

  1. 安装hexo

    1
    npm install hexo-cli -g
  2. 在空文件夹中,初始化hexo

    1
    hexo init

    注意,在win中,这一步可能会遇到 hexo.ps1 cannot be loaded because running scripts is disabled on this system. For more information 的报错,请在系统设置中 Turn on these settings to execute PowerShell scripts

  3. 调整 package.json

    1
    2
    3
    4
    5
    6
    7
    8
    9
    10
    11
    12
    13
    14
    15
    16
    17
    18
    19
    20
    21
    22
    23
    24
    25
    26
    27
    28
    {
    "name": "hexo-site",
    "version": "0.0.0",
    "private": true,
    "scripts": {
    "build": "hexo generate",
    "clean": "hexo clean",
    "deploy": "hexo deploy",
    "server": "hexo server"
    },
    "hexo": {
    "version": ""
    },
    "dependencies": {
    "hexo": "^7.0.0",
    "hexo-abbrlink": "^2.2.1",
    "hexo-deployer-cos-cdn": "^1.7.1",
    "hexo-generator-archive": "^2.0.0",
    "hexo-generator-category": "^2.0.0",
    "hexo-generator-index": "^3.0.0",
    "hexo-generator-tag": "^2.0.0",
    "hexo-renderer-ejs": "^2.0.0",
    "hexo-renderer-marked": "^6.2.0",
    "hexo-renderer-stylus": "^3.0.0",
    "hexo-server": "^3.0.0",
    "hexo-theme-landscape": "^1.0.0"
    }
    }
  4. 选择主题,并按照主题要求安装,以icarus为例

    1
    2
    npm install hexo-theme-icarus
    hexo config theme icarus
  5. 测试启动hexo

    1
    2
    hexo g
    hexo s
  6. 配置_config.yml_config.icarus.yml文件

  7. 添加备案信息

    .\node_modules\hexo-theme-icarus\layout\commonfooter.jsx 文件
    写入:

    1
    2
    3
    <p class="is-size-7">
    <a href="https://beian.miit.gov.cn/" target="_blank" rel="noopener"></a>苏ICP备XXXXXXXX号-1</a>
    </p>

    添加备案信息

  8. 设置图片居中

    参考Hexo博客主题之Icarus的设置与美化(进阶)的方法,打开Icarus主题文件夹,通过相应路径source/js/main.js,找到main.js修改如下。

    1
    2
    3
    4
    5
    6
    7
    8
    9
    10
    11
    12
    (function ($) {
    $('.article img:not(".not-gallery-item")').each(function () {
    // wrap images with link and add caption if possible
    if ($(this).parent('a').length === 0) {
    //修改部分
    $(this).wrap('<a class="gallery-item" style="display:block;text-align:center;" href="' + $(this).attr('src') + '"></a>');
    //修改部分
    if (this.alt) {
    $(this).after('<div class="has-text-centered is-size-6 has-text-grey caption">' + this.alt + '</div>');
    }
    }
    });

.bat

1
2
3
4
5
6
7
8
9
10
11
12
13
14
15
16
17
18
19
20
@echo off
REM Change directory to the folder where you want to run "npx mark-magic"
cd "C:\Users\XXXX\mark-magic"
call npx mark-magic

REM Change directory to the folder for "hexo g" and "hexo d"
cd "C:\Users\XXXX\blog"

call hexo clean
call hexo g
call hexo d

REM End of script
echo Script completed! Waiting for 3 seconds...
timeout /t 3 /nobreak >nul

start www.tsingloo.com

REM Close the window
exit

地铁 · 长望

昏黄的灯光
摇曳的车厢
去向哪呢
熟悉又陌生的地方

再推开门时
是否又都变样
谁知道呢
热烈的太阳也进入他的梦乡
亦有人 在星夜下 迷失方向

最后一班列车 割破踉踉跄跄的夜幕 轻唱
只留下疲倦的回响
踱过无尽的回廊
漾起回忆的细浪

旅人 盼望着 他的床
在前方 在高岗 在昨夜的故乡
明天 又将是怎样的一副景象
一切 留给时间酝酿

初露锋芒
不如去他乡 遗忘
去漂泊 去流浪

QFramework 随笔

参考资料:

  1. Unity游戏框架搭建决定版 QFramework的二次开发
  2. “您好 我是QFramework”
  3. QFramework v1.0 使用指南
  4. 基础 | 三层架构与MVC模式

Introduction

QFramework.cs 提供了 MVC、分层、CQRS、事件驱动、数据驱动等工具,除了这些工具,QFramework.cs 还提供了架构使用规范。

QFramework 内置模块如下:

  • 0.Framework:核心架构(包含一套系统设计架构)

  • 1.CoreKit: 核心工具库、插件管理

  • 2.ResKit:资源管理套件(快速开发)

  • 3.UIKit:UI 管理套件(支持自动绑定、代码生成)

  • 4.Audio:音频方案

    MVC

    MVC模式是软件工程中常见的一种软件架构模式,该模式把软件系统(项目)分为三个基本部分:**模型(Model)、视图(View)和控制器(Controller)**使用此模式有诸多优势,例如:简化后期对项目的修改、扩展等维护操作;使项目的某一部分变得可以重复利用;使项目的结构更加直观。

    1. **视图(View):**负责界面的显示,以及与用户的交互功能。实际在Unity中,这一部分往往指 UI 的呈现。

    2. 控制器(Controller):可以理解为一个分发器,用来决定对于视图发来的请求(命令),需要用哪一个模型来处理,以及处理完后需要跳回(通过事件更改)到哪一个视图。即用来连接视图和模型。

    3. **模型(Model):**模型持有所有的数据、状态和程序逻辑。模型接受视图数据(的命令),并返回最终的处理结果(,触发事件)。

      img

CQRS 命令和查询责任分离

一种将数据存储的读取操作和更新操作分离的模式。

Query 是一个可选的概念,如果游戏中数据的查询逻辑并不是很重的话,直接在 Controller 的表现逻辑里写就可以了,但是查询数据比较重,或者项目规模非常大的话,最好是用 Query 来承担查询的逻辑。

img

事件驱动

在事件驱动编程中,系统的流程是由外部事件(如用户输入或外部数据更改)驱动的。程序会对发生的事件做出反应。其核心思想是定义并使用事件处理器

用户输入 => 事件响应 => 代码运行 => 刷新页面状态

InputSystem 帮助Unity开发者将用户输入抽象为事件

数据驱动

操作UI(用户输入)=> 触发事件 => 响应处理 => 更新数据 => 更新UI(呈现)

BindableProperty<T> 提供了快速的绑定

Framework

系统设计架构,核心概念包括Architecture、Command、Event、Model、System

Architecture

可以将Architecture视为一个项目模块的管理器(System)的集合, 省去创建大量零散管理器单例的麻烦

使用注册的方式将当前项目所使用的 模块 系统和 工具 添加进内部的IOC容器中,方便管理。

Controller

赋予 MonoBehaviour 脚本对象访问架构的能力

Model

同类的公共数据

架构规范与推荐用法

QFramework 架构提供了四个层级:

  • 表现层:IController
  • 系统层:ISystem
  • 数据层:IModel
  • 工具层:IUtility

通用规则

  • IController 更改 ISystem、IModel 的状态必须用Command
  • ISystem、IModel 状态发生变更后通知 IController 必须用事件或BindableProperty
  • IController可以获取ISystem、IModel对象来进行数据查询
  • ICommand、IQuery 不能有状态,
  • 上层可以直接获取下层,下层不能获取上层对象
  • 下层向上层通信用事件
  • 上层向下层通信用方法调用(只是做查询,状态变更用 Command),IController 的交互逻辑为特别情况,只能用 Command

表现层

ViewController 层。

IController接口,负责接收输入和状态变化时的表现,一般情况下,MonoBehaviour 均为表现层

  • 可以获取 System、Model
  • 可以发送 Command、Query
  • 可以监听 Event

系统层

System层

ISystem接口,帮助IController承担一部分逻辑,在多个表现层共享的逻辑,比如计时系统、商城系统、成就系统等

  • 可以获取 System、Model

  • 可以监听Event

  • 可以发送Event

数据层

IModel接口,负责数据的定义、数据的增删查改方法的提供

  • 可以获取 Utility
  • 可以发送 Event

工具层

Utility层

IUtility接口,负责提供基础设施,比如存储方法、序列化方法、网络连接方法、蓝牙方法、SDK、框架继承等。啥都干不了,可以集成第三方库,或者封装API

常用技巧

TypeEventSystem

独立的事件系统,可以理解为群发和广播,创建结构体传递事件内容

public struct PlayerDieEvent { }

一些简单的事件可以通过 .Register

WildPerception

WildPerception 是一个利用 Unity Perception Package 来生成大规模多视角视频数据集的工具。
其允许用户导入自己的 Humanoid 人物模型,或者利用 SyntheticHumans Package 以合成人物模型,从而在自定义的场景中模拟行人。配合 MultiviewX_Perception 可以得到符合 Wildtrack 格式的数据集。

注意:

  1. 原 MultiviewX_FYP 现更名为 MultiviewX_Perception
  2. CalibrateTool 已集成到了此处,将不再独立导出
  3. 开发使用的 Editor 版本为 2022.3.3f1,不保证之前版本(尤其是2022.2之前)的表现。 Unity Perception Package 要求一定版本的 HDRP 。

Support For SyntheticHumans

  1. 添加 WildPerception、 SyntheticHumans Package 到您的项目中,推荐导入 SyntheticHumans 官方提供的 Samples,具体过程请参考:Install Packages and Set Things Up

  2. 为 TsingLoo.WildPerception.asmdef 添加 AssemblyDefinitionReferences,选择 SyntheticHumans 提供的 Unity.CV.SyntheticHumans.Runtime,而后在页面底部右下角点击 Apply,保存。

    选择 SyntheticHumans 提供的 Unity.CV.SyntheticHumans.Runtime

    在页面底部右下角点击 Apply,保存

  3. 找到 RuntimeModelProvider.cs 脚本,更改 false 为 true

    更改 false 为 true

  4. 将 RuntimeModelProvider 组件分配给场景

    将 RuntimeModelProvider 组件分配给场景

  5. 移除其他的ModelProvider

    移除其他的ModelProvider

  6. 添加 HumanGenerationConfig,Config 的具体配置请参考此文档下半部分:Generate Your First Humans

添加 HumanGenerationConfig

  1. 运行

Import

有两种方法可以将 WildPerception 包添加到您的项目中。

注意:

  1. 由于需要安装相关依赖,应该在联网环境中导入此包

[Method 1] Add package from git URL

注意:

  1. 这需要您的设备有 git 环境,可以去这里安装:git
  2. 由于目前 Package Manager 的限制,若如此做不可打开示例场景 SampleScene_WildPerception,但不影响其他功能。

Unity Editor 中打开 Window -> Package Manager

Add package from git URL

复制本项目地址,填写并添加

复制本项目地址

填写并添加

大约三到五分钟后,添加完成,Unity 开始导入新包。

[Method 2] Add package from disk

通过 git clone 或者直接从 github 上下载ZIP文件,或者从此处[Download WildPerception] 下载包。

直接从 github 上下载ZIP文件

将此ZIP文件解压,放到非项目Assets文件夹中(在项目文件夹外亦可)

放到非项目Assets文件夹中

Unity Editor 中打开 Window -> Package Manager

Add package from disk

将package.json选中并确定。

将package.json选中

大约两分钟后,添加完成,Unity 开始导入新包。

Setup

您可以很快赋予您的场景生成序列帧的能力,只需要简单的几步配置。

若您使用的是方法2来添加此包,不妨打开场景 Packages -> WildPerception -> Sample -> SampleScene_WildPerception。 这个场景中比较简洁,如下图所示,有预制体SceneController 和一些GameObject

需要用到的预制体及生成的GameObject

若您想使用自己搭建的场景,请为这个场景添加预制体 SceneController

为这个场景添加预制体 SceneController

SceneController

SceneController 集成了所有的配置与功能。

场景导入 SceneController 后,可以打开其Inspector面板,请按照您的情况配置。

Main Controller

MainController 是 SceneController上挂载的一个组件

点击 Init Scene,场景中会自动生成所需的GameObject,请在场景中将这些 GameObject 置于所需的位置,随后点击 Assign Transfrom

请设置 MultiviewX_Perception 项目的绝对路径

若使用 LocalFilePedestrianModelProvider, 请设置 Mode_PATH 的绝对路径,此路径务必在一个路径包含”Resources/Models”的文件夹下且此文件夹中有且仅有人物模型的预制体(.prefab),而非.fbx等模型文件。若您的项目中还没有人物模型,可以使用示例模型,其在 com.tsingloo.wildperception-main\Resources\Models 下,请使用其绝对路径。

设置相关路径

对于人物模型,仅仅要求其具有 Humanoid 骨骼,并带有 Animator组件,其 Runtime Animator Controller 可以为空,若为空,将会在其生成时使用您在 People Manager 中配置的默认Runtime Animator Controller。

仅仅要求其具有 Humanoid 骨骼,并带有 Animator 组件

注意:

  1. 请尽量保证GridOrigin_OpenCV的纵坐标(Y)与Center_HumanSpawn_CameraLookAt的纵坐标(Y)相同,否则可能会出现标定不准确的情况,这个问题可能会在后续工作中修复。
  2. 确保场景中供人物模型行走的平面携带有 NavMeshSurface 组件,并已完成烘焙,若您未在 Add Component 中找到这个组件,请前往安装 Package Manager -> Packages: Unity Registry -> AI Navigation,此处使用的版本是 1.1.1

供人物模型行走的平面携带有 NavMeshSurface 组件

Camera Manager

Camera Manager 管理并控制着相机相关的内容,您可以在这里配置将在场景运行多少帧后开始导出序列帧(Begin Frame Count)、相机的位置类型(自动生成 Ellipse_Auto 或者手动摆放 By Hand)、相机的自动生成参数 Ellipse_Auto Settings

Camera Place Type

若您希望程序自动生成相机,请使用Auto

若您希望手动放置相机,请使用 By Hand
并从菜单中添加相机,为这个场景添加相机预制体 Camera_Perception,并将预制体放在HandPlacedCameraParent下

为这个场景添加相机预制体

将相机预制体放在HandPlacedCameraParent下

Ellipse_Auto Settings

此处您可以配置相机的自动生成参数。

参数名 备注
Level 有几层相机
Nums Per Level 每层多少个相机
Height First Level 第一层离地(LookAt) 多少垂直高度(已经换算为了OpenCV下长度)
H Per Level 若有多层,每层层高(已经换算为了OpenCV下长度)
Major Axis 椭圆主轴长度 (已经换算为了OpenCV下长度)
Minor Axis 椭圆副轴长度 (已经换算为了OpenCV下长度)
Camera Prefab 将会被自动生成的相机的预制体

Pedestrians Manager

此处您可以配置人物生成的相关参数。

参数名 备注
Default Animator 人物模型使用的默认动画控制器
Add_human_count 每次敲击空格将会新生成几个人物模型
Preset_humans 场景初始化后生成多少个模型
Largest,Smallest,X,Y 规定初始化生成模型的区域(绿色矩形辅助线)以及行人的活动范围
Outter Bound Radius 人物模型回收边界,请设置大一些,务必使此边界不与 Grid 相交,否则可能出现Editor 卡死,这个问题会在后续工作中修复

AbstractPedestrianModelProvider

实现此类以能为 Pedestrians Manager 提供行人模型(将其拖拽到 Main Controller 的 Pedestrian Model Provider 属性槽中,默认为 LocalFilePedestrianModelProvider)

CalibrateTool

用于相机的标定,为 MultiviewX_Perception 提供数据,请见:CalibrateTool

Hands

最近Unity XRTK 终于加入了对手势追踪的支持,这里记录回顾一下相关的组件和类

This diagram illustrates the current Unity XR plug-in framework structure, and how it works with platform provider implementations.

Setup

为了能够正常使用手势追踪,需要XR相关的包升级。这里的 Editor 版本为 2021.3.20f1。

将XR相关的包升级

Upgrade packages

如果在包管理器中看不到升级的按钮,那么可以通过左上角“➕” -> “Add package by name“,分别输入:

com.unity.xr.handscom.unity.xr.interaction.toolkitcom.unity.xr.management 来完成升级。

注意:这些包可能对Editor版本有一定要求,具体可以查看对应说明:
XR Interaction Toolkit 2.3.1

XR Plugin Management 4.3.3

XR Hands 1.1.0

Config XR Plug-in Management

Edit -> Project Settings -> XR Plug-in Managerment 在对应平台下勾选 OpenXR

在对应平台下勾选 OpenXR

-> OpenXR 进入子菜单OpenXR,添加将使用的设备的预设,并勾选相关特性

添加将使用的设备的预设,并勾选相关特性

然后导入一些示例场景和预制体:

例如 XRTK 下的: Starter Assets, XR Device Simulator, Hands Interaction Demo

与 XR Hands 下的:HandVisualizer

在Project窗口中搜索 Complete XR Origin Hands Set Up,并将此预制体放入场景中,即可以运行场景查看效果。手和控制器的切换追随设备,并能实时体现在游戏中。 某些版本的XR组件下可能出现切换时Editor暂停,可以尝试更新组件。

将此预制体放入场景中

Access Hand Data

Refer to:Access hand data

有时候我们希望除了一些回调外,能获得手部更详实的位姿数据, 以实现网络同步等等更多的功能。

我们可以订阅 XRHandSubsystem,并获取数据,例如:

1
2
3
4
5
6
7
8
9
10
11
12
13
14
15
16
17
18
19
20
21
22
23
24
25
26
27
28
29
30
31
32
33
34
35
36
37
void Start()
{
XRHandSubsystem m_Subsystem =
XRGeneralSettings.Instance?
.Manager?
.activeLoader?
.GetLoadedSubsystem<XRHandSubsystem>();

if (m_Subsystem != null)
m_Subsystem.updatedHands += OnHandUpdate;
}

void OnHandUpdate(XRHandSubsystem subsystem,
XRHandSubsystem.UpdateSuccessFlags updateSuccessFlags,
XRHandSubsystem.UpdateType updateType)
{
switch (updateType)
{
case XRHandSubsystem.UpdateType.Dynamic:
// Update game logic that uses hand data
break;
case XRHandSubsystem.UpdateType.BeforeRender:
for (var i = XRHandJointID.BeginMarker.ToIndex();
i < XRHandJointID.EndMarker.ToIndex();
i++)
{
var trackingData = subsystem.rightHand .GetJoint(XRHandJointIDUtility.FromIndex(i));

if (trackingData.TryGetPose(out Pose pose))
{
// displayTransform is some GameObject's Transform component
Debug.Log($"[{nameof(XRHand)}]Joint{i} : {nameof(Position)} {pose.position} | {nameof(Rotate)} {pose.rotation}");
}
}
break;
}
}

General settings container used to house the instance of the active settings as well as the manager instance used to load the loaders with.

XR Loader abstract class used as a base class for specific provider implementations. Providers should implement subclasses of this to provide specific initialization and management implementations that make sense for their supported scenarios and needs.

此时可以看到,Joint点的数据已被正常获得并打印。

HandVisualizer

HandVisulizer 类控制着手势的渲染,将上述我们获得的Joints的空间位置与旋转翻译成SkinnedMeshRenderer的变化,渲染逻辑可见其OnUpdateHands()方法中,大致通过更新Joint的位置带动蒙皮的变换。

1
2
3
4
5
6
7
8
9
10
11
12
13
14
15
16
17
18
19
20
21
22
23
var originTransform = xrOrigin.Origin.transform;
var originPose = new Pose(originTransform.position, originTransform.rotation);

var wristPose = Pose.identity;
UpdateJoint(debugDrawJoints, velocityType, originPose, hand.GetJoint(XRHandJointID.Wrist), ref wristPose);
UpdateJoint(debugDrawJoints, velocityType, originPose, hand.GetJoint(XRHandJointID.Palm), ref wristPose, false);

for (int fingerIndex = (int)XRHandFingerID.Thumb;
fingerIndex <= (int)XRHandFingerID.Little;
++fingerIndex)
{
var parentPose = wristPose;
var fingerId = (XRHandFingerID)fingerIndex;

int jointIndexBack = fingerId.GetBackJointID().ToIndex();
for (int jointIndex = fingerId.GetFrontJointID().ToIndex();
jointIndex <= jointIndexBack;
++jointIndex)
{
if (m_JointXforms[jointIndex] != null)
UpdateJoint(debugDrawJoints, velocityType, originPose, hand.GetJoint(XRHandJointIDUtility.FromIndex(jointIndex)), ref parentPose);
}
}

Duplicate Hands

复制手部的运动其实也就是复制其骨骼的Transform