Notes of Obi Package

Introduction

Obi is a collection of particle-based physics plugins for Unity. Everything in Obi is made out of small spheres called particles. Particles can interact with each other, affect and be affected by other objects trough the the use of constraints.

Obi 利用Burst编译器获得高性能的物理计算结果,其完全基于处理器运算,因而可以是全平台支持,(除Obi Fluid以外)各个渲染管线通用。

本文将基于Obi 6.X 讨论如何使用 Obi Softbody 组件

Setup

导入Obi包,不得混杂使用版本不同的Obi assets

可以整个移动/Obi文件夹,或者移除/Obi/Samples文件夹,但是其他的文件不建议修改。

If you’re not using SRPs but the built-in pipeline, it’s safe to delete the /Obi/Resources/ObiMaterials/URP folder. Otherwise Unity will raise an error at build time, stating that it cannot find the URP pipeline installed.

Architecture

Covers Obi’s overall architecture, goes over the role played by all core components (solvers, updaters, and actors) and explains how the simulation works internally.

img

Solvers

Solver 负责进行物理模拟的运算。在 Solver 中提供了一系列可配置的全局物理量与参数,诸如重力(gravity)、惯性尺度(inertia scale)、阻尼(velocity damping)等等。

Each solver will simulate all child actors it finds in its hierarchy, for this it can use multiple backends (Obi 5.5 and up only).

Backends

Backend 是 Solver 使用的物理引擎。推荐使用Burst Backend(这也是默认的Backend),其基于job system与Burst编译器,性能比Oni好。

Obi 5.6起,Obi 能够使用 Burst 编译器来处理物理计算。

Using the Burst backend requires having the following Unity packages installed:

  • Burst 1.3.3 or newer
  • Collections 0.8.0-preview 5 or newer
  • Mathematics 1.0.1 or newer
  • Jobs 0.2.9-preview.15 or newer

以上的包大多数可以在Package Manager中的Unity Registry中找到,但是一些preview的包,若搜索不到,需要手动添加(you may need to manually locate the packages by URL)

如果导入Burst包后,开启项目时其报一些错误,可以看一下项目路径里是否有中文。

Unity 2022.2之后,Job system packages(对应 Jobs 0.2.9-preview.15 or newer)已经安装,不用额外导入。以上包导入正常后,可以看到,Backend 选择 Burst不会有黄色感叹号。
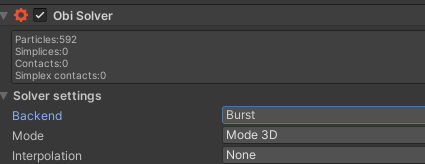
Backend 选择 Burst不会有黄色感叹号

Performance

官方文档中给出了一些需要着重注意的,与性能相关的选项,详见Performance

对于不同的Unity版本,窗口可能会有一些变化。

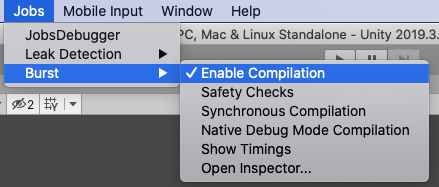
Please note that for normal performance when using the Burst backend in-editor, you must enable Burst compilation and disable the jobs debugger, safety checks and leak detection.
img

img

Also, keep in mind that Burst uses asynchronous compilation in the editor by default. This means that the first few frames of simulation will be noticeably slower, as Burst is still compiling jobs while the scene runs. You can enable synchronous compilation in the Jobs->Burst menu, this will force Burst to compile all jobs before entering play mode.

Updaters

ObiUpdater 是一个在特定时间点上推动一个或者多个Solver模拟运算的组件。

A ObiUpdater is a component that advances the simulation of one or more solvers at a certain point during execution.

一般来说,我们会想让Solver的模拟和其他在FixedUpdate()中的物理模拟保持同步。有时也可能为了一些效果希望放在skeletal animation之后,即LateUpdate()中。甚至。我们会希望自己决定何时Update来自Solver的模拟。

一般来说,一个场景中应当使用仅仅使用一个Updater。若如此做,所有在此Updater中的Solver可以合理地拆分任务,从而并行执行模拟。Obi允许一个场景中使用多个Updater,但是需要注意的是, 一个solver必须只能被一个updater引用,否则将导致此solver一帧内被update多次,导致不稳定的结果。

一个没有被任何Updater管理的solver,将不会update它的模拟。

Obi Fixed Updater

此组件将在FixedUpdate()中update模拟。 其会产生最为符合物理的效果,应当在绝大多数时候使用。

在示例场景中,Obi Solver 与 Obi Fixed Updater 挂载在作为父节点的空物体上。Obi Fixed Updater 存了一份此Obi Solver的引用。
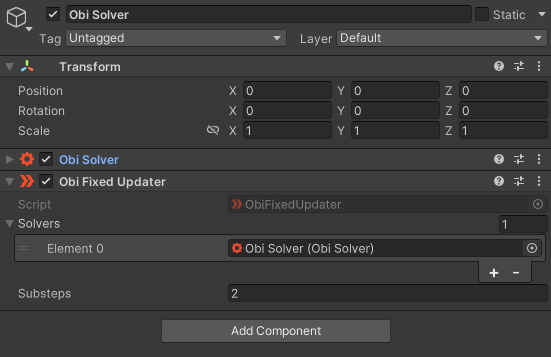
image-20230309192502042

Substeps

Updater 可以将每个物理阶段(physics step)分成更多个子阶段(smaller substeps)。例如,如果Unity的 fixed timestep = 0.02 Substeps = 4,那么每个子阶段将会推进0.02/4 = 0.005 秒的模拟。子阶段越多,结果也就越精确,当然性能也会随之下降。

Collision detection will still be performed only once per step, and amortized during all substeps.

Tweak substeps to control overall simulation precision. Tweak constraint iterations if you want to prioritize certain constraints. For more info, read about Obi’s approach to simulation.

Obi Late Fixed Updater

The late fixed updater will update the simulation after WaitForFixedUpdate(), once FixedUpdate() has been called for all components, and all Animators set to Update Physics have been updated. Use it to update the simulation after animators set to Update Physics have advanced the animation.

在制作布料等等,由角色动画驱动的物理效果时,一般考虑Late Fixed Updater

Obi Late Updater

This updater will advance the simulation during LateUpdate(). This is highly unphysical, as it introduces a variable timestep. Use it only when you cannot update the simulation at a fixed frequency. Sometimes useful for low-quality character clothing, or secondary visual effects that do not require much physical accuracy.

Delta smoothing

This updater will try to minimize the artifacts caused by using a variable timestep by applying a low-pass filter to the delta time. This value controls how aggressive this filtering is. High values will agressively filter the timestep, minimizing the change in delta time over sucessive frames. A value of zero will use the actual time delta for this frame.

ObiActorBlueprint

A blueprint is an asset that stores a bunch of particles and constraints. It does not perform any simulation or rendering by itself. It’s just a data container, not unlike a texture or an audio file. Blueprints are generated from meshes (ObiCloth and ObiSoftbody), curves (ObiRope) or material definitions (ObiFluid).

Actors

布料、绳索、fluid emitter 或者 softbody 的一部分, 都被称为 actors

Actor 接受blueprint(particles and constraints)作为输入。相同的blue print 可以被多个update使用。

Actor 必须作为 solver 的子物体上的组件,这样它才能被模拟包括。在runtime我们可以将一个actor重新放置到一个新的solver下。 At runtime you can reparent an actor to a new solver, or take it out of its current solver’s hierarchy if you want to.

A fluid emitter and a softbody as children of a solver.

一般需要以下步骤来使用Actor

  • Create a blueprint asset of the appropiate type. Generate it, then edit it if needed.
  • Create the actor, and feed it the blueprint.
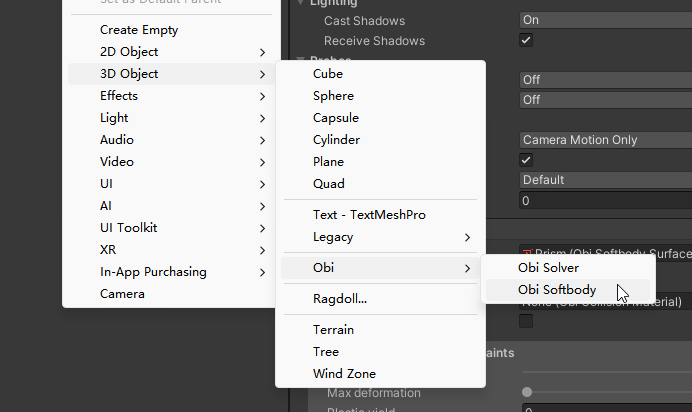
 create actor

当第一次在场景中创建actor时,Obi将会寻找一个ObiSolver的组件来添加此actor。如果找不到一个合适的solver,它会自己创建一个ObiFixedUpdater

每当Actor被添加到一个Solver时:

  • Actor会向Solver请求其蓝图所需的粒子。Solver将会给粒子分配index,一个actor所拥有的粒子的index可能不是连续的。

  • The actor makes a copy of all constraints found in the blueprint, and updates their particle references so that they point to the correct solver array positions.

  • The number of active particles in the solver is updated.

Simulation

官方文档:Simulation

Obi将所有的物理模拟建模为一系列粒子和约束。Particles are freely-moving lumps of matter, and constraints are rules that control their behavior.

每个约束将选取一些点,以及一些“外部”世界中的信息,包括:colliders, rigidbodies, wind。然后约束会改变粒子的位置,使其满足一些给定的条件。

Obi uses a simulation paradigm known as position-based dynamics, or PBD(参考【物理模拟】PBD算法详解) for short. In PBD, forces and velocities have a somewhat secondary role in simulation, and positions are used instead. 每一步后,PBS会根据约束来改变此时的位置,进而也就改变了速度矢量。
img

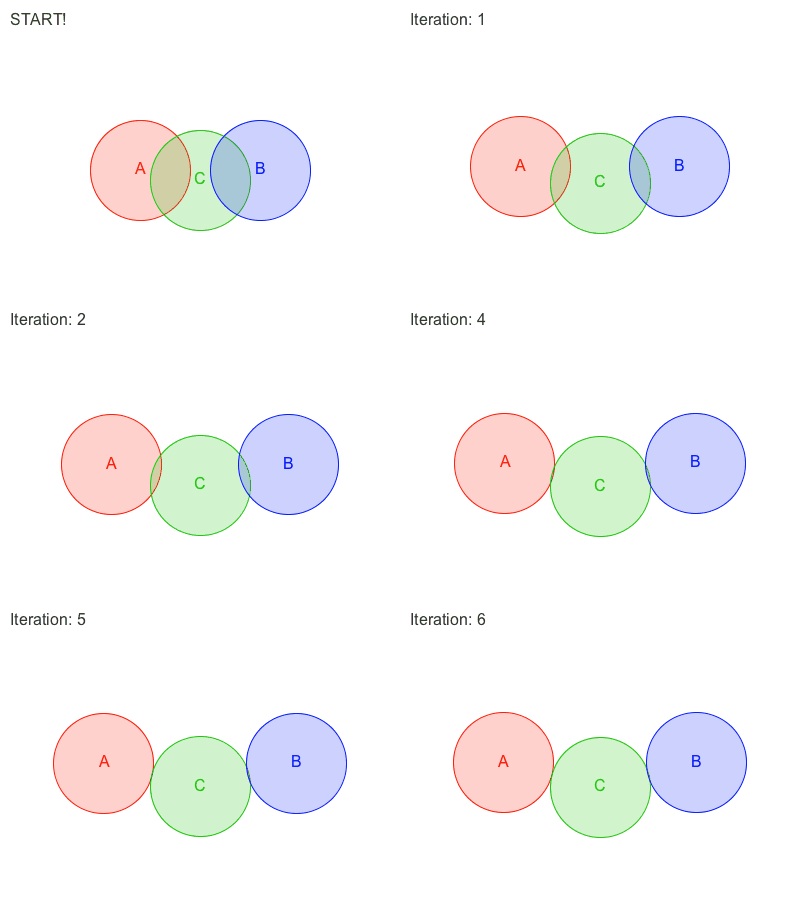
但是一些时候,往往难以找到一个位置满足所有的约束。

Sometimes, enforcing a constraint can violate another, and this makes it difficult to find a new position that satisfies all constraints. Obi will try to find a global solution to all constraints in an iterative fashion. With each iteration, we will get a better solution, closer to satisfying all constraints simultaneously.

Obi 有两种遍历约束的方法:sequential or parallel

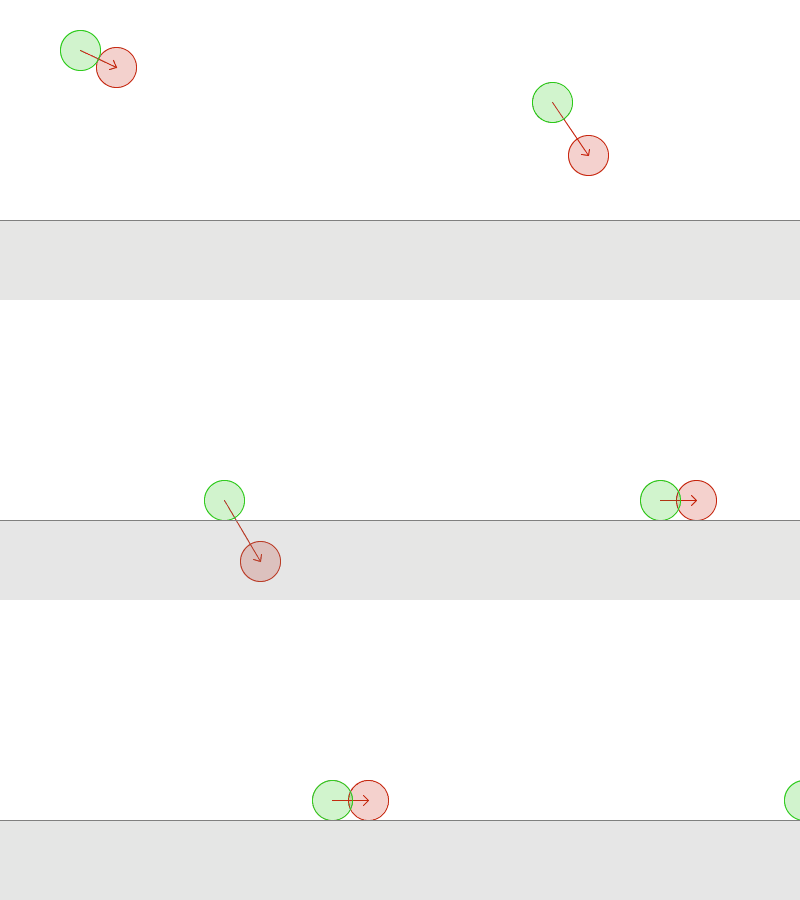
在Sequential模式中, 每个约束都会被考虑在内,并且与每个约束计算所得出的调整,会立刻被应用,然后再接着处理下一个约束。因此,处理约束的顺序会影响最终的结果。

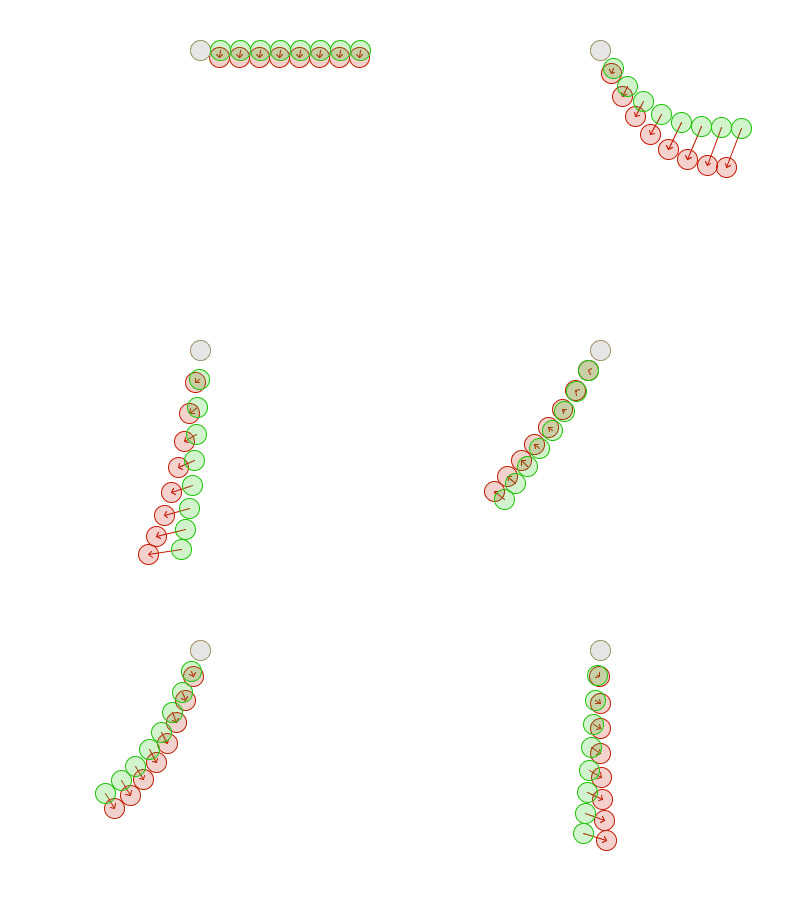
在Parallel模式中,所有的约束都在第一时间根据当前位置计算,在这之后求取各个调整结果的平均值加以应用。因此,怕parallel不用考虑顺序,然而这会减慢解算的时间。
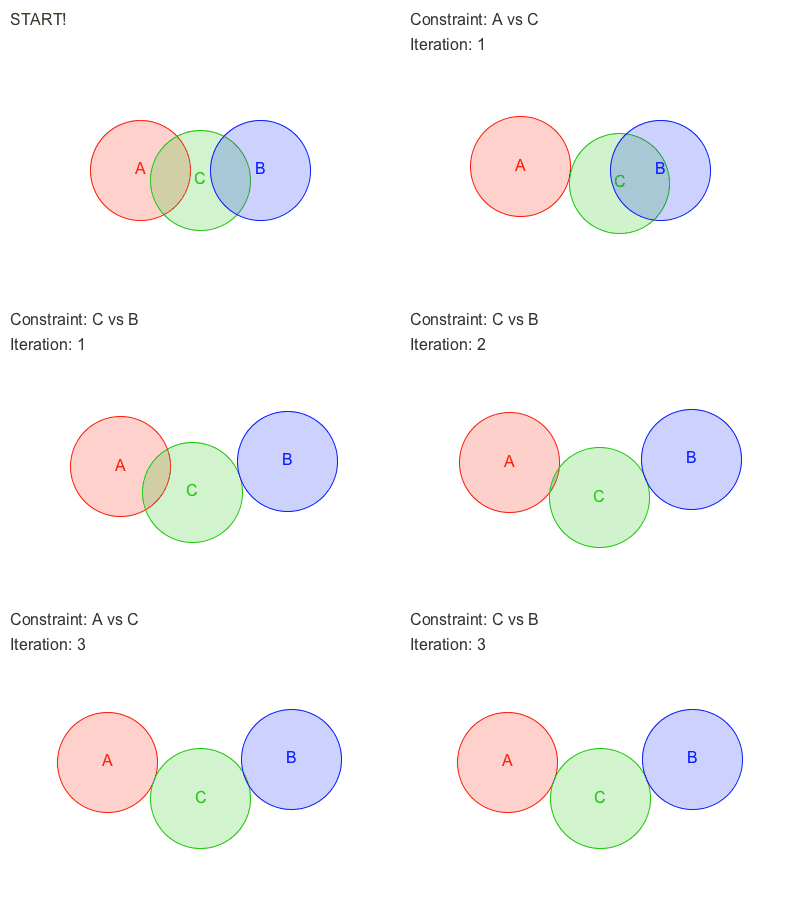
Two collision constraints solved in sequential mode.

Two collision constraints solved in parallel mode. Note it takes 6 parallel iterations to reach the same result we get with only 3 sequential iterations.

Each additional iteration will get your simulation closer to the ground-truth, but will also slightly erode performance. So the amount of iterations acts as a slider between performance -few iterations- and quality -many iterations-.

An insufficiently high iteration count will almost always manifest as some sort of unwanted softness/stretchiness, depending on which constraints could not be fully satisfied:

  • Stretchy cloth/ropes if distance constraints could not be met.
  • Bouncy, compressible fluid if density constraints could not be met.
  • Weak, soft collisions if collision constraints could not be met, and so on.

对于一些现实中、物理上容易变形的物体,可以索性将其迭代次数调小。
减小timestep size 可以减小(达到物理真实的)迭代循环的次数,当然也会增加消耗,但是增加的消耗比使用多个迭代要少,是划得来的

This can be accomplished either by increasing the amount of substeps in our fixed updater, or decreasing Unity’s fixed timestep (found in ProjectSettings->Time)

Note that reducing the timestep/increasing the amount of substeps also has an associated cost. But for the same cost in performance, the quality improvement you get by reducing the timestep size is greater than you’d get by keeping the same timestep size and using more iterations.

Unlike other engines, Obi allows you to set the amount of iterations spent in each type of constraint individually. Each one will affect the simulation in a different way, depending on what the specific type of constraint does, so you can really fine tune your simulation:

Constraint types

Obi 允许我们为每种约束类型设置其迭代次数。

官方文档详细地给出了各种约束的特性和使用场景:Constraint Types

如果物体is too stretchy or bouncy,可以尝试:

  • Increasing the amount of substeps in the updater.
  • Increasing the amount of constraint iterations.
  • Decreasing Unity’s fixed timestep.
Notes of the calibration of MultivewX_Perception(CalibrateTool)

WHAT IS NEW!!

支持利用数据集文件夹中 calibrations 中的标定数据与 datasetparameters.py 中的 NUM_CAM MAP_HEIGHT MAP_WIDTH OverlapUnitConvert OverlapGridOffset 参数给出其相机姿态和视野范围。

例如,当我们希望为 Wildtrack 数据集产生 Overlap view 时:

在命令行中输入 -view D:\Wildtrack ,注意需保证其calibrations文件夹下有extrinsicintrinsic文件夹(与Wildtrack格式一致)。

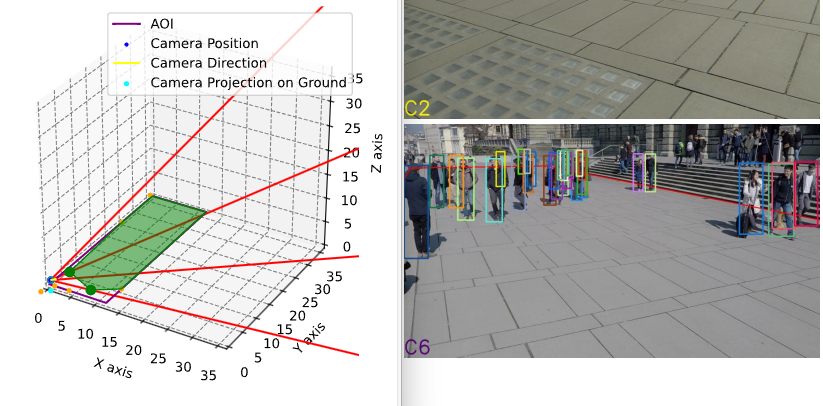
运行可得下列结果。

Camera 6

左图为本工具对 Wildtrack 的结果,右图(有一定变形)为参考

注意:请修改上述的五个参数以符合实际情况,MAP 使用的单位应当与其 calibration 使用的单位相同。Wildtrack 数据集工具声明其网格起点与世界原点并非同处,网格起点为(-300,-90,0)cm,似乎有误。此处使用的是网格起点为(-300,-900,0)cm

Args

MultiviewX_Perception可以接受命令行参数,从而用户可以快速高效地产生数据集。当未接收到相关参数时候,不会启用相关功能。

-a :Annotate and show the bbox on the first frame of each camera or not.

-s :Save the bbox on the first frame of each camera or not.

-k :Keep the remains of Perception dataset or not.

-f :Force calibrate and generate POM, regardless of perception.

-p n: Provide preview for the front n frames. ex. -p 5 will provide 5 frames to preview

-v :Generate Overlap view for the dataset

-view path :Generate Overlap view for the specified dataset, there should be folder calibrations in the given path. ex. -view D:\Wildtrack

例如,当只想借助CalibrateTool进行标定时,可以输入-f,程序会跳过处理percetion数据步骤,也不会进行后续标注的环节。

1
python run_all.py -f

Keep in Mind

CalibrateTool 现在是 WildPerception 的标定部分

Github 项目地址:MultiviewX_WildPerception

欢迎下载示例文件:sample.zip

对于场景:

  1. Unity长度(米)➗ Scaling = OpenCV长度(米)

  2. (Unity点坐标 - Unity中GridOrigin的Unity坐标)➗Scaling , 再交换Unity坐标中的y,z分量,可以得到OpenCV下点坐标。

  3. GridOrigin所在位置是OpenCV下的坐标原点

  4. 棋盘会在黄色辅助正方体内随机生成,辅助正方体的边长等于两倍的tRandomTransform,其中心是chessboardGenerateCenter

  5. 场景中全体markpoint_3dchessboardGenerateCenter的坐标加上一些预设的偏移得到。换言之,场景其实只有一份markpoints_3d,其中心为 chessboardGenerateCenter,均匀分布在水平面上。

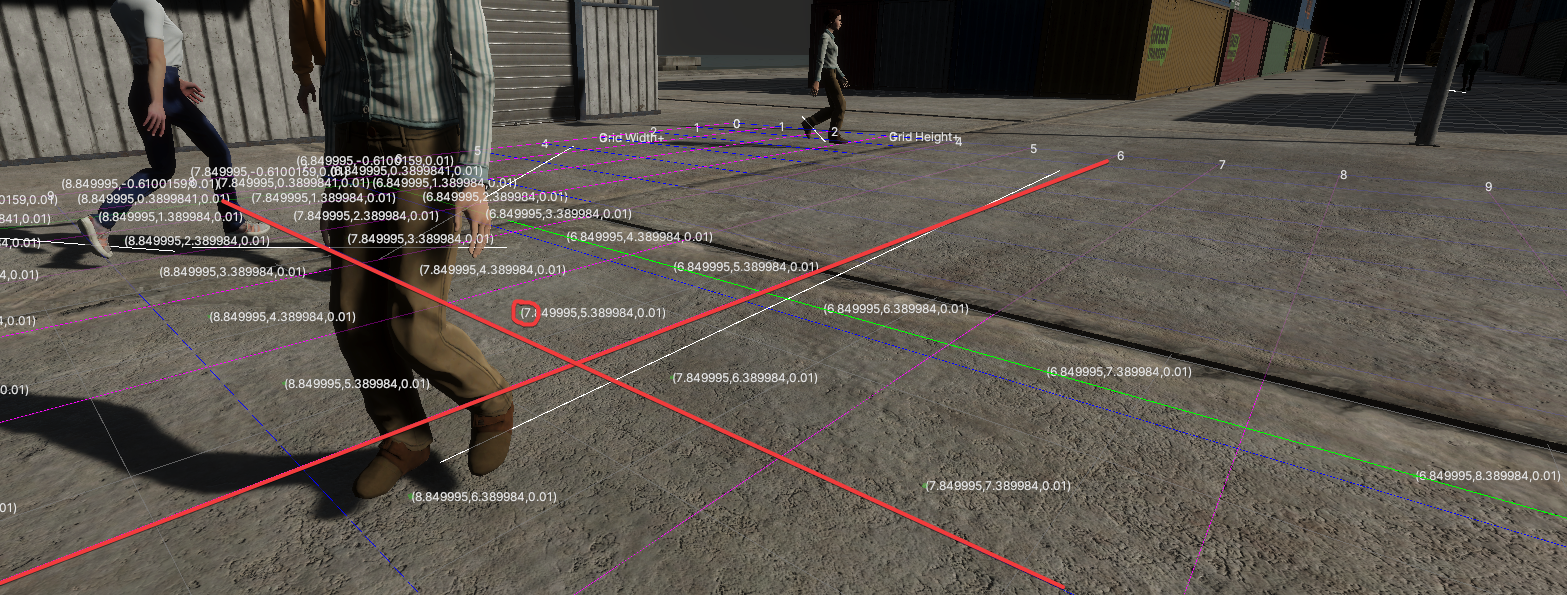
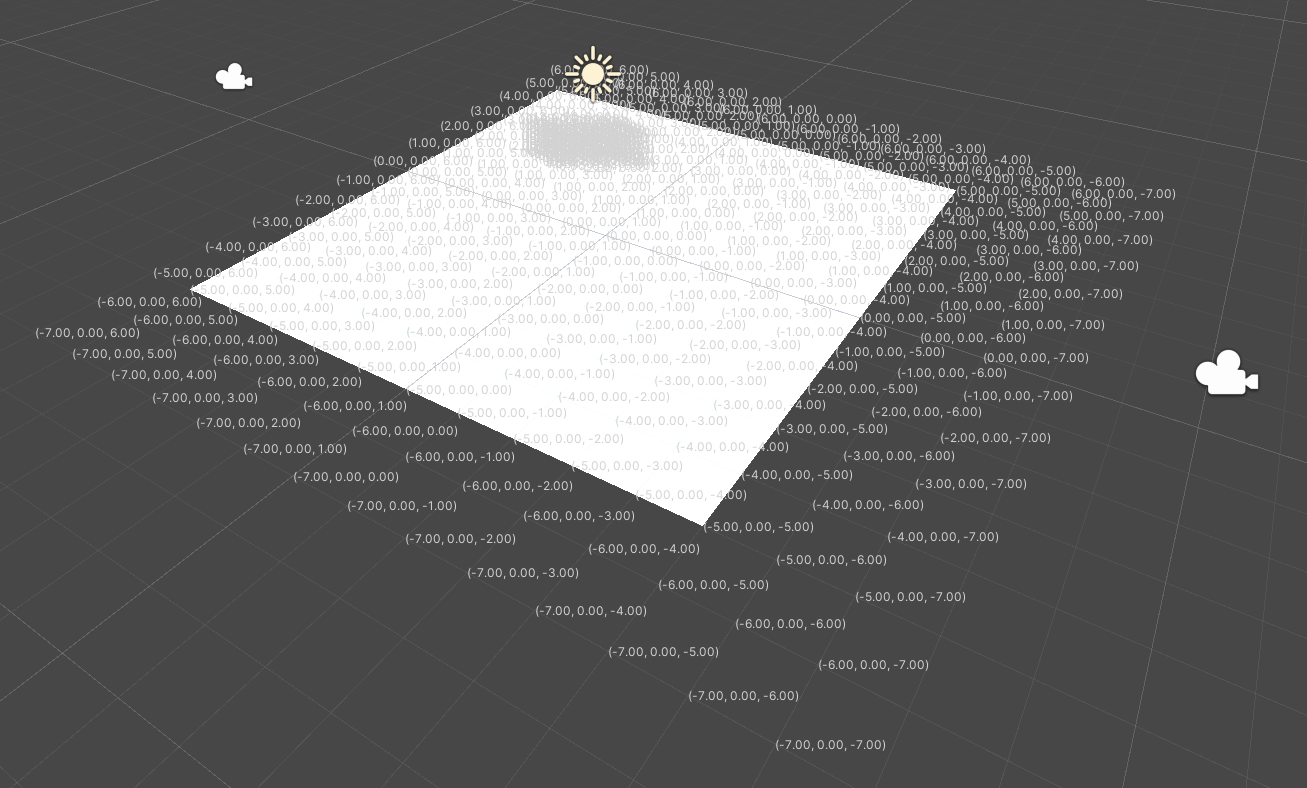
    注意:Grid辅助线上标注的和辅助点markpoint_3d上标注的值已经是OpenCV下此点的坐标。

    如下图:

    image-20230322202441746

对于每个相机:

  1. 既然整个场景公用一份markpoints_3d,为什么每个相机下都有markpoints_3d.txt这么个文件呢?

    因为不是全体markpoint_3d都在此相机的视野范围内,需要针对每个相机进行剔除对应点。每个相机的 markpoints_3d.txtmarkpoints_2d.txt 共同得出了其外参。

  2. 务必保证Game View下的分辨率与CalibrateTool配置的分辨率相同,否则会直接退出运行并报错。

  3. tRandomTransform的选择推荐是,使得黄色辅助正方体大部分在所有相机的视野中。

Introduction

CalibrateTool是一个在Unity3D中为一个或多个相机,产生多个虚拟的不同角度朝向的棋盘格数据且给出待标定相机对应内外参的工具。其生成的虚拟棋盘数据等效于利用OpenCV中cv.findChessboardCorners所产生的结果。同时,CalibrateTool 可以完成一些运行 MultiviewX_Perception 所需要的设置,诸如设置地图大小、地图格点起始位置等。具体使用在 [Work with MultiviewX_Perception](# Work with MultiviewX_Perception) 标题下。

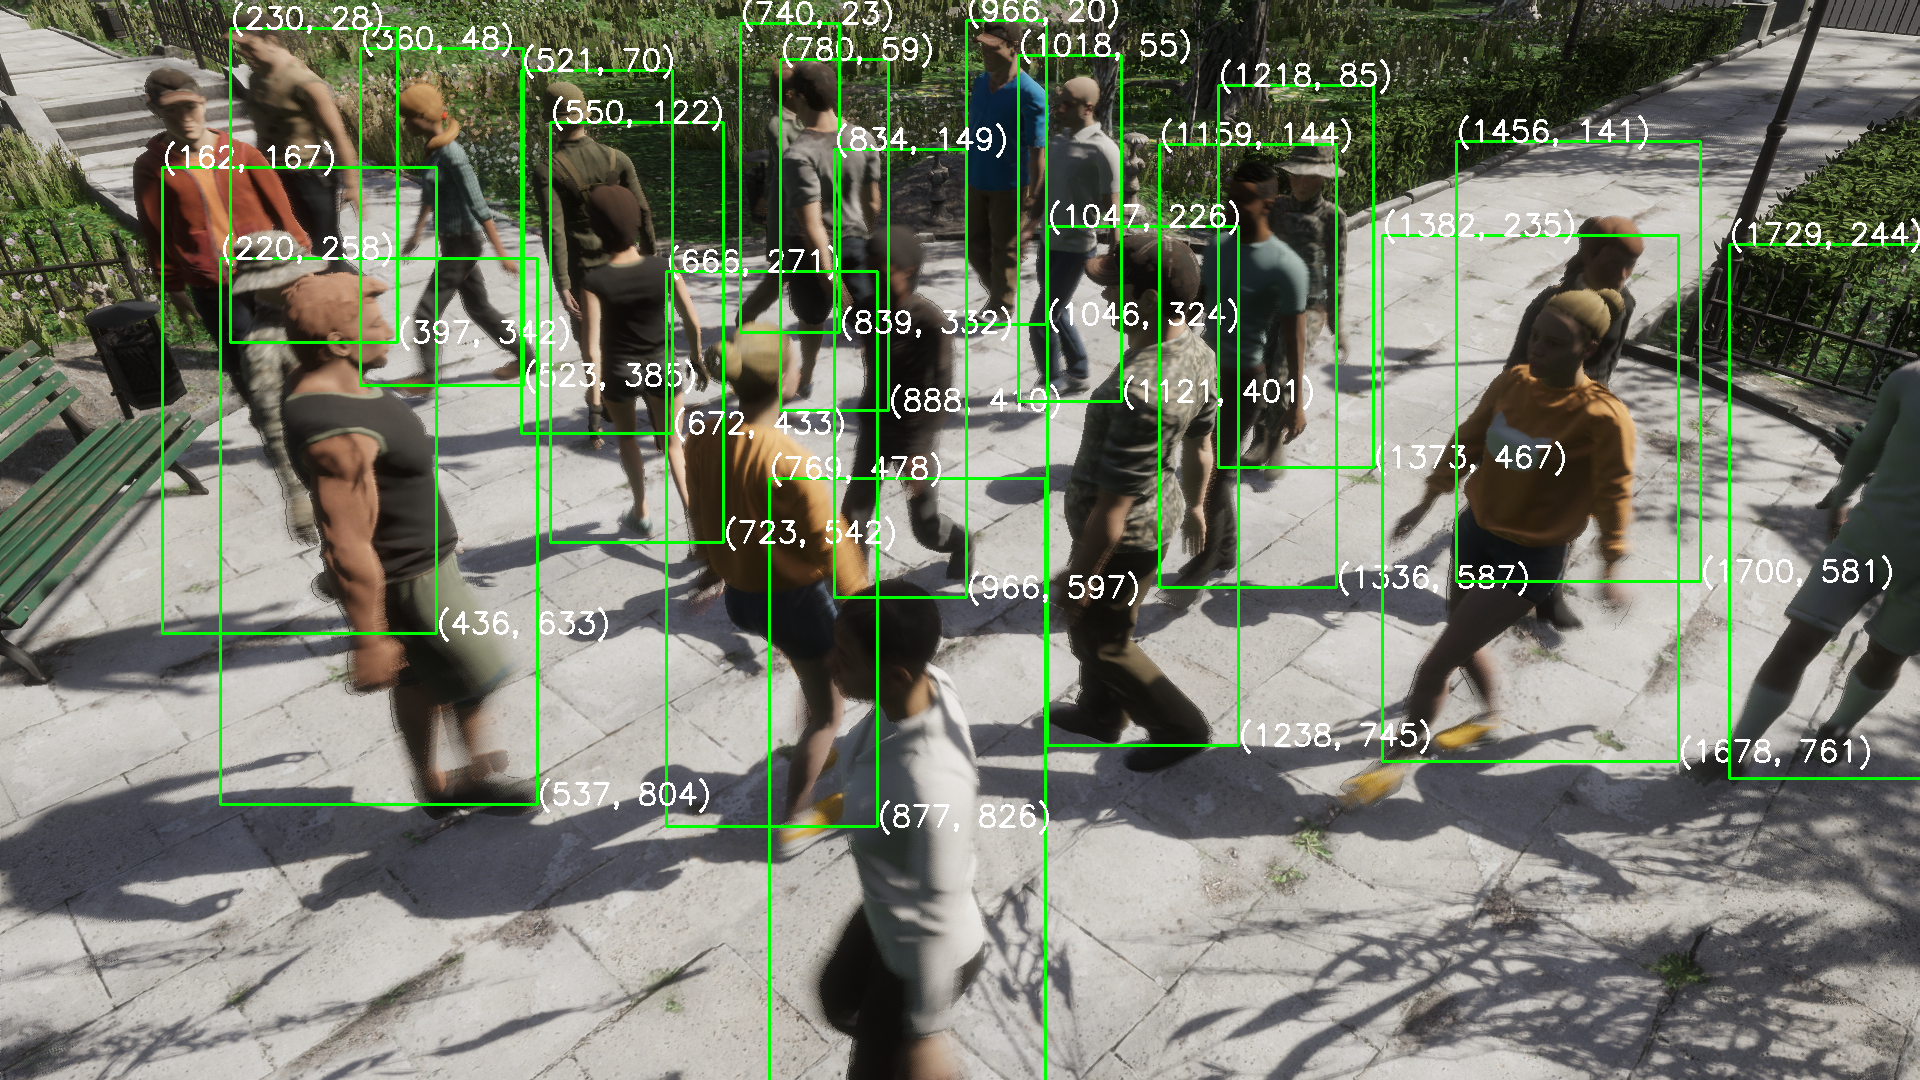
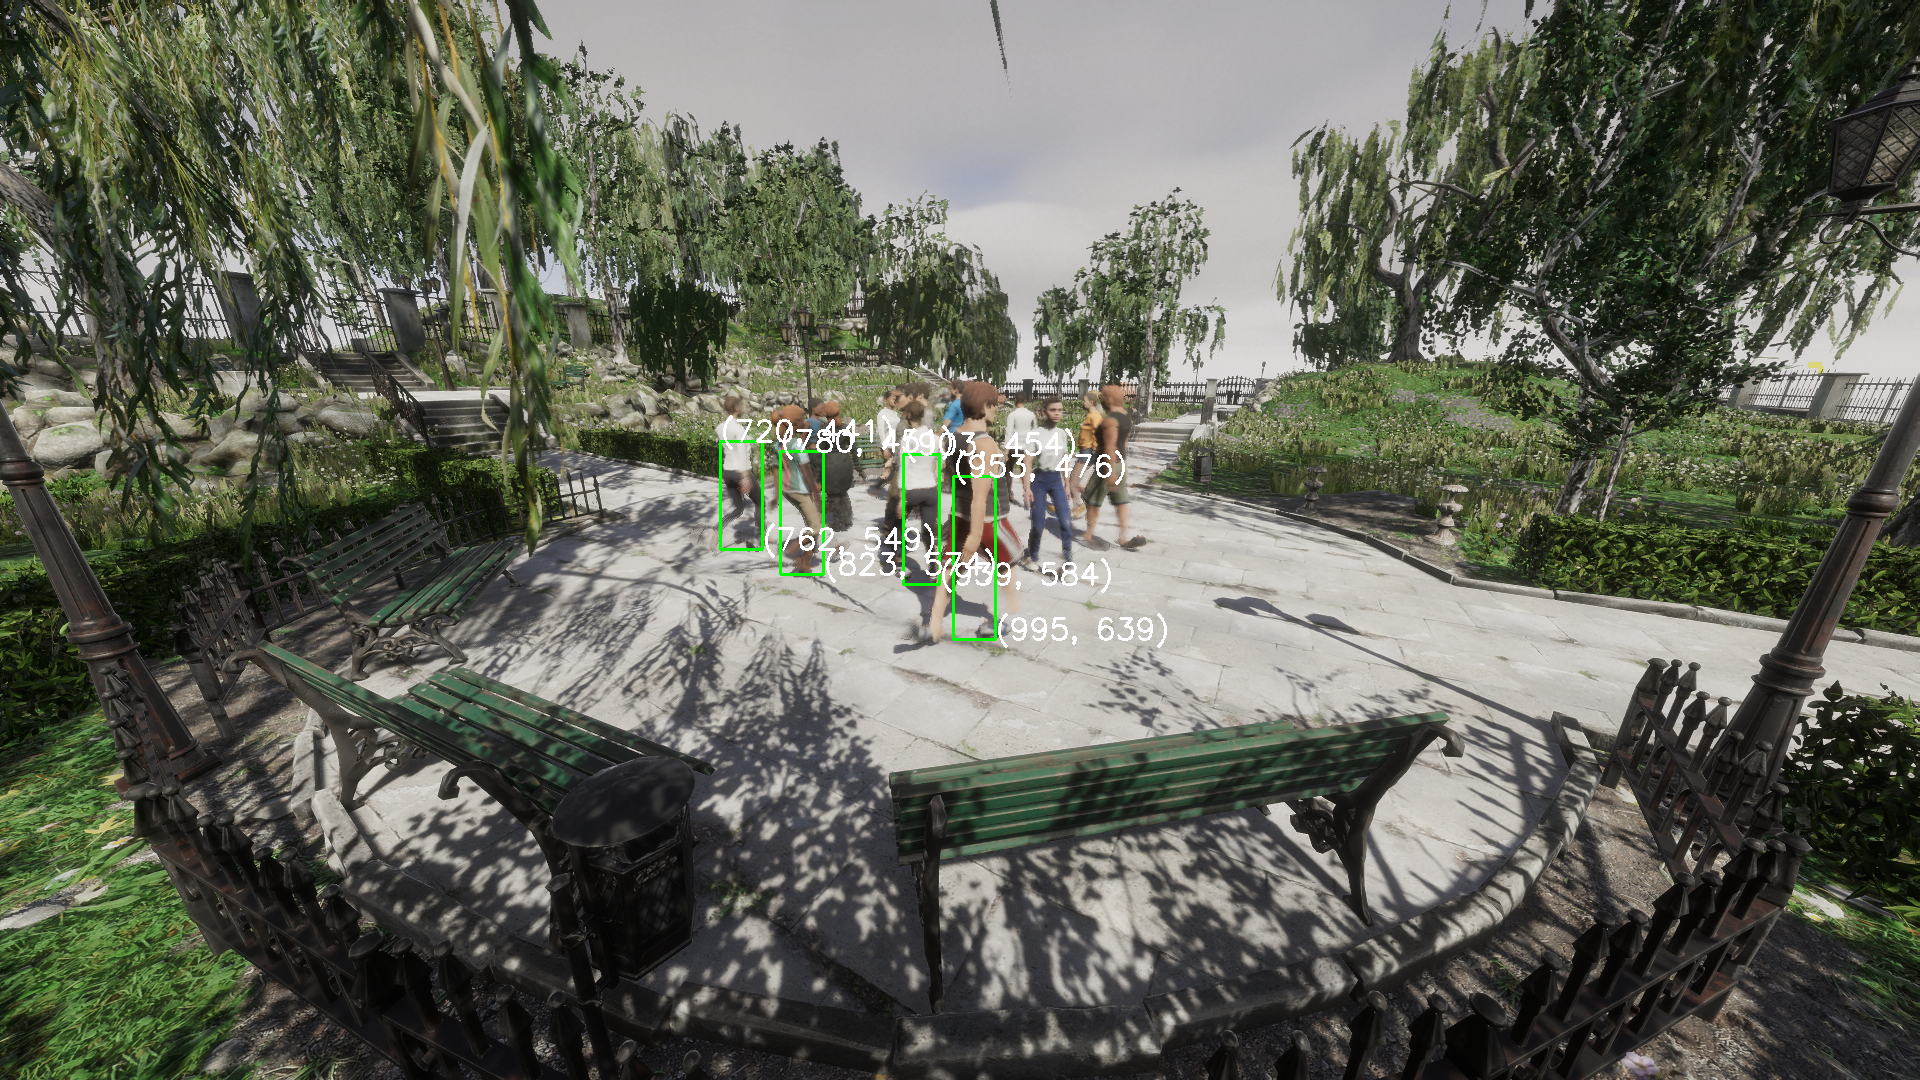
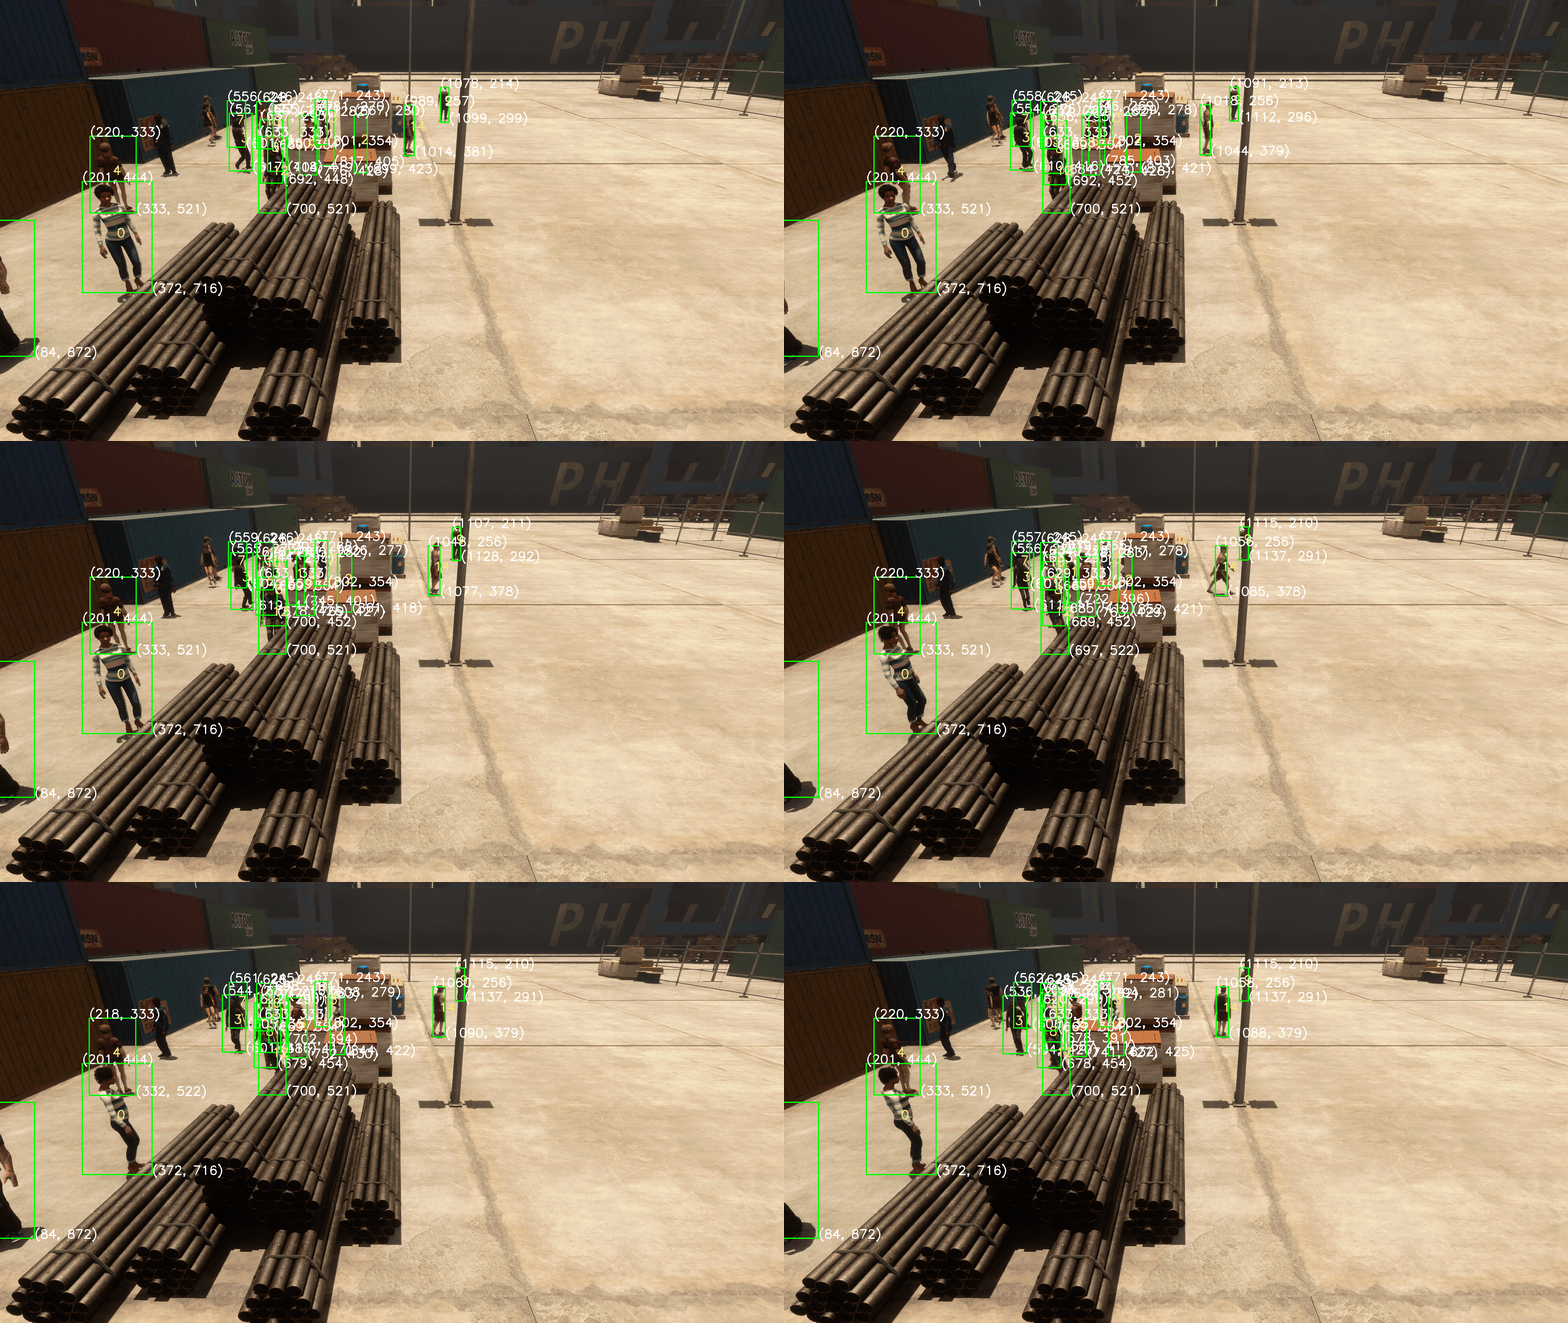
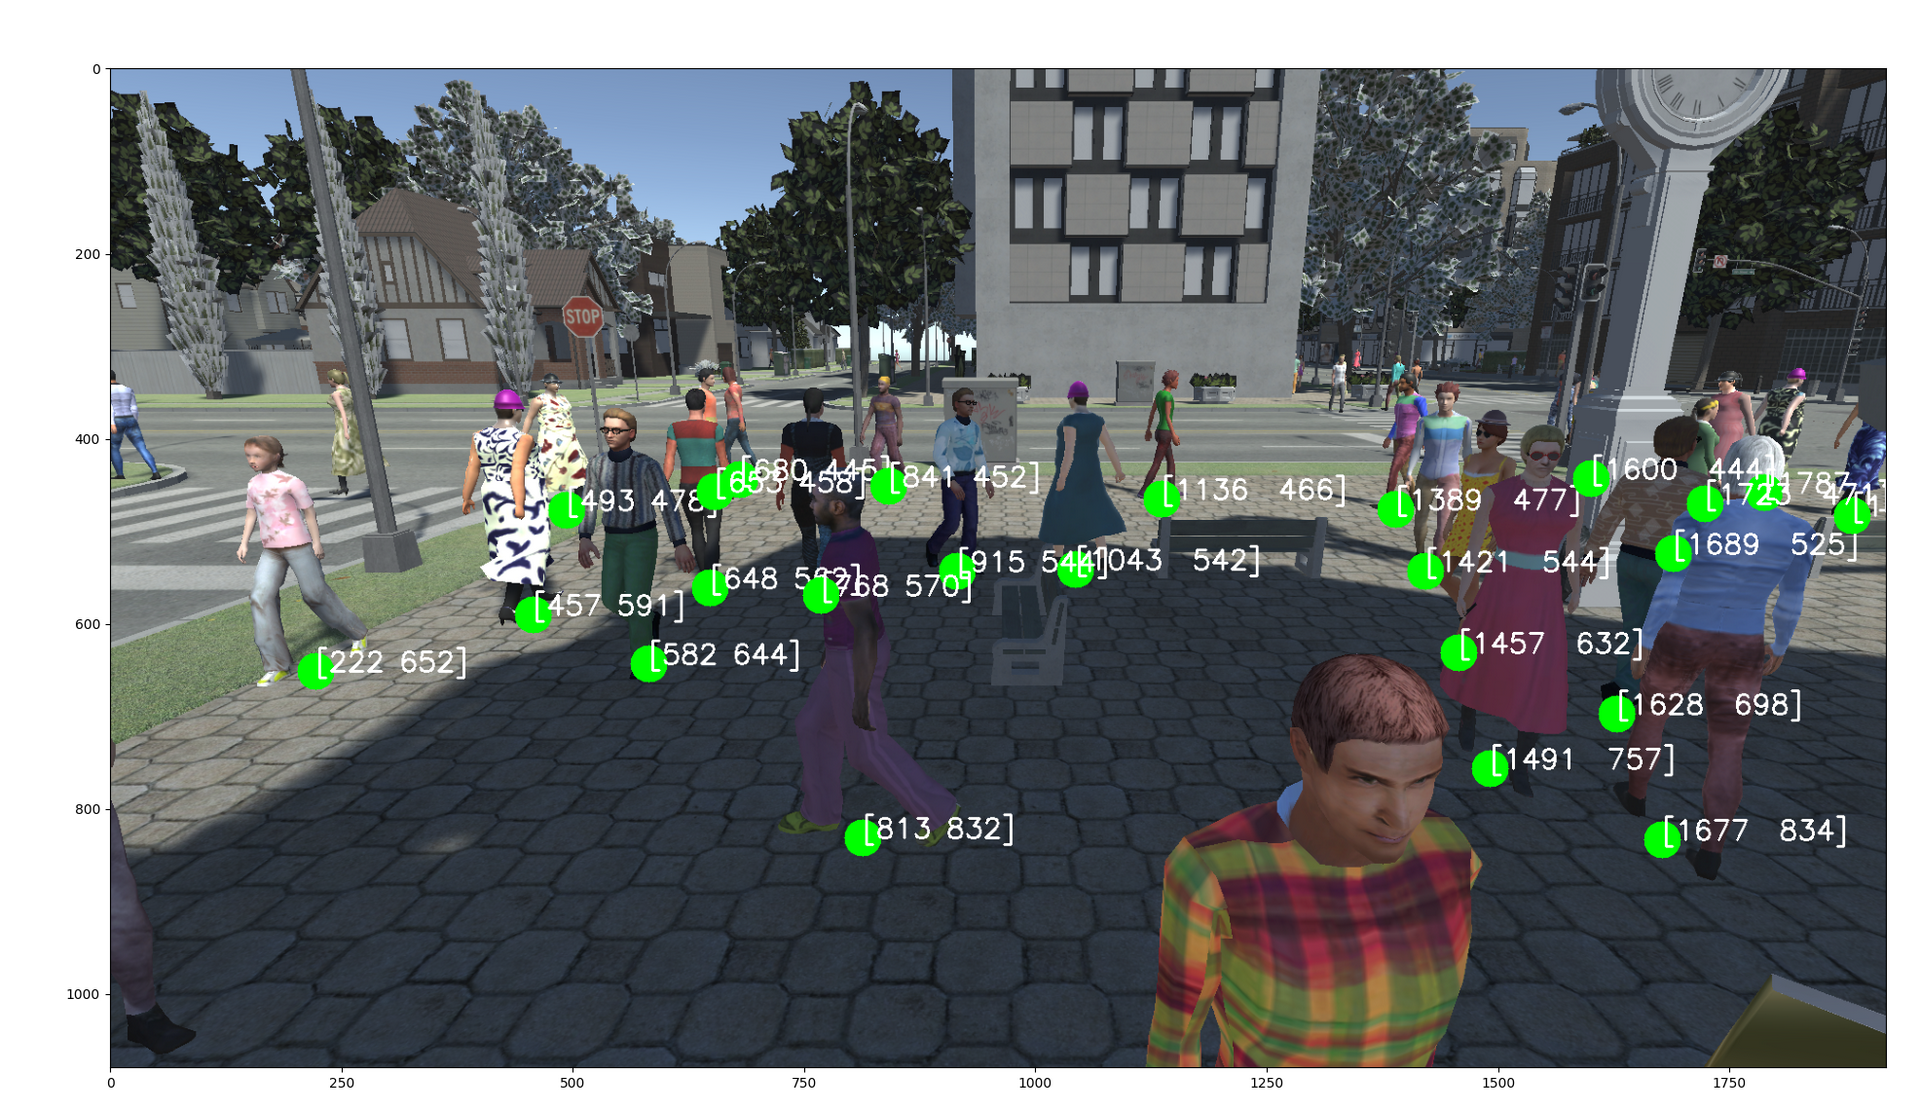
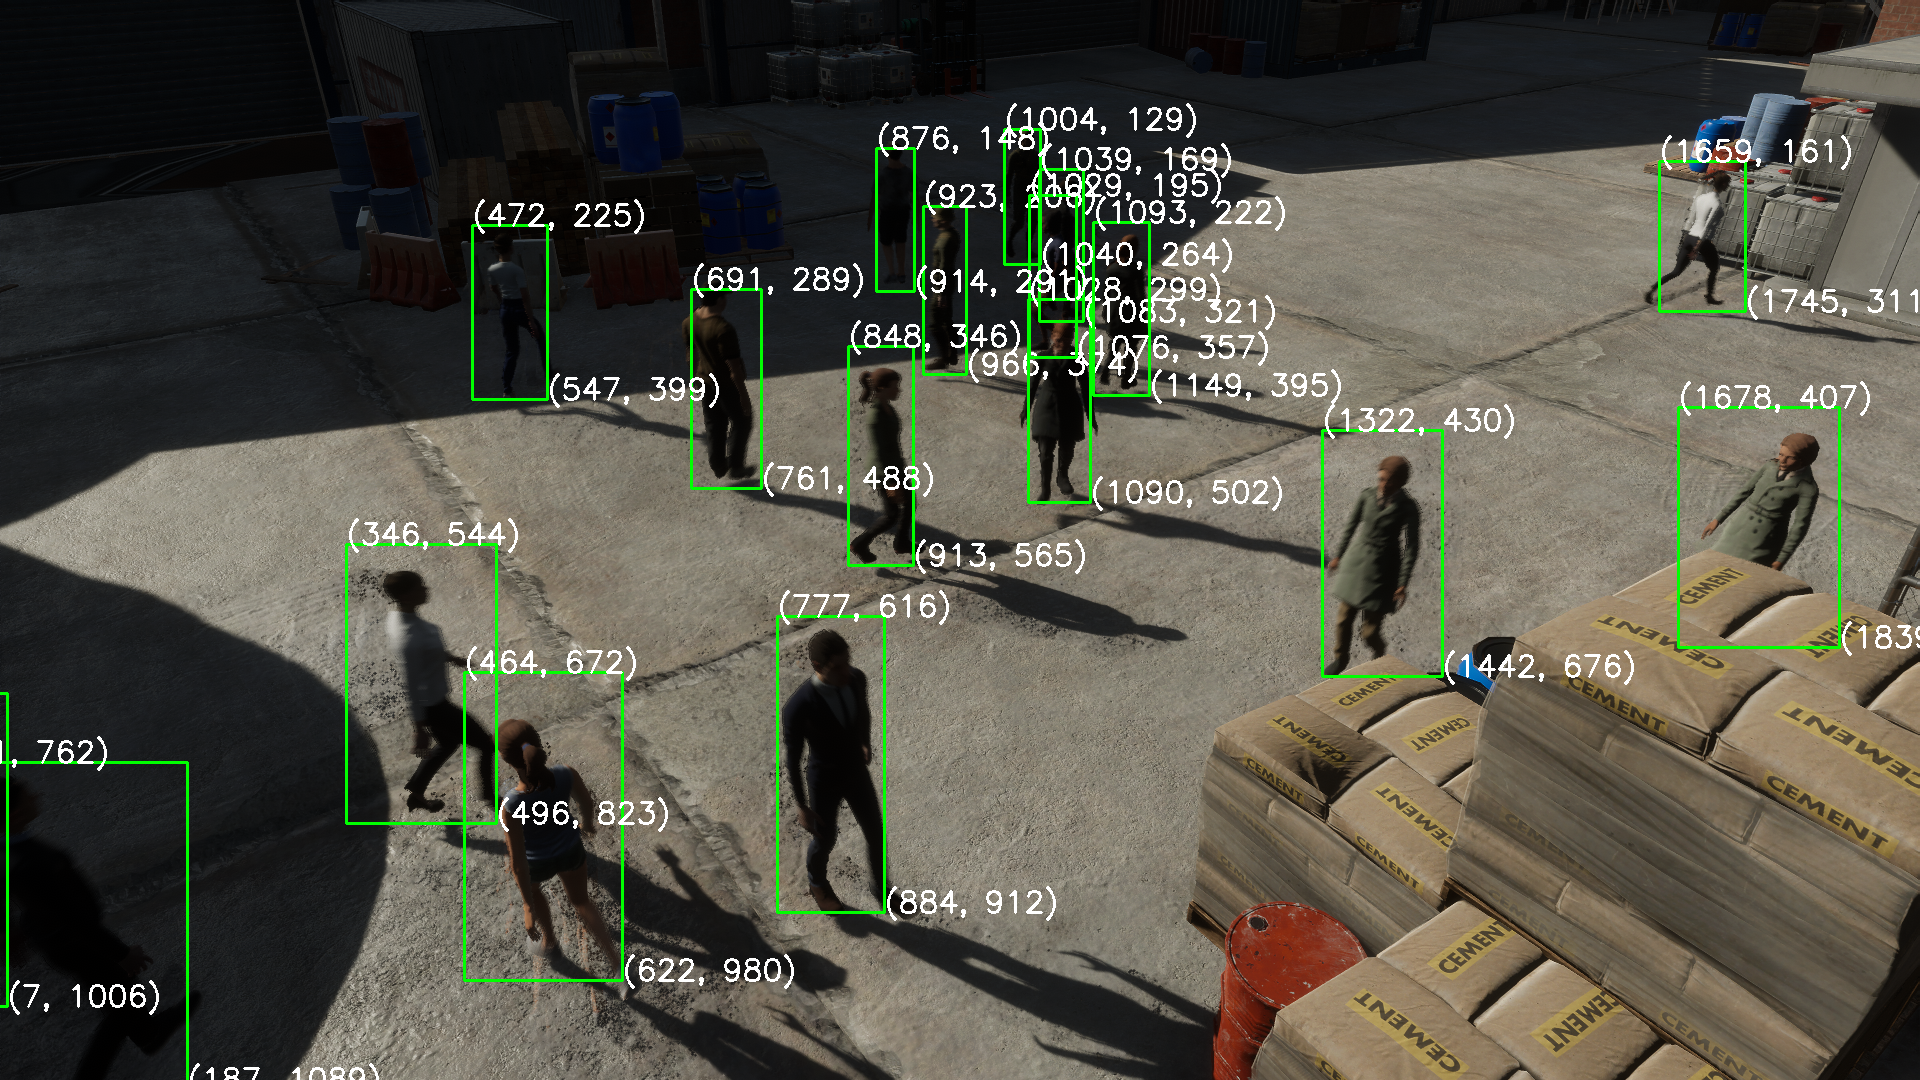
下列图片为标注环节的效果演示,此环节不在CalibrateTool能力范围内,是MultviewX_Perception的后续环节。此处贴上标注的图仅仅用来说明CalibrateTool的缩放、OpenCV坐标系的设置、标定是合理有效的。

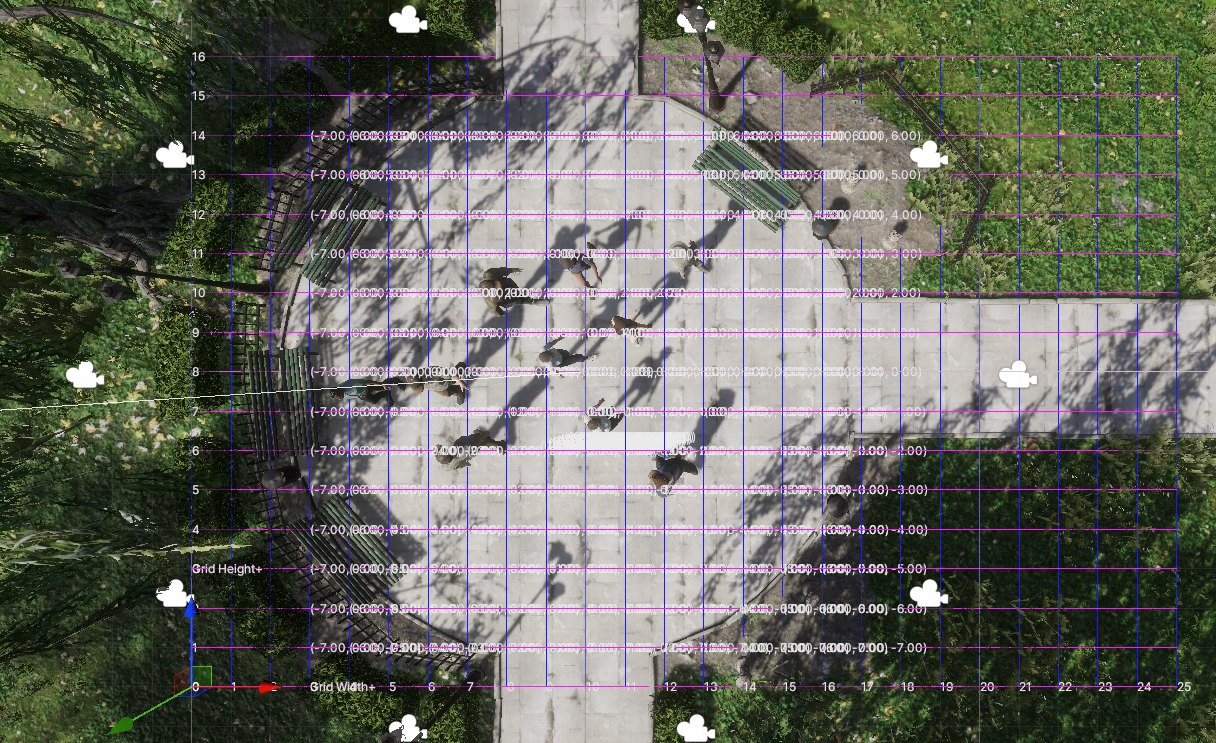
Grid地图

bbox\_cam9

bbox\_cam8

Setup

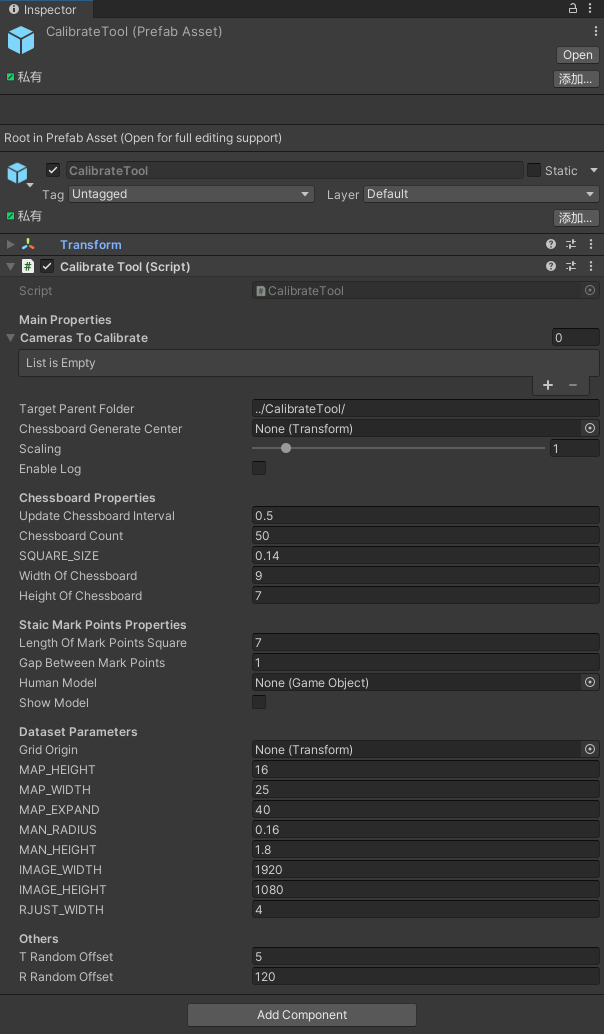
CalibrateTool.unitypackage 是对应的Unity资产,其中包含了一个带有CalibrateTool组件的预制体和组件对应的代码。(面板可能因为版本不同略有出入,推荐总是使用最新的一个版本)

  1. unitypackage包导入完成后,我们可以将 CalibrateTool 拖入到需要标定的场景中:

    检视面板

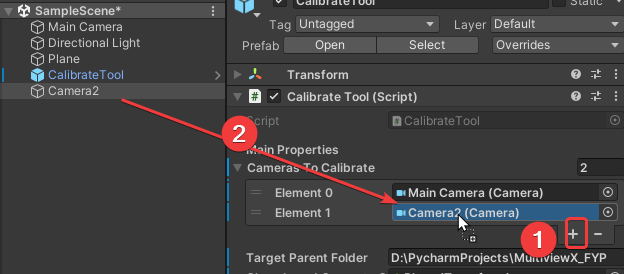
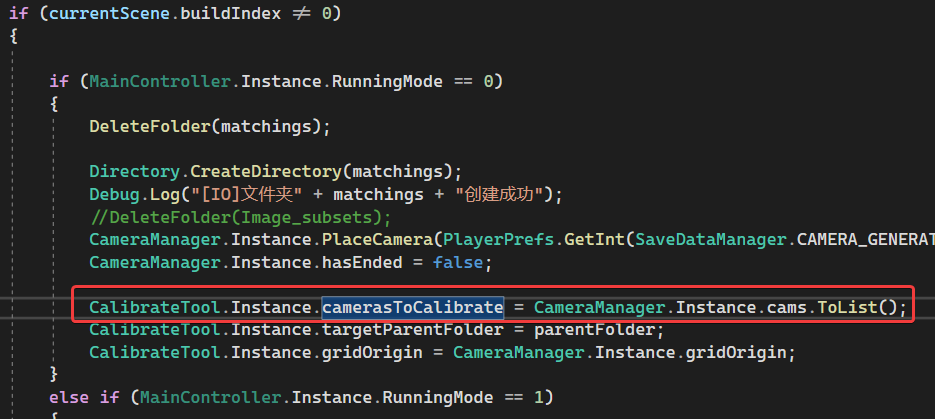
  2. 根据自己项目的情况进行配置,点击加号➕,产生空槽,将场景中需要标定的相机拖入,一个或者多个均可,同时,此字段是公开的,可以利用脚本进行赋值:

    点击➕,拖入待标定相机

    利用脚本进行赋值

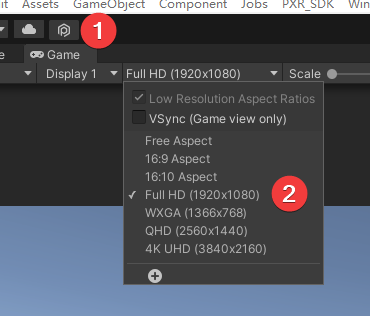
  3. 调整相机分辨率,点击Game,选择一个具体的分辨率,此处以1920*1080为例

    选择一个具体的分辨率

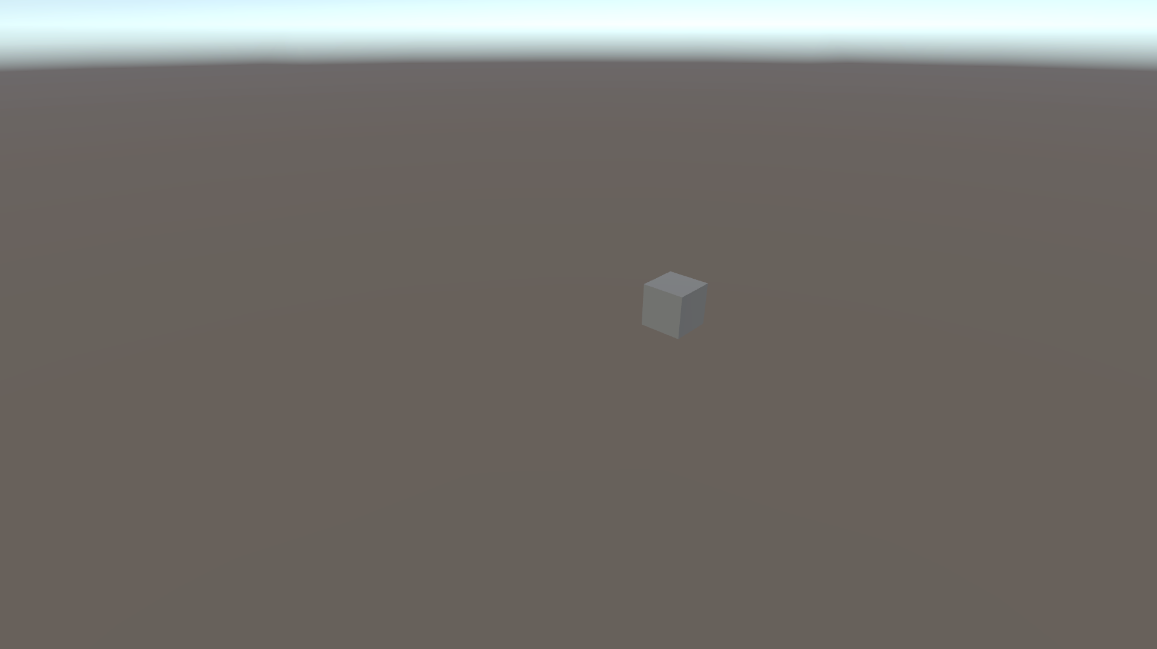
  4. 传入一个Transform,chessboardGenerateCenter,用来指示虚拟棋盘的产生位置,同时也规定了标定参照的水平面,这个 Transform 的位置最好能在所需标定的相机的屏幕中央附近(此处为了演示此位置,创建了一个cube,实际使用中只需要创建一个空物体,传入Transform即可,不必考虑其旋转,将被统一清零):

    位置最好能在所需标定的相机的屏幕中央附近

    传入一个Transform

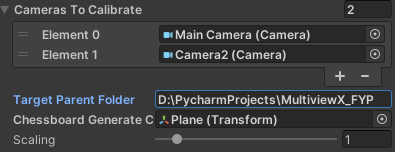
  5. 给定目标文件夹,CalibrateTool会在此文件夹下产生一个 calib 文件夹用来保存数据。一般会填入MultiviewX所在文件夹

    给定目标文件夹

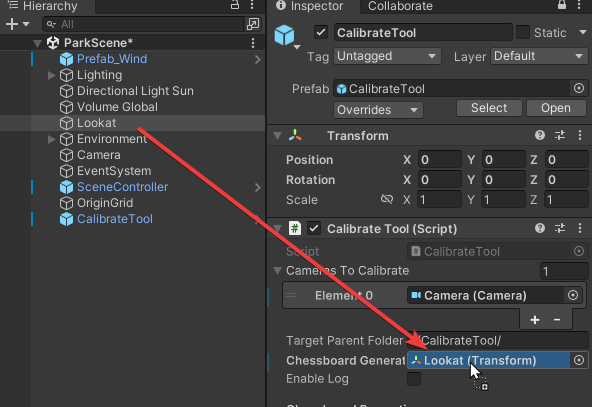
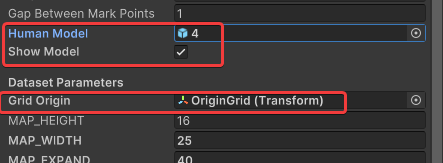
  6. 传入一个Transform,Grid Origin用来指示Grid格点的原点,同时也是OpenCV坐标系(右手坐标系)的原点,为了方便计算,应当将此点设置在标定参照的水平面上(其Unity坐标的Y值应该与chessboardGenerateCenter的Y值相同,我没有测试过不相同会如何)。

    Grid Origin

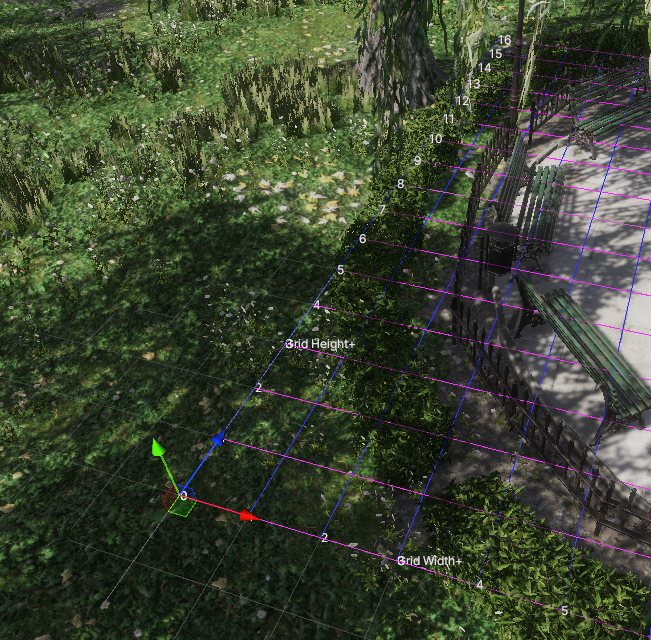
    正确配置后,Scene场景中会产生辅助线。此图中,蓝色箭头指示右手坐标系下Y轴的正反向,红色箭头指示右手坐标系下X轴的正方向

    指示Grid格点的原点

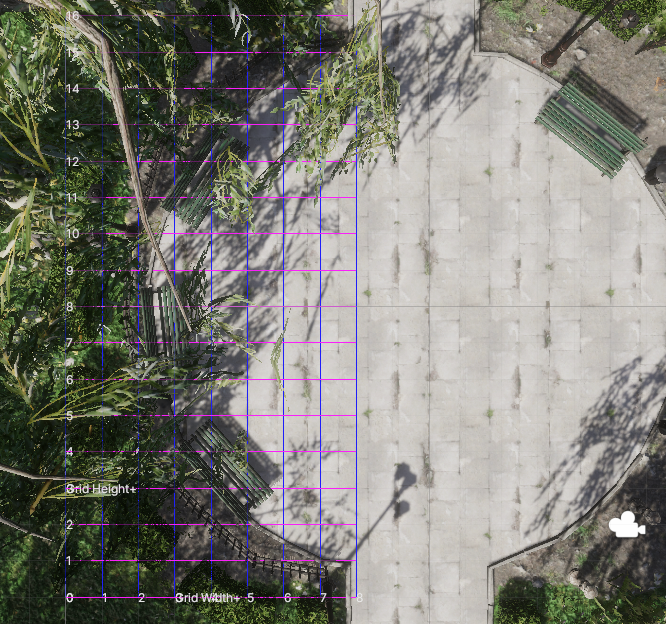
  7. 可以通过调节MAP_HEIGHTMAP_WIDTH 来调节格点图的大小,MultivewX只会标注脚底在格点图中的人。默认值16 与 25 是一个合理的值,一般不需要额外改动。

    例如,当MAP_HEIGHT = 16 ,MAP_WIDTH = 8 时,标注如图:

    MAP\_WIDTH = 8

    bbox\_cam7

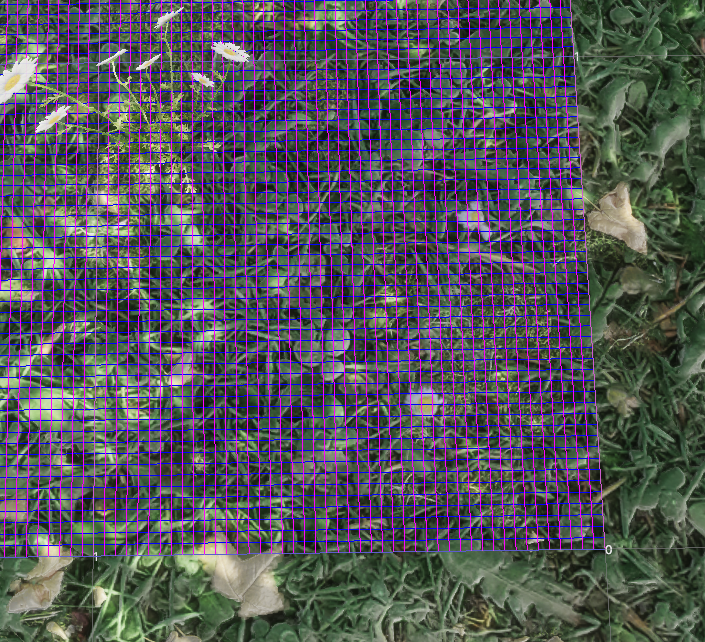
    MAP_EXPAND可以理解成每个边长被额外划分多少份(小刻度),改动此项不会改变地图的大小。

    例如,当MAP_EXPAND = 40 时:

    MAP\_EXPAND = 40

  8. 缩放(Scaling)。很多时候,场景素材的地图尺寸和人物模型尺寸是不一样的,往往会存在人物模型与场景的不协调。 下图展示了这种差异,人物模型看起来很小,成年人看起来身高和儿童一样。

    地图尺寸和人物模型尺寸这就导致用户难以一站式完成CalibrateTool的使用,需要自己手动再去调整人物模型或者场景素材,而往往这种调整还牵扯到matchings(MultiviewX接受的一种输入)的坐标变换,每个人实现matchings的方法都不一样,这里提个醒,坐标变换的顺序必须是: 缩放->旋转->平移

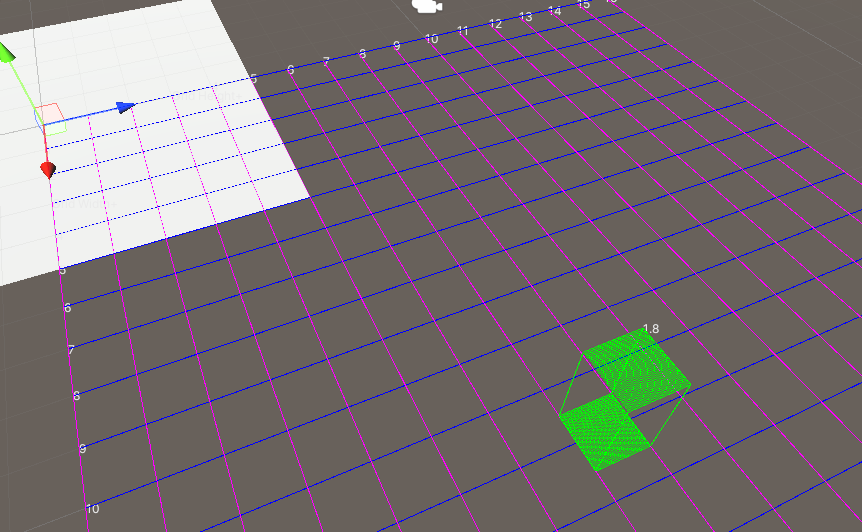
    通过调整Scaling参数,CalibrateTool的辅助线与辅助模型(立方体)可以帮助用户很直观的找到一个合理的缩放值。辅助线的每格的边长为右手坐标系下1米。辅助模型的长宽为MAN_RADIUS*2,高为MAN_HEIGHT

    给与生成辅助线所需引用

    辅助线与模型

  9. 一般情况下,其余参数不需要额外设置。如果Python端报错,可以尝试调大Update Chessboard Interval参数,增加IO读写的时间。

  10. 运行。

Calibrate

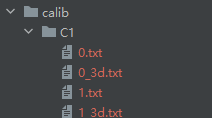
拿到数据后,我们就可以进行标定了,应该会有如下结构:calib文件夹下有 C1 - Cn 子文件夹,每个子文件夹中,有得到的棋盘数据。

image-20230301221916504

运行calibrateCameraByChessboard.py,内外参数分别保存在calibration/intrinsiccalibration/extrinsic中。所输出的外参数(对于每一个虚拟的棋盘,都有一个外参负责对应的变换)为对第一个虚拟棋盘的变换,且生成的第一个虚拟棋盘总是与给定的Chessboard Generate Center同面

虚拟棋盘始终与给定的Chessboard Generate Center同面

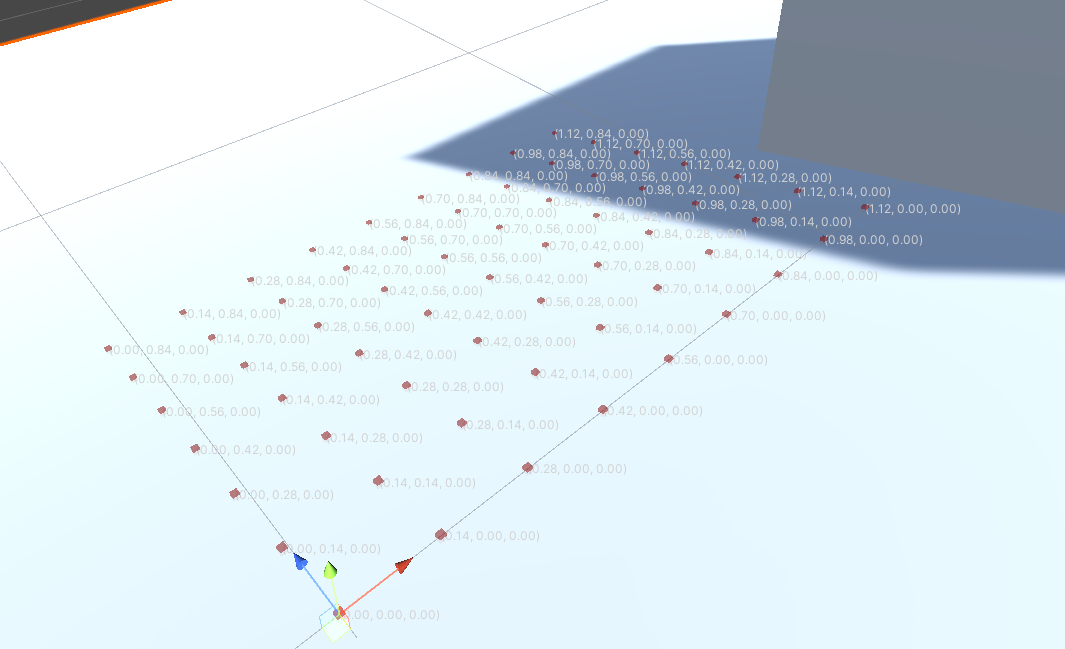
一个疑惑 这种方法中,Python收到的棋盘格的世界坐标是给定的,如上图所示。(0,0,0)总是在左下角 往往在一些相对Chessboard Generate Center物体对称的物体,会有一个很相近的tvec。 因为在单个相机时,相对于该相机描述时,物体总是需要做同样的位移变换。但是在多个相机时,这种描述,依旧是相对单个接受标定的相机。

为了解决上述的疑问,尝试采用了cv2.solvePnP,和一组在待标定(水)平面上的静态的点来得到R与T,目前不支持相对斜面标定外参。

一组在待标定平面上的静态的点

在引入Grid格点的原点的概念时,遇到了一些问题。原思路是直接变换MarkPoints,使得solvePnP ”认识“目标坐标系,但是,经过实验得知,变换MarkPoints时候,应当保证最终被solvePnP获取的(OpenCV中)世界坐标的x,y值,保证其正方向与原 Unity 中x,z正方向保持一致或全部相反。否则会导致后续POM生成失败。猜测是左右手坐标系变换后OpenCV下Y正方向的问题。

Validate

通过参考Unity3d和OpenCV的相机模型左右手坐标系下三维位姿(旋转、平移)的转换旋转向量和旋转矩阵的互相转换 python cv2.Rodrigues()得知,默认的 Unity3D 相机组件是一个理想的针孔相机,其内外参可以通过调用Unity3D给予的相关参数计算得出。

GetNativeCalibrationByMath(),给出了这种方法,其结果基于Unity场景下的世界坐标系。经过比较这两个方法获得的值,误差很小,可以认为CalibrateTool是可以合理利用的。

提供了 vali.py,其利用单应性检验标定结果。

Preview

cam1\_frames

支持动图预览

  • 例如,在命令行中输入 python run_all.py -p 15 ,即可为前15帧生成带标注框的动图预览。

Work with MultiviewX_Perception

请 clone 一份 MultiviewX_Perception,可以参考Notes of MultiviewX_Perception进行后续工作。其将原calibdateCamera.py替换为了calibrateByChessboard.py,添加了一些动态容量的数组以适应不同的摄像头数,支持Scaling缩放,并且datasetParameters将由 CalibrateTool 根据Unity中Inspector面板处的参数自动生成,等等。

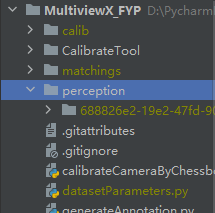
欢迎下载示例文件sample.zip,将其子文件夹calibperceptionmatchings,子文件datasetParameters.py拖入到 MultiviewX_Perception 文件夹下。

黄色字体即拖入的文件

运行run_all.py,参考Notes of MultiviewX_Perception,其给出了一些常用的命令行参数

1
python run_all.py 

当用户仅仅需要标定与生成POM时候(仅仅提供calibdatasetParameters.py),可以输入参数-f:

1
python run_all.py -f 

如果遇到WinError 32 报错,请检查是否有相关程序正在使用.pom,在PyCharm中,可能不小心打开了.pom的预览窗口,请关闭。

image-20230325105913670

示例 datasetParameters.py (for Wildtrack):

1
2
3
4
5
6
7
8
9
10
11
12
13
14
15
16
17
18
19
20
21
22
23
24
25
GRID_ORIGIN = [-14.91,-1.51,-5.43]
NUM_CAM = 7
CHESSBOARD_COUNT = 50
MAP_WIDTH = 12
MAP_HEIGHT = 36
MAP_EXPAND = 40
IMAGE_WIDTH = 1280
IMAGE_HEIGHT = 720
MAN_HEIGHT = 1.8
MAN_RADIUS = 0.16
RJUST_WIDTH = 4
Scaling = 1
NUM_FRAMES = 0
DATASET_NAME = ''

# If you are using perception package: this should NOT be 'perception', output path of perception instead
PERCEPTION_PATH = 'D:/Test/WildPerception'

# The following is for -view configure only:

# Define how to convert your unit length to meter, if you are using cm, then 0.01
OverlapUnitConvert = 0.01
# Define how to translate cams to make the world origin and the grid origin is the same
OverlapGridOffset = (3., 9., 0.)

Notes of FEM Simulation of 3D Deformable Solids

Elasticity in three dimensions

Deformation map and deformation gradient

${\pmb{R}^3 = }$ all vectors with 3 real components.

${\pmb{R}^n = }$ all vectors with n real components.

When the object undergoes deformation, every material point $\vec{X}$ is being displaced to a new deformed location which is, by convention, denoted by a lowercase variable $\vec{x}$ The relation between each material point and its deformation function $\vec{\phi} : R^{3} \rightarrow R^{3} $.
$$
\vec{x} = \vec{\phi}(\vec{X})·1
$$
An important physical quantity derived directly from $\vec{\phi}(\vec{X})$, is the deformation gradient tensor ${ \pmb{F} \in \pmb{R^{3\times3}}}$

If we write ${\vec{X} = (X_1,X_2,X_3)^T} or{\vec{X} = (X,Y,Z)^T} $ and ${\vec{\phi}(\vec{X}) = (\vec{\phi_1}(\vec{X}),\vec{\phi_2}(\vec{X}),\vec{\phi_3}(\vec{X}))^T}$

注意是原每一组点根据三个对应关系被分别转换到三个分量上

for the three components of the vector-valued function ${\vec{\phi}}$, the deformation gradient is written as:
$$
\pmb{F}:= \frac{\partial(\phi_1,\phi_2,\phi_3)}{\partial({X_1,X_2,X_3})} = \left( \begin{matrix}\frac{\partial\phi_1}{\partial X_1} & \frac{\partial\phi_1}{\partial X_2} & \frac{\partial\phi_1}{\partial X_3}\
\frac{\partial\phi_2}{\partial X_1} & \frac{\partial\phi_2}{\partial X_2} & \frac{\partial\phi_2}{\partial X_3}\
\frac{\partial\phi_3}{\partial X_1} & \frac{\partial\phi_3}{\partial X_2} & \frac{\partial\phi_3}{\partial X_3}\end{matrix}\right)
$$
or, in index notation ${ F_{ij} = \phi_{i,j} }$ . In simple terms, the deformation gradient measures the amount of change in shape and size of a material body relative to its original configuration. The magnitude of the deformation gradient can be used to determine the amount of deformation or strain that has occurred, and its orientation can be used to determine the direction of deformation.

Note that, in general, $\pmb{F}$ will be spatially varying across ${\Omega}$, which is the volumetric domain occupied by the object. This domain will be referred to as the reference(or undefined configuration)

Strain energy and hyperelasticity

One of the consequences of elastic deformation is the accumulation of potential energy in the deformed body, which is referred to as strain energy ${E[\phi]}$ in the context of deformable solids. It is suggested that the energy is fully determined by the deformation map of a given configuration.

However intuitive, this statement nevertheless reflects a significant hypothesis that led to this formulation: we have assumed that the potential energy associated with a deformed configuration only depends on the final deformed shape, and not on the deformation path over time that brought the body into its current configuration.

The independence of the strain energy on the prior deformation history is a characteristic property of so-called hyperelastic materials. This property of is closely related with the fact that elastic forces of hyperelastic materials are conservative: the total work done by the internal elastic forces in a deformation path depends solely on the initial and final configurations, not the path itself.

Different parts of a deforming body undergo shape changes of different severity. As a consequence, the relation between deformation and strain energy is better defined on a local scale. We achieve that by introducing an energy density function ${\Psi[\phi;\vec{X}]}$ which measures the strain energy per unit undeformed volume on an infinitesimal domain ${dV}$ around the material point $\vec{X}$. We can then obtain the total energy for the deforming body by integrating the energy density function over the entire domain ${\Omega}$:
$$
E[\phi] = \int_\Omega\Psi[\phi;\vec{X}]d\vec{X}
$$

Notes of Unity Perception Package

Setup

Perception 是Unity官方提供的,用以生成计算机视觉相关内容的包。Synthetichumans 是用来快速生成多个人物的资源包。

Perception

通过查阅官方文档完成设置。

  • Click on the plus (+) sign at the top-left corner of the Package Manager window and then choose the option Add package from git URL….
  • 🟢 Action: Enter the address com.unity.perception and click Add.

导入完成,并打开项目后需要更改项目相关设置:

Open Edit -> Project Settings -> Editor, and disable Asynchronous Shader Compilation.

Search for and select the asset named HDRP High Fidelity in your project, and set Lit Shader Mode to Both.

Synthetichumans

通过查阅官方文档完成设置。
因为整个包体积较大,实际采用先Clone后添加的到项目Package列表中的办法。

Add package from disk

在manifest.json中加入以下条目

1
2
"com.unity.cv.synthetichumans": "file:../../com.unity.cv.synthetichumans",
"com.unity.perception": "file:../../com.unity.perception",

Usage

Perception Camera

为相机添加Perception Camera组件,让此相机拥有相关能力。

Camera Labelers & Labeling

对于所需要的ground-truth数据,可以在Camera Labelers中注明。

labeler可以自己创建,Perception 包为我们已经为我们提供了以下常用的labelers:

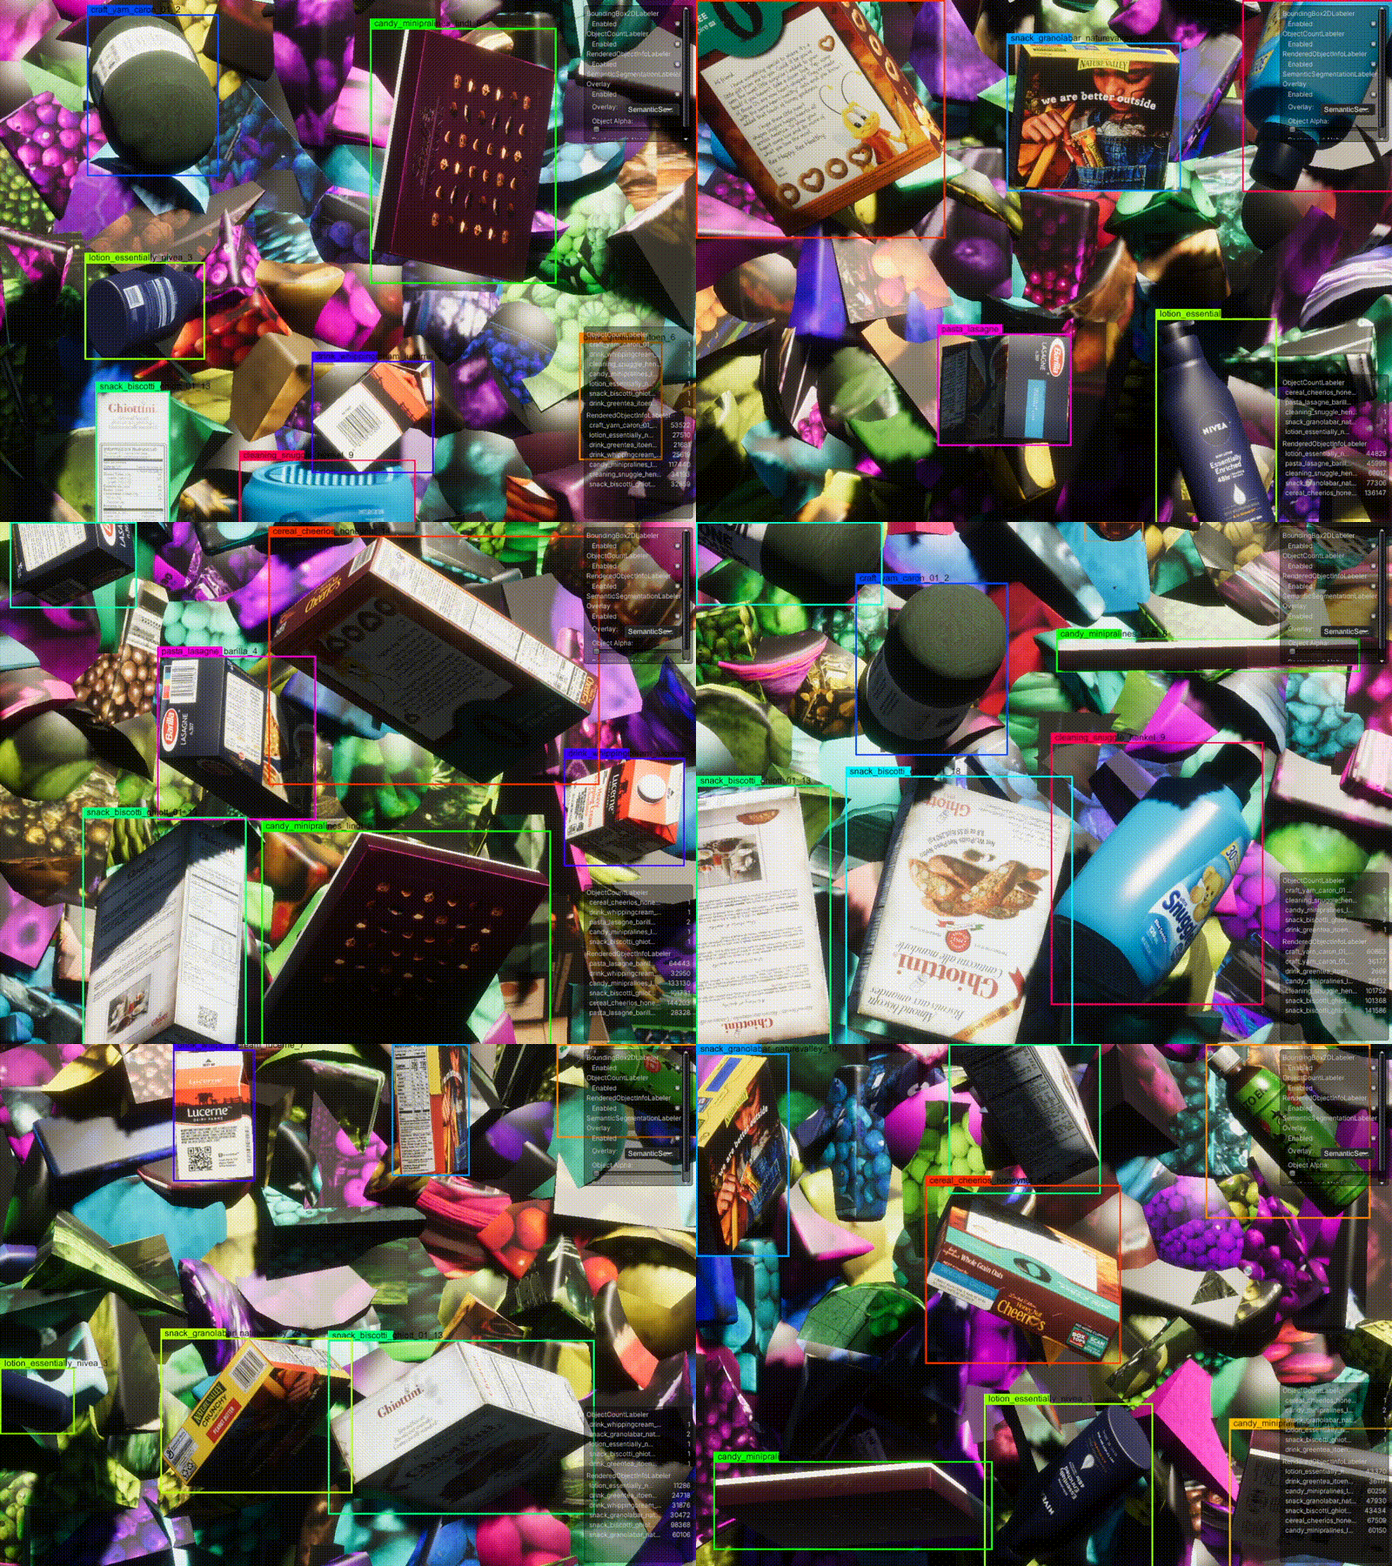
keypoint labeling, 3D bounding boxes, 2D bounding boxes, object counts, object information (pixel counts and ids), instance segmentation, semantic segmentation, occlusion, depth, normals, and more.

对于一些labelers来说,可以在Unity中实时展示。Show Labeler Visulizations打上勾即可

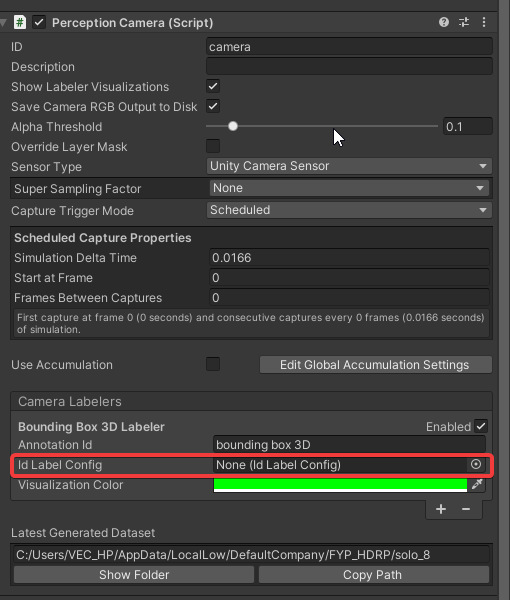
我们需要告诉Perception Camera应该标记哪些物体。例如,我们想生成一个苹果的ground truth,我们就需要告诉Unity场景中的什么是苹果。场景中的苹果,应该带有”苹果“的标签。
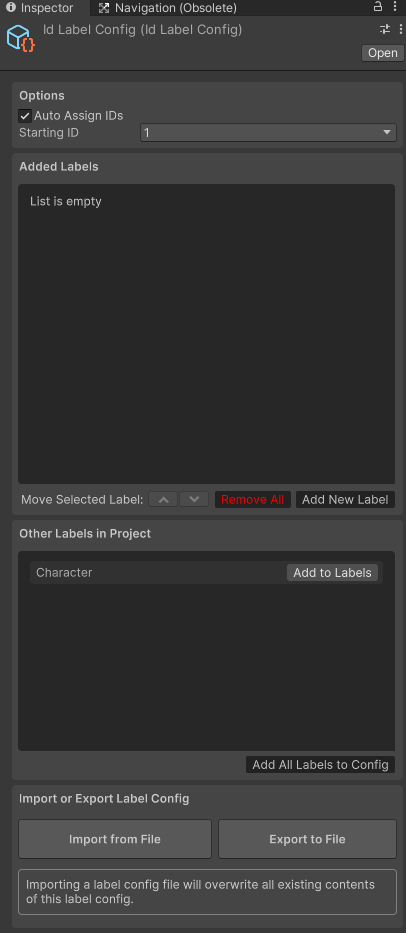
image-20230227201610587 我们可以注意到,Camera Labelers中有ID Label Config字段,这是Perception Camera会去留意的标签的一些配置

创建一个ID Label Config

In the Project tab, right-click the Assets folder, then click Create → Perception → ID Label Config.
image-20230227202819009

我们可以将这个新创建的ID Label Config传给对应的Labeler

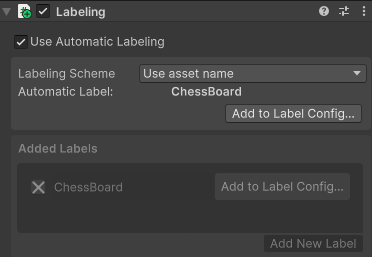
对于我们想要被标注的物体, 我们将为其添加Labeling组件。Labeling 表示此物体将携带一些与对应Label Config相联系的标签。可以看到,此处有Use Automatic Labeling字段,勾选时,将用一些规则(通常是此物体所在的文件夹名或资产名),使得此物体自动携带上标签。不勾选时,我们可以手动选择一些建议的标签,或者新建标签。在随后我们可以点击Add to Label Config将此标签添加到对应的Label Config

image-20230227203553862

每个物体都可以携带多个Labels,这样就可以实现不同的物体可以与不同的Camera Labelers交互。例如,我可以将苹果带上水果和苹果的标签,使得一种只关注水果的Camera Labelers获得信息,一种能够希望区分香蕉和苹果Camera Labelers获得相应的信息

我们可以使用Assets → Perception → Create Prefabs from Selected Models来快速导入.fbx的模型文件

Randomizers

随机器generation1

Inspect Synthetic Data

一般的,数据集将以SOLO的格式(数据的保存结构),通过一下方法,我们可以调节相关的设置

Open the Project Settings window, by selecting the menu Edit → Project Settings. Select Perception from the left panel. This will bring up the Perception Settings pane.

MultiviewX

Introduction

Refer to MultiviewX_FYP for README.

需要指出的是,从原项目hou-yz/MultiviewX(644b90a)上直接clone的项目中的Image_subsets文件夹中的图片有误导性,依据其给出的matchings文件夹中的参数以及calibrate()中的相关代码,正确的图片应该是完整数据集(7.91GB)中的0000.png-0009.png。

下图为使用0000.png-0009.png的结果

967bb58d8c686d90dae7c67d726614b6.png

a784db0dc5b1c8691bbe2cce49ddd273.png

File Structure & Flow Overview

介绍这个项目文件结构与基础运行逻辑

run_all.py

作为程序的入口,运行即可产生结果,其顺序为:

1
2
3
4
5
6
7
8
from calibrateCamera import calibrate
from generatePOM import generate_POM
from generateAnnotation import annotate

if __name__ == '__main__':
calibrate()
generate_POM()
annotate()

首先会运行calibrate()方法,也是本文着重讨论的方法。

datasetParameters.py

记录了数据集的一些参数,包括相机数量,地图宽高等等,其内容为:

1
2
3
4
5
6
7
8
NUM_CAM = 6
MAP_HEIGHT = 16
MAP_WIDTH = 25
MAP_EXPAND = 40
IMAGE_HEIGHT = 1080
IMAGE_WIDTH = 1920
MAN_RADIUS = 0.16
MAN_HEIGHT = 1.8

CX folder

存放了相机X摄取的帧,

matchings folder

matchings 文件夹中给出本程序接受的主要变量,以相机为单位(CameraX.txt,CameraX_3d.txt)进行管理,理解其中各个参数的含义尤为重要。

Refer to Regarding the ground truths for MultiviewX · Issue #7 · hou-yz/MultiviewX · GitHub 可以看到一些对于参数含义的讨论,其内容如下:

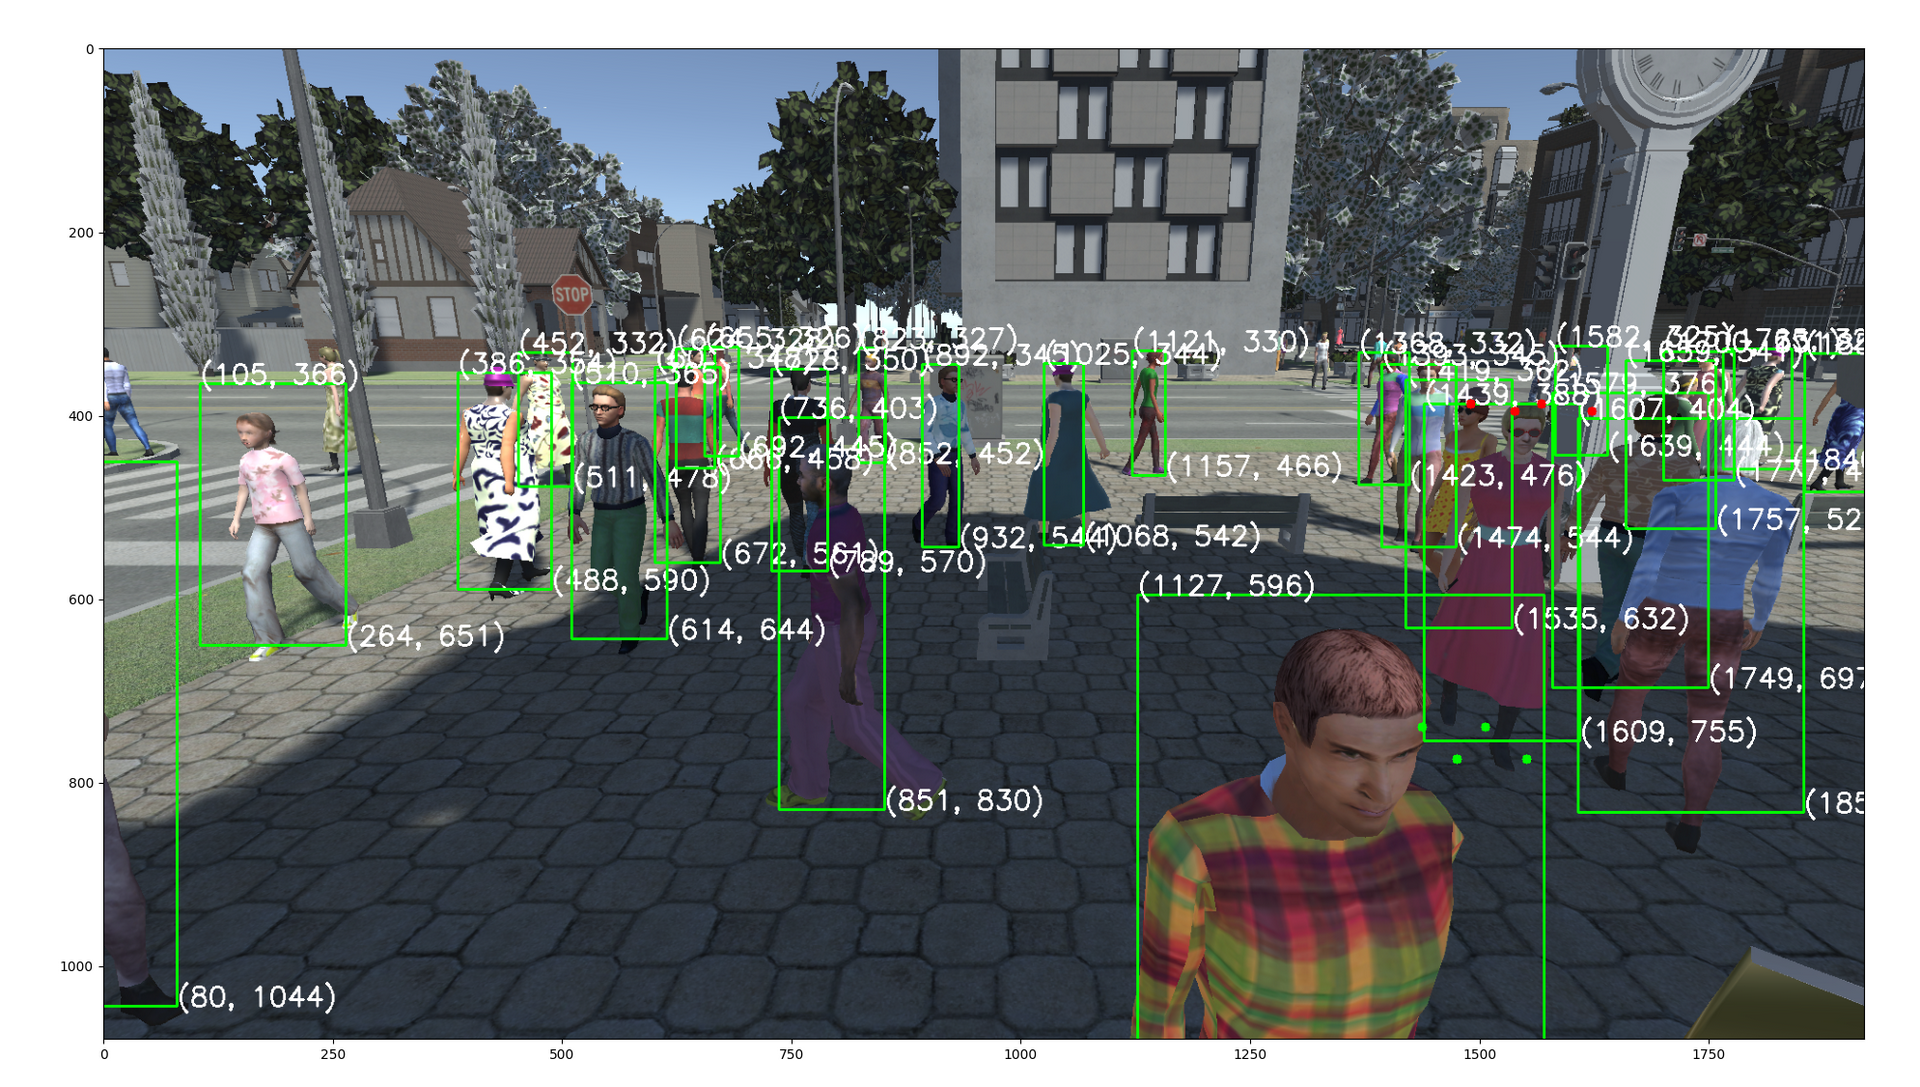
the camera~.txt files provide 3d bounding boxes in both 3d coordinates and their 2d correspondences, both generated from unity.

Just in case anyone needs this for future reference, each row seems to consist of the following.

  • first column: frame number (0~399)
  • second column: person ID (PID)
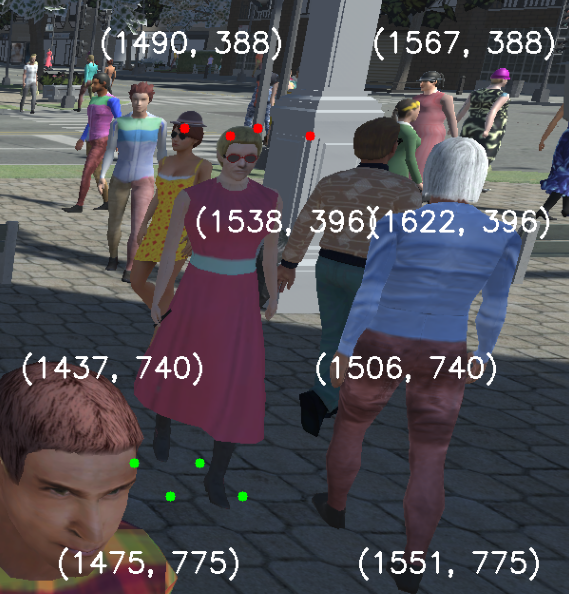
  • third column onward: 3 (or in case of 2D bounding boxes, 2) coordinates for each vertex of the cuboid 3D bounding box and the feet of a person.

CameraX.txt

其中数据如下(为了更为直观的展示,将包围立方盒的16栏参数放在了一栏中,并使用括号包标出点,原数据中均使用空格隔开,并没有括号或者逗号

此数据的坐标系为屏幕空间。

Frame Number Person ID(PID) Cuboid 3D Bounding Box(8 points to define, 16 columns occupied) 脚底点的X坐标 脚底点的Y坐标
0 -190200 (1506.871,740.1227),
(1437.122 ,740.1227),
(1475.729,775.8286),
(1551.121 ,775.8286),
(1567.83,388.0219),
(1490.307,388.0219),
(1538.434, 396.1149),
(1622.993,396.1149)
1491.906 757.2814

367f286364486d2b01c1432d8f50df79.png

CameraX_3d.txt

其中数据如下,可以参照上述CameraX.txt 知晓含义

此数据的坐标系为世界坐标系。

Frame Number Person ID(PID) Cuboid 3D Bounding Box(8 points to define, 16 columns occupied) 脚底点坐标
0 -190200 (9.492622 11.4601144790649 0)
(9.132622 11.4601144790649 0)
(9.132622 11.8201150894165 0)
(9.492622 11.8201150894165 0)
(9.492622 11.4601144790649 1.8)
(9.132622 11.4601144790649 1.8)
(9.132622 11.8201150894165 1.8)
(9.492622 11.8201150894165 1.8)
(9.312622,11.6401147842407,0)

Unity3D(Any CG Tools)

在得到上述变量的相关含义后,就可以在对应的计算机图形学工具中准备数据(给出CameraX.txt,CameraX_3d.txt)了。

任何工具,只要能得出合理的空间坐标,图像上坐标,都是可以接受的。

工具将产出帧,以及此帧中对应的信息。

Introduction

本文中使用的是 Unity3D 2021.3.5f1c1,随后会给出相关的C#代码。思路比较简单,首先是在场景搭建中使用利于观察的方砖,其次是对每一个物体,生成一个3D的包围盒。

综合原GitHub中的项目文件来看,其产生的数据的精度是过高的,导致CameraX.txt,CameraX_3d.txt 略显臃肿。在Python代码中,其砍去了数据中小数部分,并且在标定阶段(calibrateCamera())给予了相应的补偿。

Code Practice

为了更为直观地展现流程,本文随后将关注单帧的信息生成,一些相关的代码可见于FYP_HDRP_Scripts

Bounding Box

首先为模型动态生成BoxCollider,随后获取此BoxCollider的顶点坐标

动态生成BoxCollider

见FYP_HDRP_Scripts

获取顶点坐标

参考# Unity 获取BoxCollider八个点的世界坐标

Introduction to VR Development

Introduction

Virtual reality (VR) is a simulated experience that employs pose tracking and 3D near-eye displays to give the user an immersive feel of a virtual world.

The equipment I am using now is Pico Neo3 based on PICO Unity Integration SDK

对于使用Unity开发, 其 XR Interactioin Toolkit 包已经提供了相当实用强力的脚本与抽象。本文会给出一些踩的坑和常见用法。

Environment:

  1. Unity Editor 2021.3.5f1c1

  2. XR Interaction Toolkit | XR Interaction Toolkit | 2.2.0

  3. Preview Tool provided by Pico Official

Notice

  • 2.2.0中,XRKT提供了一些新的方法与属性, 一些旧版的被标记为弃用。本例中的代码可能有些无法在老版本中实现,但旧版一般也都提供了近似的方法与属性。

  • 推测在使用Preview Tool时(有线连接),尤其是在PC端提示绿标“连接成功” 时,PC端的以太网会连接到一个”NDIS”设备,导致一些暂时的网络异常(无法访问网页)。

Interaction Toolkit

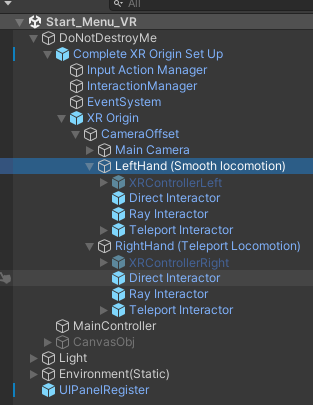
这可以被理解为使用Unity进行XR开发的核心,进行相关的配置后,几乎一切目前的VR设备可以被抽象为Unity的Device。XR Origin管理着这些设备。

在本文的项目中,直接使用了示例场景中的Introduction to VR Development.prefab预制体,其已经配置好了XR Origin,Input Action Manager InteractionManager EventSystem 等等基础的交互组件。

624b6fa1d9d4a945c593557a04b5a698.png

624b6fa1d9d4a945c593557a04b5a698.png

Interactor & Interactable

XRTK提供的主要交互方式为Interactor,可以大致分为

RayInteractor,Direct Interactor,Teleport Interactor三种,分别可以理解为射线交互,近距离的抓取抛掷交互,传送交互。其均继承自XRBaseControllerInteactor

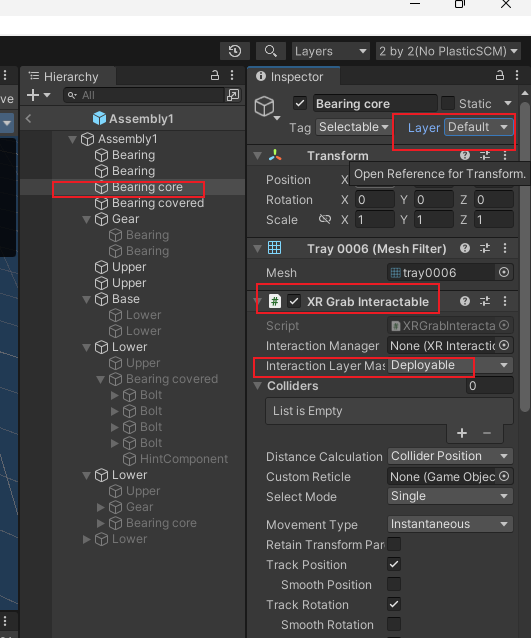
可以被交互的物体需要挂载Interactable组件,并合理配置其Layer与Interaction Layer

Layer & Raycast Mask

即Inspector中右上角的Layer概念,可以控制对射线的遮罩。

Interaction Layer

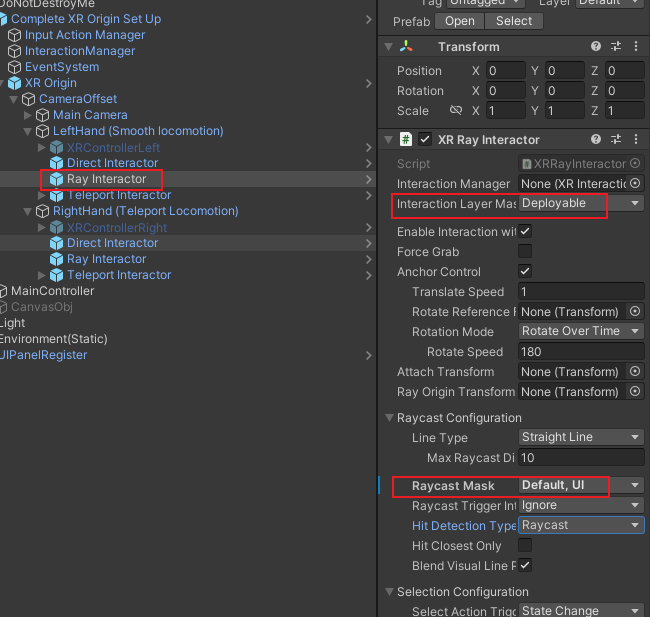
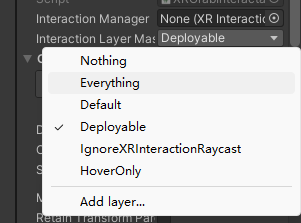
配置Interactor可以交互的层,只有Interactable的Interaction Layer被包括在了Interactor的Interaction Layer中,Interactor才能与之交互。

例如:

CUBE 物体挂载的 Interactable组件中,勾选Interaction Layer为Deployable。并且CUBE的Layer 被囊括在Interactor中的Raycast Configuration -> Raycast Mask 中。

对应RayInteractor中的Interaction Layer囊括了此Deployable,那么CUBE可以被此Interactor交互。

e320974c3f47a8dd692c384abe24a8d8.png

e320974c3f47a8dd692c384abe24a8d8.png

498a2344f6b99fd75cf255dc921c6923.png

498a2344f6b99fd75cf255dc921c6923.png

Events

Interactor 对物体的交互可以抽象为两种类型,即Hover(悬停,待选,摸)Select(选取,拿起,抓起)。每个类型又提供了EnteredExited两个事件。

Development Practice

Assign Interaction Layer

通过代码指定Interaction Layer,在以下情况下,分别代表1 - Default 2 - Deployable

d5223dbaf91397bab58910ed077ae74e.png

d5223dbaf91397bab58910ed077ae74e.png

1
2
XRGrabInteractable xRGrabInteractable = gameObject.GetOrAddComponent<XRGrabInteractable>();
xRGrabInteractable.interactionLayers = 2;

Bind Events and Handler Methods

绑定selectEnteredselectExited等等事件,Handler方法接受对应的EventArgs,以XRInteractorHoverEnteredHandler(HoverEnterEventArgs args)为例

1
2
3
4
5
6
7
8
9
10
11
12
13
14
15
16
17
public class DragManager: SingletonForMonobehaviour<DragManager>
{
//首先声明Interactor类,并在U
public XRDirectInteractor leftDirectInteractor;
public XRRayInteractor leftRayInteractor;

private void InitXRInteractor()
{
leftRayInteractor.hoverEntered.AddListener(XRInteractorHoverEnteredHandler); }
}

private void XRInteractorHoverEnteredHandler(HoverEnterEventArgs args)
{
Debug.log("[Interactor]Enter Hover"):
}

}

获取当前交互的物体

1
2
3
4
5
private void XRInteractorHoverEnteredHandler(HoverEnterEventArgs args)
{
IXRHoverInteractable hoverComponent = args.interactableObject;
GameObject obj = hoverComponent.transform.gameObject;
}

UI Elements

在UI组件上挂载TrackedDeviceGraphicRaycaster,可以使得其接受对应的Hover、Select事件

Input Event

响应对应的按键。

Base Concepts & Models

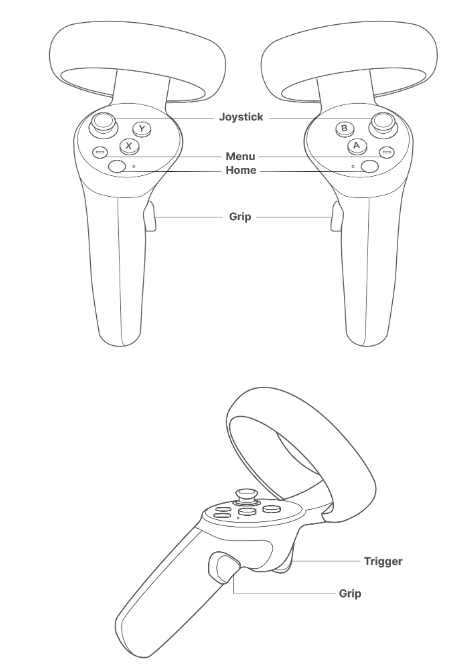
PICO Neo3为例:

43cc2a7be65a3d7abe62537ceab2e0b1.png

43cc2a7be65a3d7abe62537ceab2e0b1.png

The table below describes the mappings between PICO controller buttons and Unity keys:

Button Unity Keys
Menu CommonUsages.menuButton: represents whether the Menu button has been activated (pressed).
Trigger - CommonUsages.triggerButton: represents whether the Trigger button has been activated (pressed).
- CommonUsages.trigger: represents the degree to which the Trigger button was pressed. For example, in an archery game, it represents how full the bow has been drawn.
Grip - CommonUsages.gripButton: represents whether the Grip button has been activated (pressed).
- CommonUsages.grip: represents the degree to which the Grip button was pressed. For example, in an archery game, it represents how full the bow has been drawn.
Joystick - CommonUsages.primary2DAxisClick: represents whether the Joystick has been activated (pressed).
- CommonUsages.primary2DAxis: represents whether the Joystick has been moved upward, downward, leftward, or rightward.
X/A CommonUsages.primaryButton: represents whether the X/A button has been activated (pressed).
Y/B CommonUsages.secondaryButton: represents whether the Y/B button has been activated (pressed).

Development Practice

下面给出了代码中获取到输入、事件的用法。

也许2.2.0的VRKT提供了相应事件,可以自行搜索用法。此处给出的代码参考PicoXR中的输入事件_窗外听轩雨的博客-CSDN博客 的内容。

Get Input Device

通过XRNode获取设备

1
2
3
4
5
6
//XRNode为枚举变量
//常用的有 Head LeftHand RightHand
//根据这些枚举可以轻松获得指定的头盔,左手柄,右手柄
InputDevice headController = InputDevices.GetDeviceAtXRNode(XRNode.Head);
InputDevice leftHandController = InputDevices.GetDeviceAtXRNode(XRNode.LeftHand);
InputDevice rightHandController = InputDevices.GetDeviceAtXRNode(XRNode.RightHand);

Try Get Input Value

1
2
3
4
5
6
7
8
9
10
InputDevice device;
//省略device的获取 使用前要先获取
public void Test()
{
bool isDown; //记录是否按下
if(device.TryGetFeatureValue(CommonUsages.triggerButton,out isDown) && isDown)
{
//xxxxx 处理逻辑
}
}

InputEvent.cs

将输入转为事件,分离事件与处理逻辑。

1
2
3
4
5
6
7
8
9
10
11
12
13
14
15
16
17
18
19
20
21
22
23
24
25
26
27
28
29
30
31
32
33
34
35
36
37
38
39
40
41
42
43
44
45
46
47
48
49
50
51
52
53
54
55
56
57
58
59
60
61
62
63
64
65
66
67
68
69
70
71
72
73
74
75
76
77
78
79
80
81
82
83
84
85
86
87
88
89
90
91
92
93
94
95
96
97
98
99
100
101
102
103
104
105
106
107
108
109
110
111
112
113
114
115
116
117
118
119
120
121
122
123
124
125
126
127
128
129
130
131
132
133
134
135
136
137
138
139
140
141
142
143
144
145
146
147
148
149
150
151
152
153
154
155
156
157
158
159
160
161
162
163
164
165
166
167
168
169
using System;
using System.Collections;
using System.Collections.Generic;
using UnityEngine;
using UnityEngine.XR;
using Common;
/// <summary>
/// 提供各种输入事件
/// </summary>
public class InputEvent:MonoSingleton<InputEvent>
{
//*************输入设别**************************
InputDevice leftHandController;
InputDevice rightHandController;
InputDevice headController;

//**************对外提供公开事件******************
#region public event

public Action onLeftTriggerEnter;
public Action onLeftTriggerDown;
public Action onLeftTriggerUp;

public Action onRightTriggerEnter;
public Action onRightTriggerDown;
public Action onRightTriggerUp;

public Action onLeftGripEnter;
public Action onLeftGripDown;
public Action onLeftGripUp;

public Action onRightGripEnter;
public Action onRightGripDown;
public Action onRightGripUp;

public Action onLeftAppButtonEnter;
public Action onLeftAppButtonDown;
public Action onLeftAppButtonUp;

public Action onRightAppButtonEnter;
public Action onRightAppButtonDown;
public Action onRightAppButtonUp;

public Action onLeftJoyStickEnter;
public Action onLeftJoyStickDown;
public Action onLeftJoyStickUp;

public Action onRightJoyStickEnter;
public Action onRightJoyStickDown;
public Action onRightJoyStickUp;

public Action<Vector2> onLeftJoyStickMove;
public Action<Vector2> onRightJoyStickMove;

public Action onLeftAXButtonEnter;
public Action onLeftAXButtonDown;
public Action onLeftAXButtonUp;

public Action onLeftBYButtonEnter;
public Action onLeftBYButtonDown;
public Action onLeftBYButonUp;

public Action onRightAXButtonEnter;
public Action onRightAXButtonDown;
public Action onRightAXButtonUp;

public Action onRightBYButtonEnter;
public Action onRightBYButtonDown;
public Action onRightBYButtonUp;

#endregion

//提供状态字典独立记录各个feature的状态
Dictionary<string, bool> stateDic;

//单例模式提供的初始化函数
protected override void Init()
{
base.Init();
leftHandController = InputDevices.GetDeviceAtXRNode(XRNode.LeftHand);
rightHandController = InputDevices.GetDeviceAtXRNode(XRNode.RightHand);
headController = InputDevices.GetDeviceAtXRNode(XRNode.Head);
stateDic = new Dictionary<string, bool>();

}
//*******************事件源的触发**************************

/// <summary>
/// 按钮事件源触发模板
/// </summary>
/// <param name="device">设备</param>
/// <param name="usage">功能特征</param>
/// <param name="btnEnter">开始按下按钮事件</param>
/// <param name="btnDown">按下按钮事件</param>
/// <param name="btnUp">抬起按钮事件</param>
private void ButtonDispatchModel(InputDevice device,InputFeatureUsage<bool> usage,Action btnEnter,Action btnDown,Action btnUp)
{
Debug.Log("usage:" + usage.name);
//为首次执行的feature添加bool状态 -- 用以判断Enter和Up状态
string featureKey = device.name + usage.name;
if(!stateDic.ContainsKey(featureKey))
{
stateDic.Add(featureKey, false);
}

bool isDown;
if(device.TryGetFeatureValue(usage,out isDown) && isDown)
{
if(!stateDic[featureKey])
{
stateDic[featureKey] = true;
if(btnEnter != null)
btnEnter();
}
if(btnDown!=null)
btnDown();
}
else
{
if(stateDic[featureKey])
{
if(btnUp!=null)
btnUp();
stateDic[featureKey] = false;
}
}
}

/// <summary>
/// 摇杆事件源触发模板
/// </summary>
/// <param name="device">设备</param>
/// <param name="usage">功能特征</param>
/// <param name="joyStickMove">移动摇杆事件</param>
private void JoyStickDispatchModel(InputDevice device,InputFeatureUsage<Vector2> usage,Action<Vector2> joyStickMove)
{
Vector2 axis;
if (device.TryGetFeatureValue(usage, out axis) && !axis.Equals(Vector2.zero))
{
if(joyStickMove!=null)
joyStickMove(axis);
}
}

//******************每帧轮询监听事件***********************
private void Update()
{
ButtonDispatchModel(leftHandController, CommonUsages.triggerButton, onLeftTriggerEnter, onLeftTriggerDown, onLeftTriggerUp);
ButtonDispatchModel(rightHandController, CommonUsages.triggerButton, onRightTriggerEnter, onRightTriggerDown, onRightTriggerUp);

ButtonDispatchModel(leftHandController, CommonUsages.gripButton, onLeftGripEnter, onLeftGripDown, onLeftGripUp);
ButtonDispatchModel(rightHandController, CommonUsages.gripButton, onRightGripEnter, onRightGripDown, onRightGripUp);

ButtonDispatchModel(leftHandController, CommonUsages.primaryButton, onLeftAXButtonEnter, onLeftAXButtonDown, onLeftAXButtonUp);
ButtonDispatchModel(rightHandController, CommonUsages.primaryButton, onRightAXButtonEnter, onRightAXButtonDown, onRightAXButtonUp);

ButtonDispatchModel(leftHandController, CommonUsages.secondaryButton, onLeftBYButtonEnter, onLeftBYButtonDown, onLeftBYButonUp);
ButtonDispatchModel(rightHandController, CommonUsages.secondaryButton, onRightBYButtonEnter, onRightBYButtonDown, onRightBYButtonUp);

ButtonDispatchModel(leftHandController, CommonUsages.primary2DAxisClick, onLeftJoyStickEnter, onLeftJoyStickDown, onLeftJoyStickUp);
ButtonDispatchModel(rightHandController, CommonUsages.primary2DAxisClick, onRightJoyStickEnter, onRightJoyStickDown, onRightJoyStickUp);

ButtonDispatchModel(leftHandController, CommonUsages.menuButton, onLeftAppButtonEnter, onLeftAppButtonDown, onLeftAppButtonUp);
ButtonDispatchModel(rightHandController, CommonUsages.menuButton, onRightAppButtonEnter, onRightAppButtonDown,onRightAppButtonUp);

JoyStickDispatchModel(leftHandController, CommonUsages.primary2DAxis, onLeftJoyStickMove);
JoyStickDispatchModel(rightHandController, CommonUsages.primary2DAxis, onRightJoyStickMove);
}
}

Bind Events and Handler Methods

将对应的输入事件与处理事件想绑定,此处给出了EnterDownUp三个事件

private void BindXRInputEvent()
{
    InputEvent.Instance.onLeftAXButtonEnter += AXButtonEnterHandler;
    InputEvent.Instance.onLeftAXButtonUp += AXButtonUpHandler;

    InputEvent.Instance.onLeftBYButtonEnter += BYButtonEnterHandler;
    InputEvent.Instance.onLeftBYButonUp += BYButtonUpHandler;
}


private void AXButtonEnterHandler()
{
    Debug.Log("[Input] LeftAXButtonEnter is called");
    if (!hasStarted) return;
    UIManager.Instance.OpenPanel(eUIPanelType.ChooseBluePrintPanel);
}

private void AXButtonUpHandler()
{
    Debug.Log("[Input] LeftAXButtonUp is called");
    if (!hasStarted) return;
    UIManager.Instance.PopPanel();
}

Build

由于Neo3是安卓设备,在Unity打包时会遇到一些打安卓包的坑,主要原因是外网的一些资源不能正常访问。主要的解决办法时换源或者使用代理。