尝试打包WebGL平台遇到的坑

在将一个 Unity 2022.3 数字孪生项目(利用Unity3D_Robotics_ABB)从原 Win 平台迁移到 WebGL 平台的过程中,遇到了 RuntimeError: null function or function signature mismatchThe script 'xxxxx' could not be instantiated!digest auth failed 等等报错和故障。在对网上的解决方案探索和尝试的过程中,有小结如下

System.Threading 相关命名空间(C# 原生线程)不支持

这是着手切换WebGL平台之前就知道不行的一点,不过使用 UniTask 可以替换。

Unity3D_Robotics_ABB 作者在其实现中主要使用了原生的 Thread 来处理异步的逻辑,在 Unity 打 WebGL 包时并没有报错且能成功出包,然而,在运行 WebGL 的程序时(尤其做某些会拉起线程的操作时),会出现卡死、弹窗报错RuntimeError: null function or function signature mismatch 的问题。

若出现上述问题,应该考虑利用 Unity 托管的异步实现(UniTask、协程等),或 async/await 关键词处理对应需求。

System.Net 相关命名空间不支持(需要利用Unity提供的 UnityWebRequest(UWR) 来进行 HTTP 请求)

这是解决问题花费时间比较长的一点。

在解决完线程的问题后,运行 WebGL 程序,发现会出现 The script 'xxxxx' could not be instantiated! 等控制台警告,且此脚本功能失效。经过测试后,发现脚本中若引用了 System.Net 等 .NET networking classes,则此脚本不能被正确加载,见 WebGL Networking ,此时需要使用 UnityWebRequest 类进行 http 请求。

由于 UnityWebRequest 没有对 Authentication 的支持,需要手动处理一些问题:digest auth failed 。例如,Basic 验证方案可以自己加Header 并存入对应值。然而,对于 Digest 验证方案,手动处理比较麻烦。此时考虑调 JavaScript 的加 Digest 验证的方法并发送 HTTP 请求,或者由代理服务器添加 Digest 验证

技术水平有限,最终选择了由代理服务器添加 Digest 验证的方法,下面是对应的 Python 程序:

1
2
3
4
5
6
7
8
9
10
11
12
13
14
15
16
17
18
19
20
21
22
23
24
25
26
27
28
29
30
31
32
33
34
35
36
37
38
39
40
41
42
43
44
45
46
47
48
from flask import Flask, request, Response
import requests
from requests.auth import HTTPDigestAuth

app = Flask(__name__)

# The URL of the API that requires Digest Authentication
TARGET_API_URL = "http://www.tsingloo.com"
# Replace 'your_username' and 'your_password' with your actual credentials
USERNAME = 'your_username'
PASSWORD = 'your_password'

@app.route('/', defaults={'path': ''})
@app.route('/<path:path>', methods=['GET', 'POST', 'PUT', 'DELETE'])
def proxy(path):
# Construct the full URL to the target API
url = f"{TARGET_API_URL}/{path}"

# Log the requested URL
app.logger.info(f"I am requesting {url}")

# Get the original request method and data
method = request.method
data = request.get_data()

# Selectively copy headers, excluding those that can cause issues
excluded_headers = ['Host', 'Content-Length', 'Content-Type']
headers = {key: value for key, value in request.headers if key not in excluded_headers}

# If the request has a content type, include it in the headers
if 'Content-Type' in request.headers:
headers['Content-Type'] = request.headers['Content-Type']

# Inside your proxy function
response = requests.request(method, url, data=data, headers=headers)

# Make sure to copy the content-type header from the original response to the new response
content_type = response.headers.get('Content-Type')
response_headers = {'Content-Type': content_type} if content_type else {}

return Response(response.content, status=response.status_code, headers=response_headers)

@app.before_request
def log_request():
print(f"Received request: {request.url} - {request.method}")

if __name__ == '__main__':
app.run(debug=True)

短时间内利用 UWR 对 RWS 发送大量请求

为了追求项目的实时性,短时间内 Unity 利用 UWR 向机械臂(RWS)发送大量请求,前70个请求成功,而后的请求报 “503 Service Unavailable (Too many sessions 70/70)”错,且当双方断开连接时,仍需要一段时间“冷却”,而后才能请求正确收到回复,然后短时间内约70个 UWR 的 http 的请求后,重复上述 503 错误。使用C#提供的 HTTP 相关类时未见此问题。当503报错时,关闭代理服务器,重新插拔网线,都不能立刻释放此70个sessions。

值得注意的是,当 UWR 已经收到503报错时,再继续使用Postman测试相关接口,如(http://192.168.x.x/rw/rapid/tasks/T_ROB1/motion?resource=jointtarget)时,Postman有时可以正常收到数据。复盘此情况,推测是在排障中,由 Postman 已经发送了带 http头”Connection: Keep-Alive”并成功建立了正常的连接,早于 UWR 的请求,换言之,其 70 个session中已经维护了一个与postman的长连接。冷却后,使用 Postman 短时间内大量测试相关接口可以持续获得正常的数据,未见503报错。

冷却后,当使用Edge浏览器短时间内大量访问接口,前70个请求成功,而后的也会503报错,表现与 UWR 一样,且观察浏览器发出的 HTTP 请求,其已携带”Connection: Keep-Alive”,不同的是,浏览器发出的 HTTP 带有很长的“User-Agent”头,这一点没弄明白。

冷却后,当使用 Python 对接口短时间内大量发送简单的http请求(不挟带请求头”Connection: Keep-Alive”)时,前70个请求成功,而后的也会503报错,表现与 UWR 一样。

经检查,(编辑器 2022.3 版本默认的) UWR 发出的 HTTP 请求默认不携带标头 Connection: Keep-Alive,有讨论,见Connection: keep-alive in Unity Web Request?,且当使用 UnityWebRequest.SetRequestHeader 手动设置此标头时,会见警告且官方文档不推荐如此做。

最终,通过 UnityWebRequest.SetRequestHeader 手动设置标头”Connection: Keep-Alive”,解决了上述 503 报错。

几乎同一时刻对 RWS 发送多个请求

在将原线程替换为 UniTask 后,某个方法每帧将同时对 RWS 发送三个不同的 HTTP 请求,导致报 “Connection manager can’t add .. ” 错,改为一帧(约23ms)轮流发一个 HTTP 请求后解决。

HttpClient.PostAsyncUnityWebRequest.Post

使用PostAsync时,需要传入一个string和一个httpcontent,在使用 .Post 时,可以是两个string,也可以是一个string和一个 WWWForm,推荐使用后者,可以规避一些可能的编码问题。

反序列化时 dynamic 关键字引起的崩溃

项目中使用从 Unity Package Manager 中添加的 Newtonsoft.Json 来处理请求,原本从字符串中反序列化对象代码如下:

1
2
dynamic obj = JsonConvert.DeserializeObject(jsonStr);
var state = obj.name;

初次尝试打WebGL包时会报缺少某命名空间错,而后在项目设置中将 API 兼容性 级别改为 .Net Framewrok 后不再报错。
上述代码会导致WebGL运行时弹窗报错奔溃,推荐参考 json 的内容定义类型而后获取对应字段的值(JSON2CSharp)。

1
2
3
4
5
6
7
8
9
10
11
12
13
14
15
16
17
18
19
20
[Serializable]
public class People
{
public string name;
public int age;
public DateTime birthday;
public bool isMarried;
public float money;
}

public void DeserializeJson()
{
string jsonStr = "{\"name\" :\"张三\",\"age\":30,\"birthday\":\"1990-03-31T17:15:29\",\"isMarried\":true,\"money\":10.0}";

People zhangsan = JsonConvert.DeserializeObject<People>(jsonStr);
Debug.Log("zhangsan.name " + zhangsan.name + " birthday: " + zhangsan.birthday + " isMarried: " + zhangsan.isMarried);

//output: zhangsan.name 张三 birthday: 03/31/1990 17:15:29 isMarried: True
}

QFramework 随笔

参考资料:

  1. Unity游戏框架搭建决定版 QFramework的二次开发
  2. “您好 我是QFramework”
  3. QFramework v1.0 使用指南
  4. 基础 | 三层架构与MVC模式

Introduction

QFramework.cs 提供了 MVC、分层、CQRS、事件驱动、数据驱动等工具,除了这些工具,QFramework.cs 还提供了架构使用规范。

QFramework 内置模块如下:

  • 0.Framework:核心架构(包含一套系统设计架构)

  • 1.CoreKit: 核心工具库、插件管理

  • 2.ResKit:资源管理套件(快速开发)

  • 3.UIKit:UI 管理套件(支持自动绑定、代码生成)

  • 4.Audio:音频方案

    MVC

    MVC模式是软件工程中常见的一种软件架构模式,该模式把软件系统(项目)分为三个基本部分:**模型(Model)、视图(View)和控制器(Controller)**使用此模式有诸多优势,例如:简化后期对项目的修改、扩展等维护操作;使项目的某一部分变得可以重复利用;使项目的结构更加直观。

    1. **视图(View):**负责界面的显示,以及与用户的交互功能。实际在Unity中,这一部分往往指 UI 的呈现。

    2. 控制器(Controller):可以理解为一个分发器,用来决定对于视图发来的请求(命令),需要用哪一个模型来处理,以及处理完后需要跳回(通过事件更改)到哪一个视图。即用来连接视图和模型。

    3. **模型(Model):**模型持有所有的数据、状态和程序逻辑。模型接受视图数据(的命令),并返回最终的处理结果(,触发事件)。

      img

CQRS 命令和查询责任分离

一种将数据存储的读取操作和更新操作分离的模式。

Query 是一个可选的概念,如果游戏中数据的查询逻辑并不是很重的话,直接在 Controller 的表现逻辑里写就可以了,但是查询数据比较重,或者项目规模非常大的话,最好是用 Query 来承担查询的逻辑。

img

事件驱动

在事件驱动编程中,系统的流程是由外部事件(如用户输入或外部数据更改)驱动的。程序会对发生的事件做出反应。其核心思想是定义并使用事件处理器

用户输入 => 事件响应 => 代码运行 => 刷新页面状态

InputSystem 帮助Unity开发者将用户输入抽象为事件

数据驱动

操作UI(用户输入)=> 触发事件 => 响应处理 => 更新数据 => 更新UI(呈现)

BindableProperty<T> 提供了快速的绑定

Framework

系统设计架构,核心概念包括Architecture、Command、Event、Model、System

Architecture

可以将Architecture视为一个项目模块的管理器(System)的集合, 省去创建大量零散管理器单例的麻烦

使用注册的方式将当前项目所使用的 模块 系统和 工具 添加进内部的IOC容器中,方便管理。

Controller

赋予 MonoBehaviour 脚本对象访问架构的能力

Model

同类的公共数据

架构规范与推荐用法

QFramework 架构提供了四个层级:

  • 表现层:IController
  • 系统层:ISystem
  • 数据层:IModel
  • 工具层:IUtility

通用规则

  • IController 更改 ISystem、IModel 的状态必须用Command
  • ISystem、IModel 状态发生变更后通知 IController 必须用事件或BindableProperty
  • IController可以获取ISystem、IModel对象来进行数据查询
  • ICommand、IQuery 不能有状态,
  • 上层可以直接获取下层,下层不能获取上层对象
  • 下层向上层通信用事件
  • 上层向下层通信用方法调用(只是做查询,状态变更用 Command),IController 的交互逻辑为特别情况,只能用 Command

表现层

ViewController 层。

IController接口,负责接收输入和状态变化时的表现,一般情况下,MonoBehaviour 均为表现层

  • 可以获取 System、Model
  • 可以发送 Command、Query
  • 可以监听 Event

系统层

System层

ISystem接口,帮助IController承担一部分逻辑,在多个表现层共享的逻辑,比如计时系统、商城系统、成就系统等

  • 可以获取 System、Model

  • 可以监听Event

  • 可以发送Event

数据层

IModel接口,负责数据的定义、数据的增删查改方法的提供

  • 可以获取 Utility
  • 可以发送 Event

工具层

Utility层

IUtility接口,负责提供基础设施,比如存储方法、序列化方法、网络连接方法、蓝牙方法、SDK、框架继承等。啥都干不了,可以集成第三方库,或者封装API

常用技巧

TypeEventSystem

独立的事件系统,可以理解为群发和广播,创建结构体传递事件内容

1
public struct PlayerDieEvent { }

一些简单的事件可以通过 .Register

Hands

最近Unity XRTK 终于加入了对手势追踪的支持,这里记录回顾一下相关的组件和类

This diagram illustrates the current Unity XR plug-in framework structure, and how it works with platform provider implementations.

Setup

为了能够正常使用手势追踪,需要XR相关的包升级。这里的 Editor 版本为 2021.3.20f1。

将XR相关的包升级

Upgrade packages

如果在包管理器中看不到升级的按钮,那么可以通过左上角“➕” -> “Add package by name“,分别输入:

com.unity.xr.handscom.unity.xr.interaction.toolkitcom.unity.xr.management 来完成升级。

注意:这些包可能对Editor版本有一定要求,具体可以查看对应说明:
XR Interaction Toolkit 2.3.1

XR Plugin Management 4.3.3

XR Hands 1.1.0

Config XR Plug-in Management

Edit -> Project Settings -> XR Plug-in Managerment 在对应平台下勾选 OpenXR

在对应平台下勾选 OpenXR

-> OpenXR 进入子菜单OpenXR,添加将使用的设备的预设,并勾选相关特性

添加将使用的设备的预设,并勾选相关特性

然后导入一些示例场景和预制体:

例如 XRTK 下的: Starter Assets, XR Device Simulator, Hands Interaction Demo

与 XR Hands 下的:HandVisualizer

在Project窗口中搜索 Complete XR Origin Hands Set Up,并将此预制体放入场景中,即可以运行场景查看效果。手和控制器的切换追随设备,并能实时体现在游戏中。 某些版本的XR组件下可能出现切换时Editor暂停,可以尝试更新组件。

将此预制体放入场景中

Access Hand Data

Refer to:Access hand data

有时候我们希望除了一些回调外,能获得手部更详实的位姿数据, 以实现网络同步等等更多的功能。

我们可以订阅 XRHandSubsystem,并获取数据,例如:

1
2
3
4
5
6
7
8
9
10
11
12
13
14
15
16
17
18
19
20
21
22
23
24
25
26
27
28
29
30
31
32
33
34
35
36
37
void Start()
{
XRHandSubsystem m_Subsystem =
XRGeneralSettings.Instance?
.Manager?
.activeLoader?
.GetLoadedSubsystem<XRHandSubsystem>();

if (m_Subsystem != null)
m_Subsystem.updatedHands += OnHandUpdate;
}

void OnHandUpdate(XRHandSubsystem subsystem,
XRHandSubsystem.UpdateSuccessFlags updateSuccessFlags,
XRHandSubsystem.UpdateType updateType)
{
switch (updateType)
{
case XRHandSubsystem.UpdateType.Dynamic:
// Update game logic that uses hand data
break;
case XRHandSubsystem.UpdateType.BeforeRender:
for (var i = XRHandJointID.BeginMarker.ToIndex();
i < XRHandJointID.EndMarker.ToIndex();
i++)
{
var trackingData = subsystem.rightHand .GetJoint(XRHandJointIDUtility.FromIndex(i));

if (trackingData.TryGetPose(out Pose pose))
{
// displayTransform is some GameObject's Transform component
Debug.Log($"[{nameof(XRHand)}]Joint{i} : {nameof(Position)} {pose.position} | {nameof(Rotate)} {pose.rotation}");
}
}
break;
}
}

General settings container used to house the instance of the active settings as well as the manager instance used to load the loaders with.

XR Loader abstract class used as a base class for specific provider implementations. Providers should implement subclasses of this to provide specific initialization and management implementations that make sense for their supported scenarios and needs.

此时可以看到,Joint点的数据已被正常获得并打印。

HandVisualizer

HandVisulizer 类控制着手势的渲染,将上述我们获得的Joints的空间位置与旋转翻译成SkinnedMeshRenderer的变化,渲染逻辑可见其OnUpdateHands()方法中,大致通过更新Joint的位置带动蒙皮的变换。

1
2
3
4
5
6
7
8
9
10
11
12
13
14
15
16
17
18
19
20
21
22
23
var originTransform = xrOrigin.Origin.transform;
var originPose = new Pose(originTransform.position, originTransform.rotation);

var wristPose = Pose.identity;
UpdateJoint(debugDrawJoints, velocityType, originPose, hand.GetJoint(XRHandJointID.Wrist), ref wristPose);
UpdateJoint(debugDrawJoints, velocityType, originPose, hand.GetJoint(XRHandJointID.Palm), ref wristPose, false);

for (int fingerIndex = (int)XRHandFingerID.Thumb;
fingerIndex <= (int)XRHandFingerID.Little;
++fingerIndex)
{
var parentPose = wristPose;
var fingerId = (XRHandFingerID)fingerIndex;

int jointIndexBack = fingerId.GetBackJointID().ToIndex();
for (int jointIndex = fingerId.GetFrontJointID().ToIndex();
jointIndex <= jointIndexBack;
++jointIndex)
{
if (m_JointXforms[jointIndex] != null)
UpdateJoint(debugDrawJoints, velocityType, originPose, hand.GetJoint(XRHandJointIDUtility.FromIndex(jointIndex)), ref parentPose);
}
}

Duplicate Hands

复制手部的运动其实也就是复制其骨骼的Transform

Notes of Obi Package

Obi is a collection of particle-based physics plugins for Unity. Everything in Obi is made out of small spheres called particles. Particles can interact with each other, affect and be affected by other objects trough the the use of constraints.

Obi 利用Burst编译器获得高性能的物理计算结果,其完全基于处理器运算,因而可以是全平台支持,(除Obi Fluid以外)各个渲染管线通用。

本文将基于Obi 6.X 讨论如何使用 Obi Softbody 组件

Setup

导入Obi包,不得混杂使用版本不同的Obi assets

可以整个移动/Obi文件夹,或者移除/Obi/Samples文件夹,但是其他的文件不建议修改。

If you’re not using SRPs but the built-in pipeline, it’s safe to delete the /Obi/Resources/ObiMaterials/URP folder. Otherwise Unity will raise an error at build time, stating that it cannot find the URP pipeline installed.

Architecture

Covers Obi’s overall architecture, goes over the role played by all core components (solvers, updaters, and actors) and explains how the simulation works internally.

img

Solvers

Solver 负责进行物理模拟的运算。在 Solver 中提供了一系列可配置的全局物理量与参数,诸如重力(gravity)、惯性尺度(inertia scale)、阻尼(velocity damping)等等。

Each solver will simulate all child actors it finds in its hierarchy, for this it can use multiple backends (Obi 5.5 and up only).

Backends

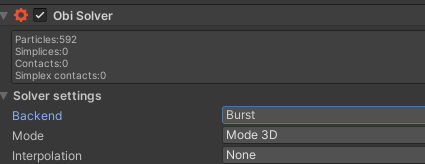
Backend 是 Solver 使用的物理引擎。推荐使用Burst Backend(这也是默认的Backend),其基于job system与Burst编译器,性能比Oni好。

Obi 5.6起,Obi 能够使用 Burst 编译器来处理物理计算。

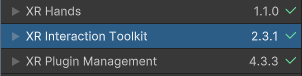
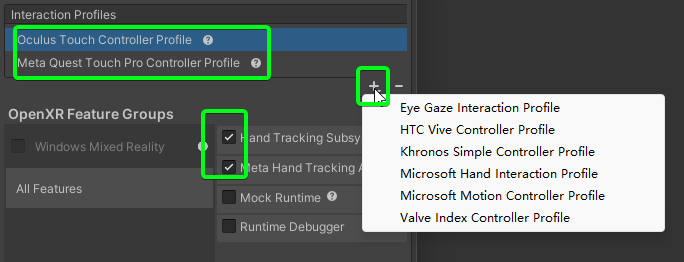
Using the Burst backend requires having the following Unity packages installed:

  • Burst 1.3.3 or newer
  • Collections 0.8.0-preview 5 or newer
  • Mathematics 1.0.1 or newer
  • Jobs 0.2.9-preview.15 or newer

以上的包大多数可以在Package Manager中的Unity Registry中找到,但是一些preview的包,若搜索不到,需要手动添加(you may need to manually locate the packages by URL)

如果导入Burst包后,开启项目时其报一些错误,可以看一下项目路径里是否有中文。

Unity 2022.2之后,Job system packages(对应 Jobs 0.2.9-preview.15 or newer)已经安装,不用额外导入。以上包导入正常后,可以看到,Backend 选择 Burst不会有黄色感叹号。

Backend 选择 Burst不会有黄色感叹号

Performance

官方文档中给出了一些需要着重注意的,与性能相关的选项,详见Performance

对于不同的Unity版本,窗口可能会有一些变化。

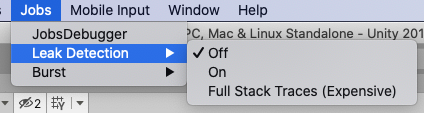
Please note that for normal performance when using the Burst backend in-editor, you must enable Burst compilation and disable the jobs debugger, safety checks and leak detection.

img

img

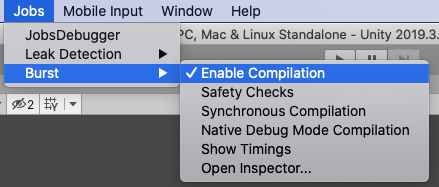
Also, keep in mind that Burst uses asynchronous compilation in the editor by default. This means that the first few frames of simulation will be noticeably slower, as Burst is still compiling jobs while the scene runs. You can enable synchronous compilation in the Jobs->Burst menu, this will force Burst to compile all jobs before entering play mode.

Updaters

ObiUpdater 是一个在特定时间点上推动一个或者多个Solver模拟运算的组件。

A ObiUpdater is a component that advances the simulation of one or more solvers at a certain point during execution.

一般来说,我们会想让Solver的模拟和其他在FixedUpdate()中的物理模拟保持同步。有时也可能为了一些效果希望放在skeletal animation之后,即LateUpdate()中。甚至。我们会希望自己决定何时Update来自Solver的模拟。

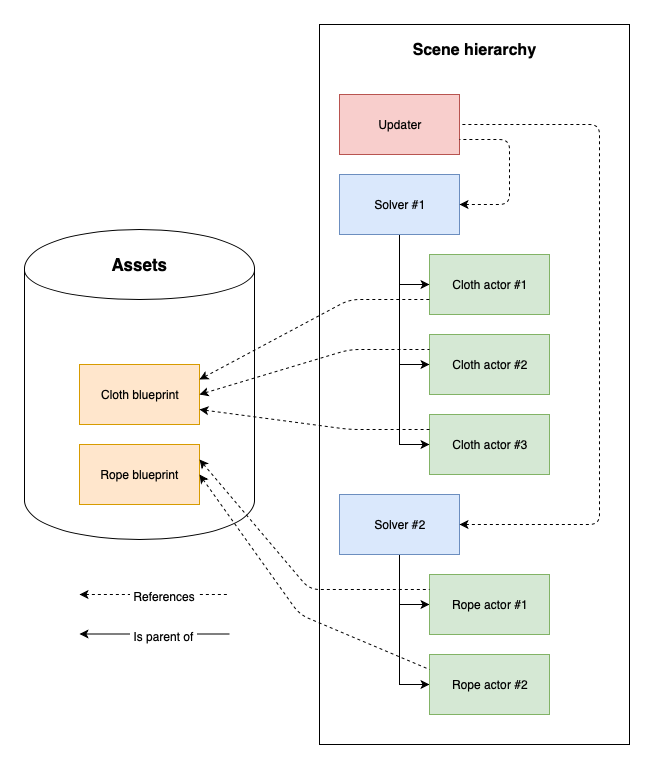
一般来说,一个场景中应当使用仅仅使用一个Updater。若如此做,所有在此Updater中的Solver可以合理地拆分任务,从而并行执行模拟。Obi允许一个场景中使用多个Updater,但是需要注意的是, 一个solver必须只能被一个updater引用,否则将导致此solver一帧内被update多次,导致不稳定的结果。

一个没有被任何Updater管理的solver,将不会update它的模拟。

Obi Fixed Updater

此组件将在FixedUpdate()中update模拟。 其会产生最为符合物理的效果,应当在绝大多数时候使用。

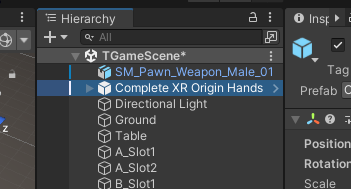
在示例场景中,Obi Solver 与 Obi Fixed Updater 挂载在作为父节点的空物体上。Obi Fixed Updater 存了一份此Obi Solver的引用。
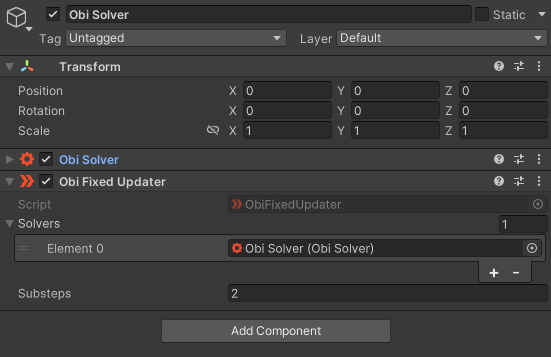
image-20230309192502042

Substeps

Updater 可以将每个物理阶段(physics step)分成更多个子阶段(smaller substeps)。例如,如果Unity的 fixed timestep = 0.02 Substeps = 4,那么每个子阶段将会推进0.02/4 = 0.005 秒的模拟。子阶段越多,结果也就越精确,当然性能也会随之下降。

Collision detection will still be performed only once per step, and amortized during all substeps.

Tweak substeps to control overall simulation precision. Tweak constraint iterations if you want to prioritize certain constraints. For more info, read about Obi’s approach to simulation.

Obi Late Fixed Updater

The late fixed updater will update the simulation after WaitForFixedUpdate(), once FixedUpdate() has been called for all components, and all Animators set to Update Physics have been updated. Use it to update the simulation after animators set to Update Physics have advanced the animation.

在制作布料等等,由角色动画驱动的物理效果时,一般考虑Late Fixed Updater

Obi Late Updater

This updater will advance the simulation during LateUpdate(). This is highly unphysical, as it introduces a variable timestep. Use it only when you cannot update the simulation at a fixed frequency. Sometimes useful for low-quality character clothing, or secondary visual effects that do not require much physical accuracy.

Delta smoothing

This updater will try to minimize the artifacts caused by using a variable timestep by applying a low-pass filter to the delta time. This value controls how aggressive this filtering is. High values will agressively filter the timestep, minimizing the change in delta time over sucessive frames. A value of zero will use the actual time delta for this frame.

ObiActorBlueprint

A blueprint is an asset that stores a bunch of particles and constraints. It does not perform any simulation or rendering by itself. It’s just a data container, not unlike a texture or an audio file. Blueprints are generated from meshes (ObiCloth and ObiSoftbody), curves (ObiRope) or material definitions (ObiFluid).

Actors

布料、绳索、fluid emitter 或者 softbody 的一部分, 都被称为 actors

Actor 接受blueprint(particles and constraints)作为输入。相同的blue print 可以被多个update使用。

Actor 必须作为 solver 的子物体上的组件,这样它才能被模拟包括。在runtime我们可以将一个actor重新放置到一个新的solver下。 At runtime you can reparent an actor to a new solver, or take it out of its current solver’s hierarchy if you want to.

A fluid emitter and a softbody as children of a solver.

一般需要以下步骤来使用Actor

  • Create a blueprint asset of the appropiate type. Generate it, then edit it if needed.
  • Create the actor, and feed it the blueprint.

 create actor

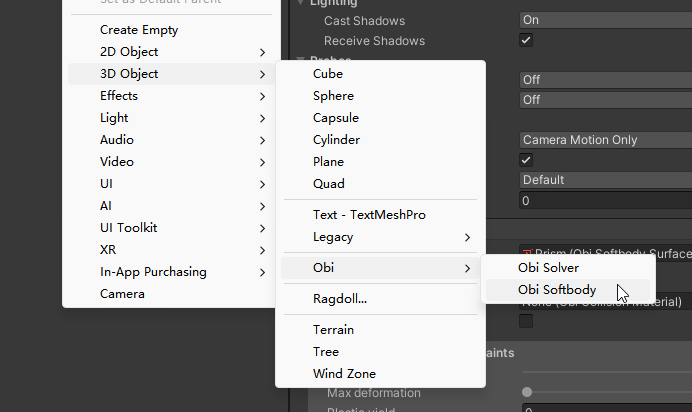
当第一次在场景中创建actor时,Obi将会寻找一个ObiSolver的组件来添加此actor。如果找不到一个合适的solver,它会自己创建一个ObiFixedUpdater

每当Actor被添加到一个Solver时:

  • Actor会向Solver请求其蓝图所需的粒子。Solver将会给粒子分配index,一个actor所拥有的粒子的index可能不是连续的。

  • The actor makes a copy of all constraints found in the blueprint, and updates their particle references so that they point to the correct solver array positions.

  • The number of active particles in the solver is updated.

Simulation

官方文档:Simulation

Obi将所有的物理模拟建模为一系列粒子和约束。Particles are freely-moving lumps of matter, and constraints are rules that control their behavior.

每个约束将选取一些点,以及一些“外部”世界中的信息,包括:colliders, rigidbodies, wind。然后约束会改变粒子的位置,使其满足一些给定的条件。

Obi uses a simulation paradigm known as position-based dynamics, or PBD(参考【物理模拟】PBD算法详解) for short. In PBD, forces and velocities have a somewhat secondary role in simulation, and positions are used instead. 每一步后,PBS会根据约束来改变此时的位置,进而也就改变了速度矢量。

img

但是一些时候,往往难以找到一个位置满足所有的约束。

Sometimes, enforcing a constraint can violate another, and this makes it difficult to find a new position that satisfies all constraints. Obi will try to find a global solution to all constraints in an iterative fashion. With each iteration, we will get a better solution, closer to satisfying all constraints simultaneously.

Obi 有两种遍历约束的方法:sequential or parallel

在Sequential模式中, 每个约束都会被考虑在内,并且与每个约束计算所得出的调整,会立刻被应用,然后再接着处理下一个约束。因此,处理约束的顺序会影响最终的结果。

在Parallel模式中,所有的约束都在第一时间根据当前位置计算,在这之后求取各个调整结果的平均值加以应用。因此,怕parallel不用考虑顺序,然而这会减慢解算的时间。

Two collision constraints solved in sequential mode.

Two collision constraints solved in parallel mode. Note it takes 6 parallel iterations to reach the same result we get with only 3 sequential iterations.

Each additional iteration will get your simulation closer to the ground-truth, but will also slightly erode performance. So the amount of iterations acts as a slider between performance -few iterations- and quality -many iterations-.

An insufficiently high iteration count will almost always manifest as some sort of unwanted softness/stretchiness, depending on which constraints could not be fully satisfied:

  • Stretchy cloth/ropes if distance constraints could not be met.
  • Bouncy, compressible fluid if density constraints could not be met.
  • Weak, soft collisions if collision constraints could not be met, and so on.

对于一些现实中、物理上容易变形的物体,可以索性将其迭代次数调小。

减小timestep size 可以减小(达到物理真实的)迭代循环的次数,当然也会增加消耗,但是增加的消耗比使用多个迭代要少,是划得来的

This can be accomplished either by increasing the amount of substeps in our fixed updater, or decreasing Unity’s fixed timestep (found in ProjectSettings->Time)

Note that reducing the timestep/increasing the amount of substeps also has an associated cost. But for the same cost in performance, the quality improvement you get by reducing the timestep size is greater than you’d get by keeping the same timestep size and using more iterations.

Unlike other engines, Obi allows you to set the amount of iterations spent in each type of constraint individually. Each one will affect the simulation in a different way, depending on what the specific type of constraint does, so you can really fine tune your simulation:

Constraint types

Obi 允许我们为每种约束类型设置其迭代次数。

官方文档详细地给出了各种约束的特性和使用场景:Constraint Types

如果物体is too stretchy or bouncy,可以尝试:

  • Increasing the amount of substeps in the updater.
  • Increasing the amount of constraint iterations.
  • Decreasing Unity’s fixed timestep.