1
2
3
4
5
6
7
8
9
10
11
12
13
14
15
16
17
18
19
20
21
22
23
24
25
26
27
28
29
30
31
32
33
34
35
36
37
38
39
40
41
42
43
44
45
46
47
48
49
50
51
52
53
54
55
56
57
58
59
60
61
62
63
64
65
66
67
68
69
70
71
72
73
74
75
76
77
78
79
80
81
82
83
84
85
86
87
88
89
90
91
92
93
94
95
96
97
98
99
100
101
102
103
104
105
106
107
108
109
110
111
112
113
114
115
116
117
118
119
120
121
122
123
124
125
126
127
128
129
130
131
132
133
134
135
136
137
138
139
140
141
142
143
144
145
146
147
148
149
150
151
152
153
154
155
156
157
158
159
160
161
162
163
164
165
166
167
168
169
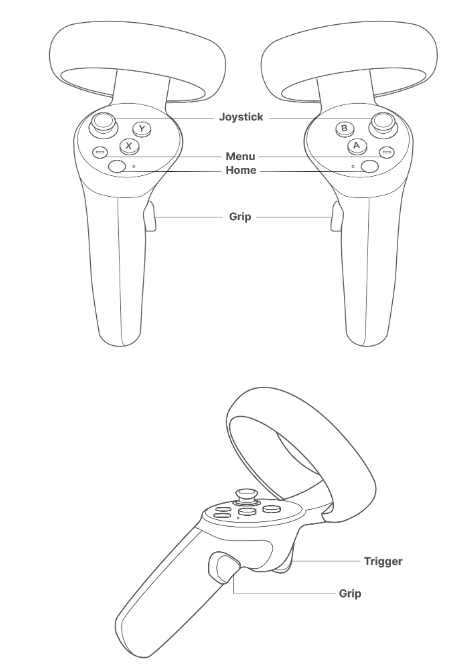
| using System;
using System.Collections;
using System.Collections.Generic;
using UnityEngine;
using UnityEngine.XR;
using Common;
public class InputEvent:MonoSingleton<InputEvent>
{
InputDevice leftHandController;
InputDevice rightHandController;
InputDevice headController;
#region public event
public Action onLeftTriggerEnter;
public Action onLeftTriggerDown;
public Action onLeftTriggerUp;
public Action onRightTriggerEnter;
public Action onRightTriggerDown;
public Action onRightTriggerUp;
public Action onLeftGripEnter;
public Action onLeftGripDown;
public Action onLeftGripUp;
public Action onRightGripEnter;
public Action onRightGripDown;
public Action onRightGripUp;
public Action onLeftAppButtonEnter;
public Action onLeftAppButtonDown;
public Action onLeftAppButtonUp;
public Action onRightAppButtonEnter;
public Action onRightAppButtonDown;
public Action onRightAppButtonUp;
public Action onLeftJoyStickEnter;
public Action onLeftJoyStickDown;
public Action onLeftJoyStickUp;
public Action onRightJoyStickEnter;
public Action onRightJoyStickDown;
public Action onRightJoyStickUp;
public Action<Vector2> onLeftJoyStickMove;
public Action<Vector2> onRightJoyStickMove;
public Action onLeftAXButtonEnter;
public Action onLeftAXButtonDown;
public Action onLeftAXButtonUp;
public Action onLeftBYButtonEnter;
public Action onLeftBYButtonDown;
public Action onLeftBYButonUp;
public Action onRightAXButtonEnter;
public Action onRightAXButtonDown;
public Action onRightAXButtonUp;
public Action onRightBYButtonEnter;
public Action onRightBYButtonDown;
public Action onRightBYButtonUp;
#endregion
Dictionary<string, bool> stateDic;
protected override void Init()
{
base.Init();
leftHandController = InputDevices.GetDeviceAtXRNode(XRNode.LeftHand);
rightHandController = InputDevices.GetDeviceAtXRNode(XRNode.RightHand);
headController = InputDevices.GetDeviceAtXRNode(XRNode.Head);
stateDic = new Dictionary<string, bool>();
}
private void ButtonDispatchModel(InputDevice device,InputFeatureUsage<bool> usage,Action btnEnter,Action btnDown,Action btnUp)
{
Debug.Log("usage:" + usage.name);
string featureKey = device.name + usage.name;
if(!stateDic.ContainsKey(featureKey))
{
stateDic.Add(featureKey, false);
}
bool isDown;
if(device.TryGetFeatureValue(usage,out isDown) && isDown)
{
if(!stateDic[featureKey])
{
stateDic[featureKey] = true;
if(btnEnter != null)
btnEnter();
}
if(btnDown!=null)
btnDown();
}
else
{
if(stateDic[featureKey])
{
if(btnUp!=null)
btnUp();
stateDic[featureKey] = false;
}
}
}
private void JoyStickDispatchModel(InputDevice device,InputFeatureUsage<Vector2> usage,Action<Vector2> joyStickMove)
{
Vector2 axis;
if (device.TryGetFeatureValue(usage, out axis) && !axis.Equals(Vector2.zero))
{
if(joyStickMove!=null)
joyStickMove(axis);
}
}
private void Update()
{
ButtonDispatchModel(leftHandController, CommonUsages.triggerButton, onLeftTriggerEnter, onLeftTriggerDown, onLeftTriggerUp);
ButtonDispatchModel(rightHandController, CommonUsages.triggerButton, onRightTriggerEnter, onRightTriggerDown, onRightTriggerUp);
ButtonDispatchModel(leftHandController, CommonUsages.gripButton, onLeftGripEnter, onLeftGripDown, onLeftGripUp);
ButtonDispatchModel(rightHandController, CommonUsages.gripButton, onRightGripEnter, onRightGripDown, onRightGripUp);
ButtonDispatchModel(leftHandController, CommonUsages.primaryButton, onLeftAXButtonEnter, onLeftAXButtonDown, onLeftAXButtonUp);
ButtonDispatchModel(rightHandController, CommonUsages.primaryButton, onRightAXButtonEnter, onRightAXButtonDown, onRightAXButtonUp);
ButtonDispatchModel(leftHandController, CommonUsages.secondaryButton, onLeftBYButtonEnter, onLeftBYButtonDown, onLeftBYButonUp);
ButtonDispatchModel(rightHandController, CommonUsages.secondaryButton, onRightBYButtonEnter, onRightBYButtonDown, onRightBYButtonUp);
ButtonDispatchModel(leftHandController, CommonUsages.primary2DAxisClick, onLeftJoyStickEnter, onLeftJoyStickDown, onLeftJoyStickUp);
ButtonDispatchModel(rightHandController, CommonUsages.primary2DAxisClick, onRightJoyStickEnter, onRightJoyStickDown, onRightJoyStickUp);
ButtonDispatchModel(leftHandController, CommonUsages.menuButton, onLeftAppButtonEnter, onLeftAppButtonDown, onLeftAppButtonUp);
ButtonDispatchModel(rightHandController, CommonUsages.menuButton, onRightAppButtonEnter, onRightAppButtonDown,onRightAppButtonUp);
JoyStickDispatchModel(leftHandController, CommonUsages.primary2DAxis, onLeftJoyStickMove);
JoyStickDispatchModel(rightHandController, CommonUsages.primary2DAxis, onRightJoyStickMove);
}
}
|
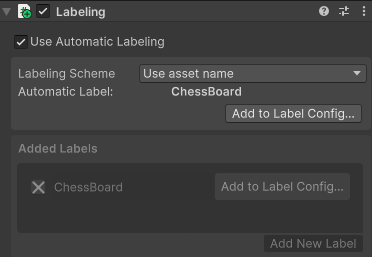
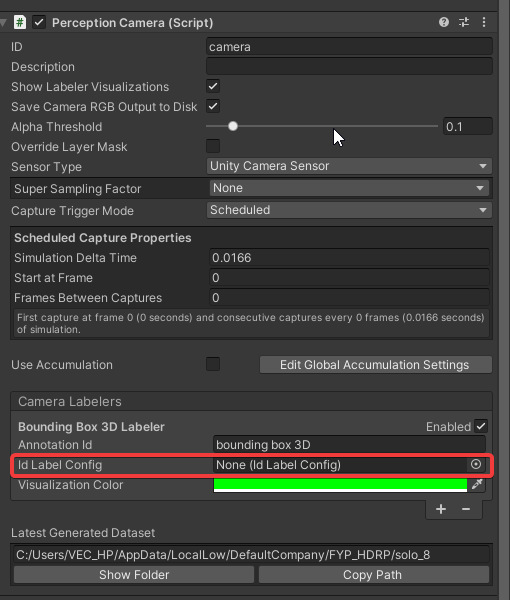 我们可以注意到,Camera Labelers中有
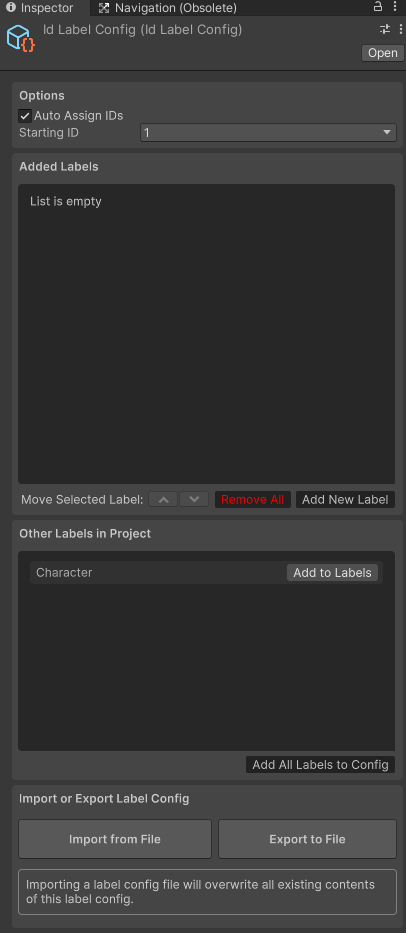


 Value = 16 ISI = 1